

My Favorite Dahlias for Cut Flower Use 2025
The top performing Dahlias at Three Acre Farm.
“What are your favorite Dahlias for cut flower use?”
I was asked this question a few weeks ago and I decided it would make an excellent blog post topic!
I’ve grown hundreds of different Dahlia. Some are keepers. Some are not. Every year, I add a few new Dahlias to the mix… and cull a few that no longer “make the cut” (pun intended).
“Cut Flower Dahlias” vs “Garden Dahlias”
Let me be clear. I am growing Dahlias for cut flower use, not landscape/garden use. I only care how the bloom looks in the vase. I don’t care how leggy or unattractive the plant looks.
My #1 goal is to harvest each and every bloom at just the right stage and get it into the hands of Dahlias lovers in my community.
Some people prefer to grow Dahlias as a bedding/decorative/landscape plant. They want a plant that looks good in the garden AND produces nice blooms. These are usually Dahlia plants they purchase at a plant nursery, which are quite different than the Dahlias I plant on my farm (there are THOUSANDS of different varieties of dahlias, bred for different uses).
A pretty landscape plant is not my goal, so please note the plants I’m recommending will produce lovely blooms, but the plants may look unsightly. In fact… cutting gardens in general can look a bit unsightly!
Here's what I’m looking for in a good Dahlia for cut flower use:
Sturdy Stems. No bobbleheads or bendy stems, please!
Long Stems. I harvest our dahlias into 5-gallon buckets, so I need the stems to be 18-24”. In order to get long stems like this, most of the dahlia varieties I grow reach 4-6 feet tall. Most bedding/landscape Dahlias are bred to be much shorter and are not suitable for cut flower use.
Long(er) Vase Life. As a general rule, the tighter the petals, the longer the vase life. The “Ball” type dahlias have a longer vase life than most other types. You’ll notice that nearly all the Dahlias I recommend in this blog post are Ball-type Dahlias… and it’s because they have the best vase life.
Sturdy Petals. Some Dahlias are stunning, but their petals bruise easily and they don’t hold up well.
Versatile Color. For floral design, I’m usually looking for more muted, subtle colors. Some dahlias can be gaudy, garish and over-the-top.
A few other notes:
Because of their short vase life (3-5 days), Dahlias are considered an “Event Flower”, not a bouquet flower. This means, they are great for events like weddings, baby showers, parties, etc, where they only need to look good for the day of the event. Don’t expect them to last a week in a vase, like many other types of flowers. You CAN use them in bouquets but know they will expire faster than the other flowers.
Dahlia colors can vary wildly depending on soil type, nutrient availability and weather conditions.
Some Dahlias grow better in certain climates and may need time to acclimate to a new environment. For example, when I order Dahlia tubers from producers on the West Coast, I usually have to grow them for 2-3 seasons before I can get an accurate assessment of them. Don’t give up on them after 1 season!
When harvesting your Dahlia blooms, be sure to cut DEEP into the plant, about 18-24” down from the bloom, making the cut above a set of leaves. This signals the plant to send up 2 new stems from the set of leaves you left behind.
Ok, here are just a few of my favorite Dahlias for cut flower use out of the 98 varieties I’m trialing this year!
Brown Sugar

These rusty, spicy cinnamon-y tones are absolutely PERFECT for autumn bouquets and bunches. Great flowers, great growth habit, great tubers!
Caitlin’s Joy

This Dahlia is a trifecta - gorgeous long-lasting blooms, productive upright growth habit and an amazing tuber producer. The warm shimmering tones are perfect for late summer/fall arrangments.
Chimacum Troy
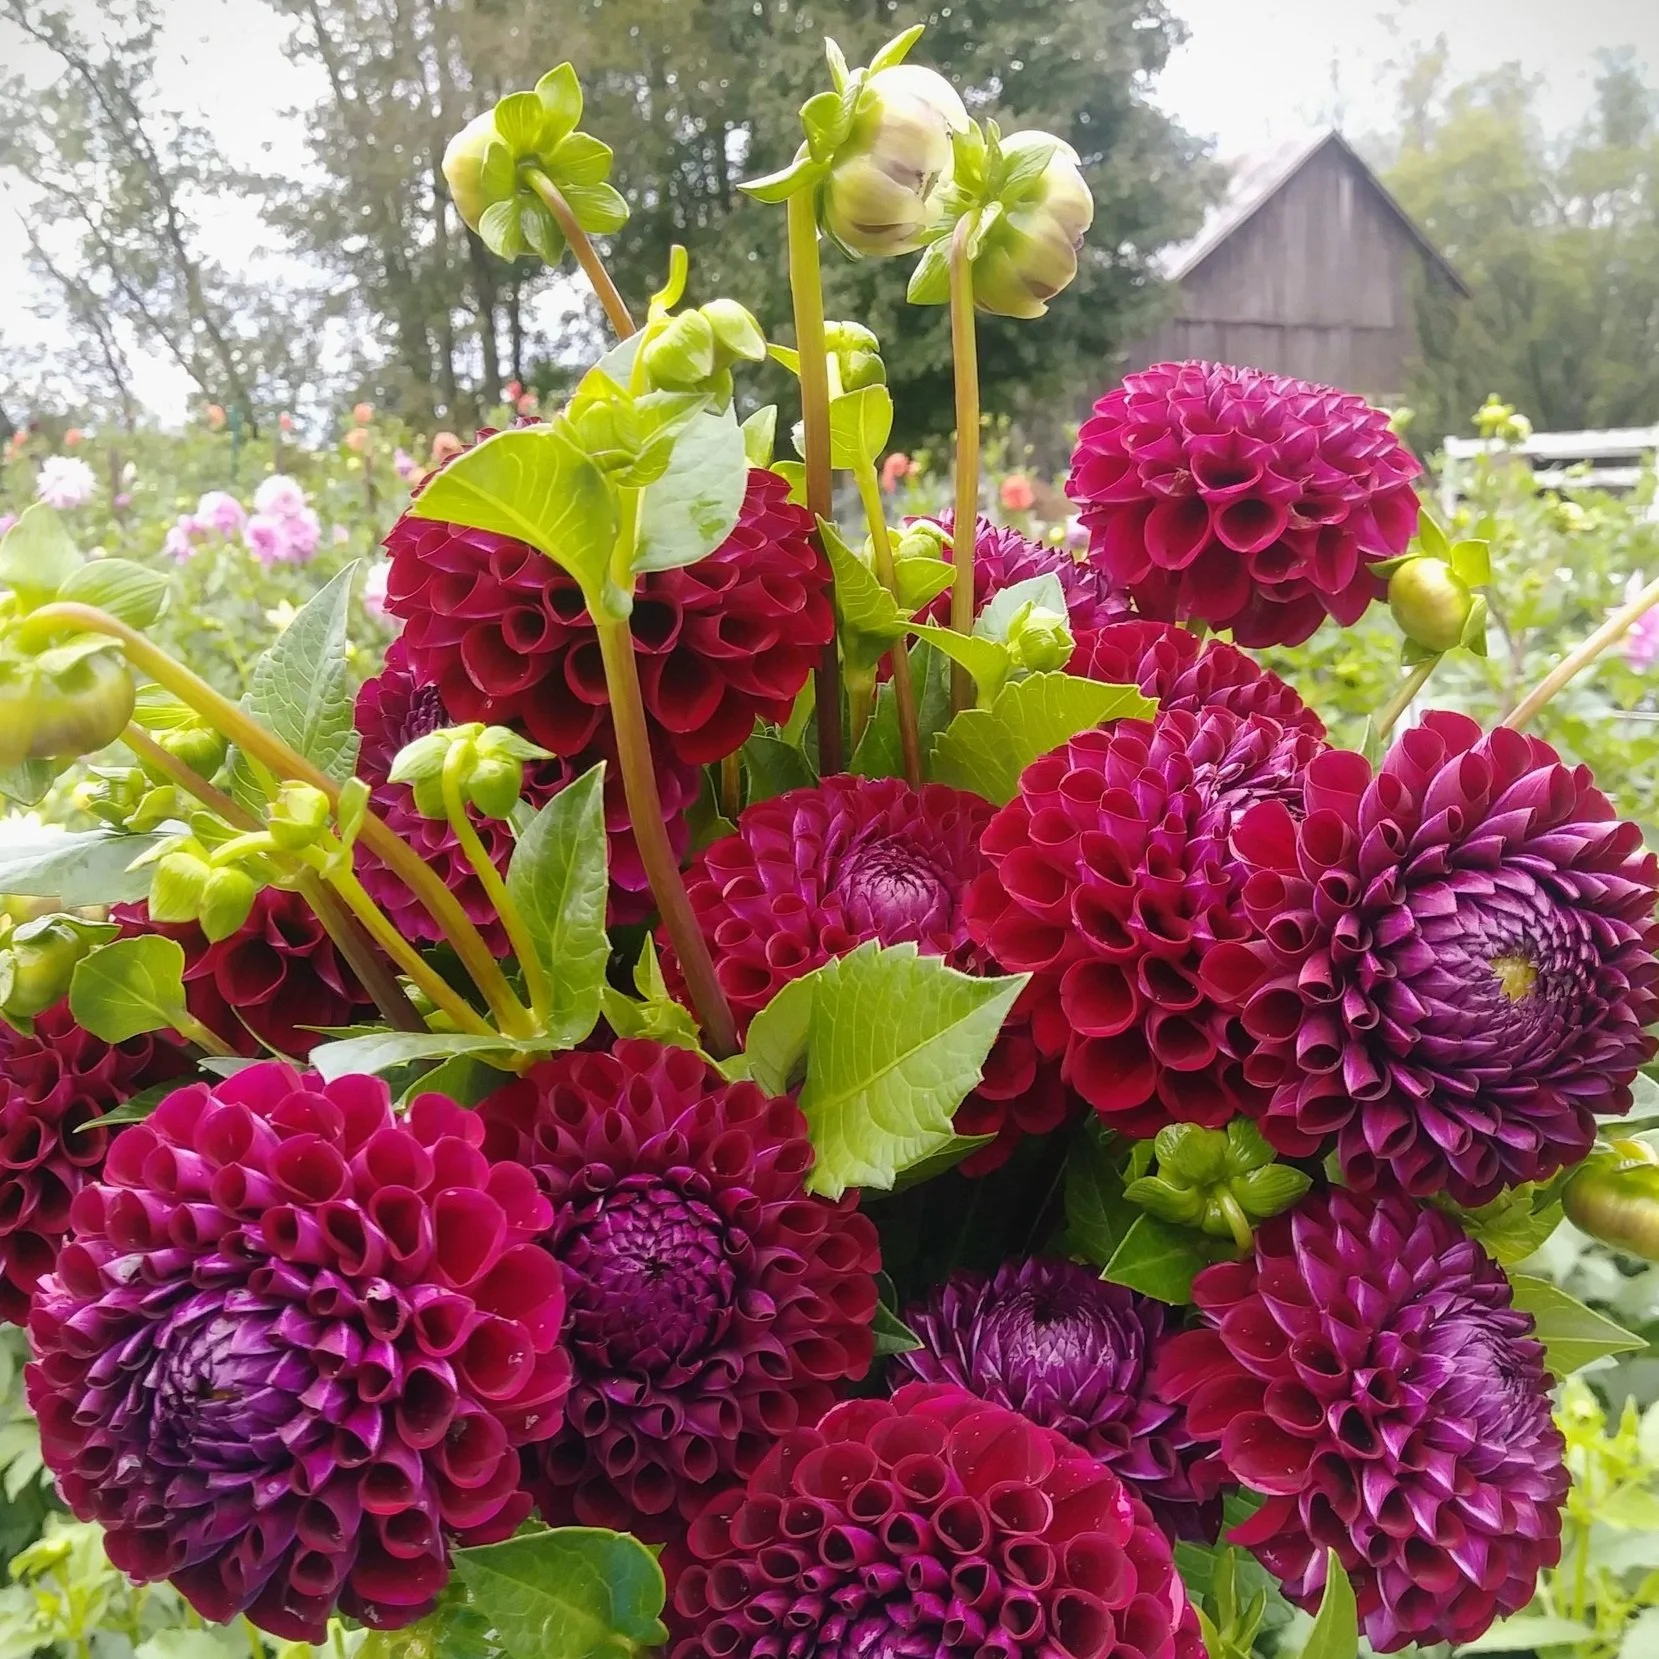
If you’re looking for a classic wine colored dahlia, look no further. I can’t get enough of this one!
She’s a good bloom producer and tuber producer. “Ivanetti” is a very similar dahlia. Their coloring and size is almost identical, but I find “Chimacum Troy” is more prolific with her blooms.
Clearview Peachy

One of the most impressive Dahlias I’ve ever grown. The stems are exceptionally sturdy and long, and the blooms are tough and hold up to lots of handling. Clearview Peachy is the longest lasting Dahlia bloom I’ve ever encountered. I once had blooms that lasted for 14 days (3-5 is average for Dahlias!).
The peachy tones are perfect for late summer/fall.
Coralie

Talk about a winner of a Dahlia! Coralie is early to bloom and super productive over the growing season. The bloom color is endlessly versatile. The petals are surprisingly sturdy and she is an excellent cut flower.
Cornel Bronze

Ok, if you had to grow just ONE dahlia for cut flower use, I’d hands down recommend “Cornel Bronze”. The plants are sturdy and vigorous, and the blooms are bulletproof. The bronze-orange color is fantastic in fall arrangements.
She’s also a good tuber producer!
Crichton Honey

This one is swoon worthy! The first 3 seasons I grew her, the plants were quite short (2-3 ft) and the stems had a tendency to flop over. I almost gave up on her, but I’m glad I didn’t. Now the plants are vigorous and 3-4 tall, and holding up nicely with support.
The blooms are stunning shades of apricot, orange and yellow, and most welcome in fall arrangements.
Diva

Diva deserves to be in every Dahlia patch. She tall, strong and sturdy with classically beautiful wine colored blooms. They pair beautifully with “Chimacum Troy” and “Bracken Rose”.
While the blooms are larger, the petals are still quite durable.
Ferncliff Copper

Have you ever seen a dreamier color?!? “Ferncliff Copper” makes my jaw drop every time. Be sure to harvest her a bit on the early side, as she’ll keep opening up in the vase.
Blooms are large and robust, as are her tubers.
Ice Tea

These colors are so yummy and delicious! I can’t get enough of “Ice Tea”. The blooms are sturdy and the perfect size for arrangements.
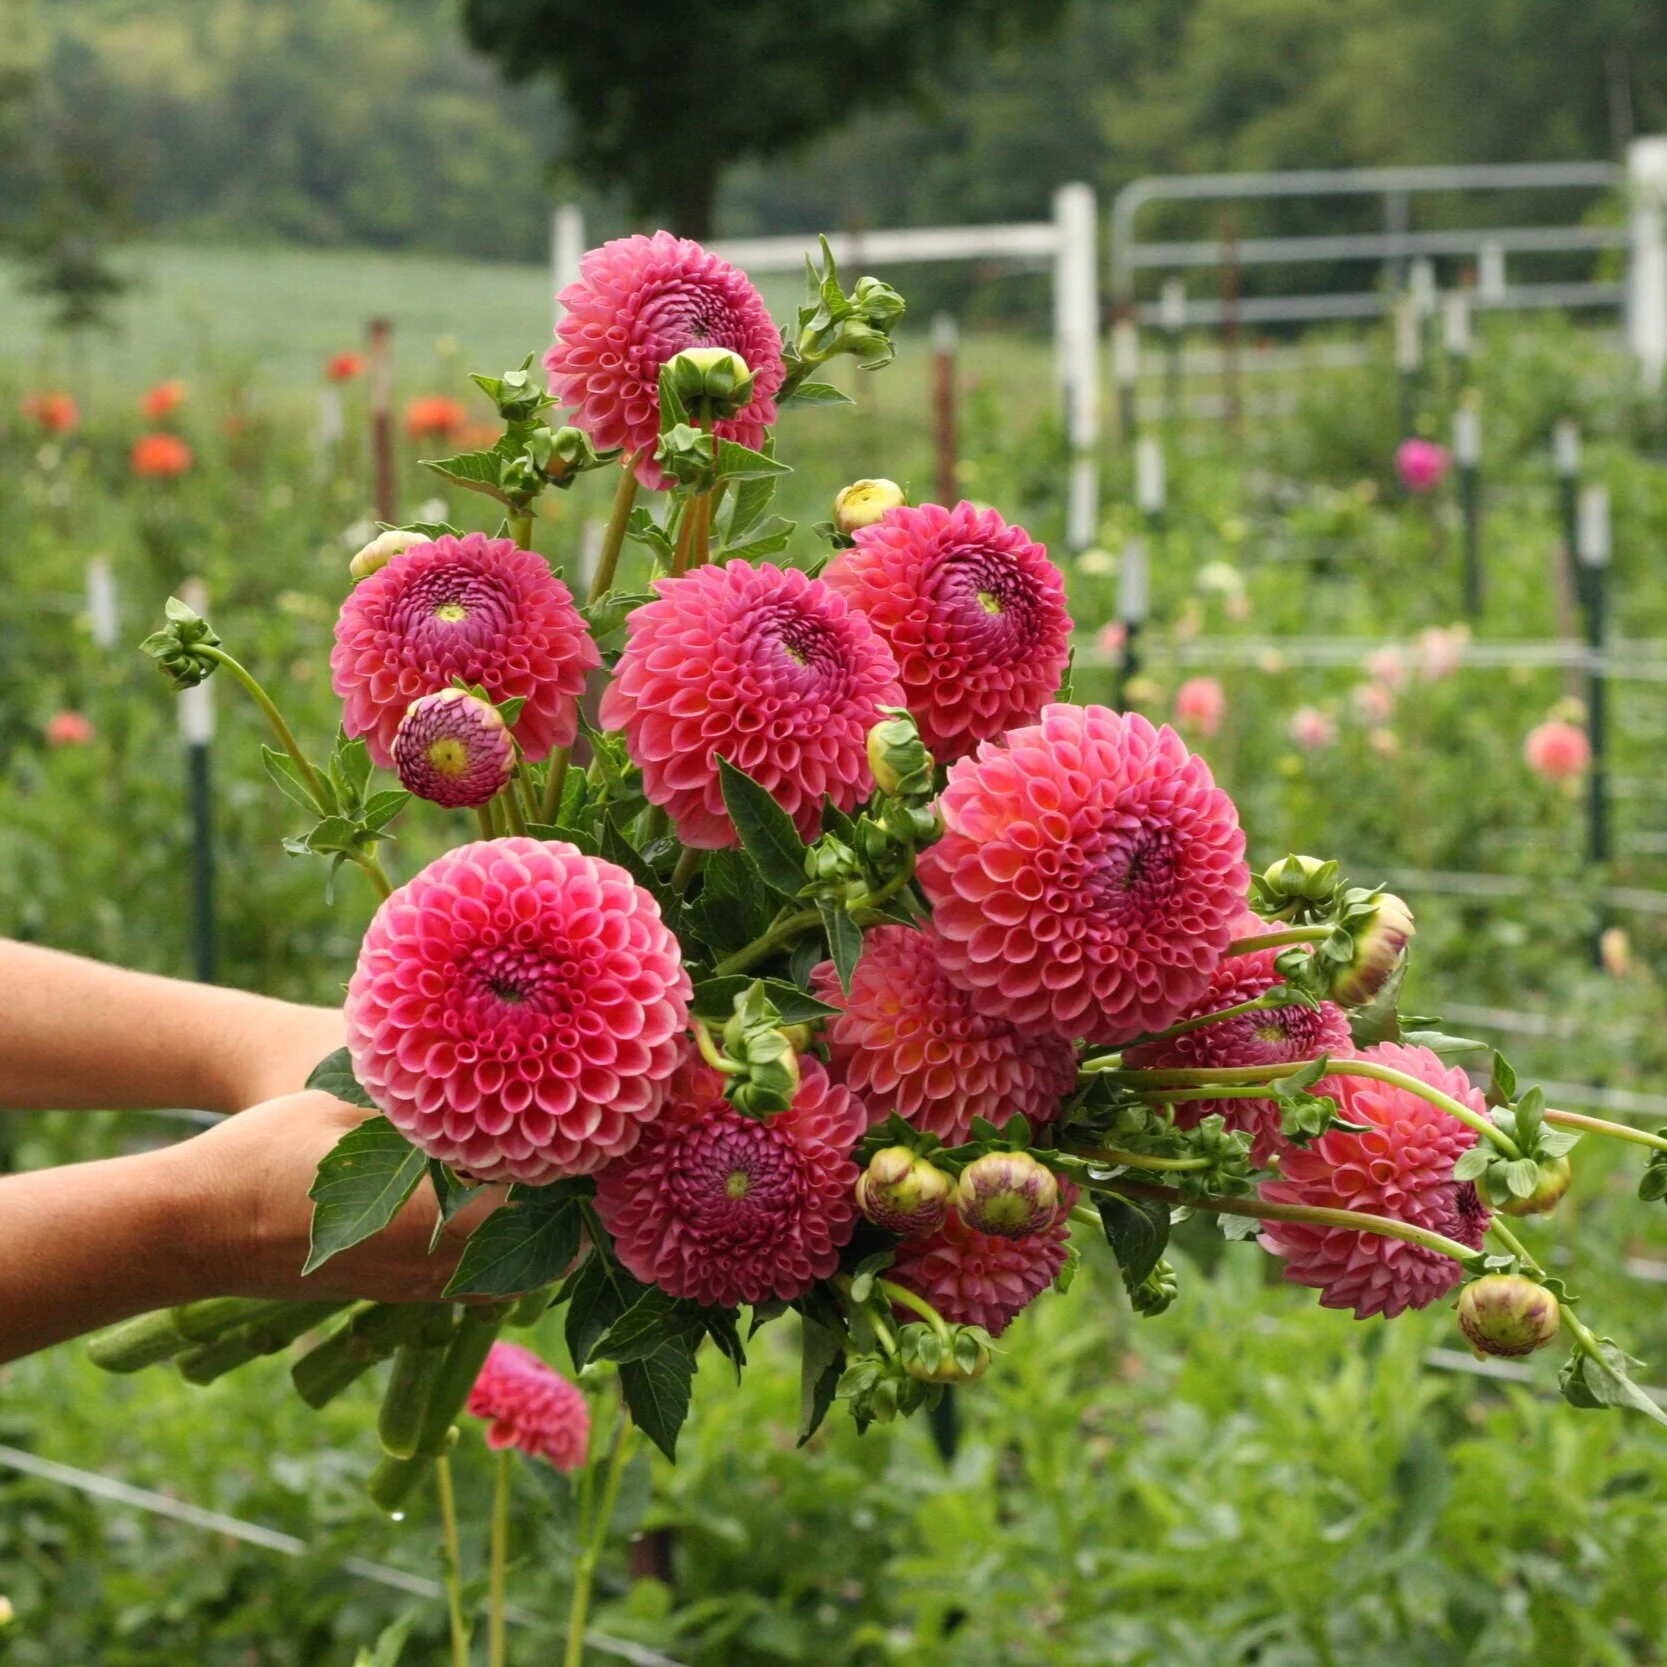
Isabel

Isabel grows about 3ft tall, which means she offers the best of both worlds: nice long stems for cutting, but not so tall and lanky that she requires lots of support.
Her color is a stunning cool pink with violet undertones. The petals have an iridescent quality and seem to glow from within
Jowey Linda

What a gorgeous cheerful autumn color! Vigorous plants have exceptionally sturdy stems. Jowey Linda has a long vase life and the petals are extremely durable and weatherproof. She also grows great tubers that are easy to divide!
Jowey Paula

These ombre pink, orange, yellow and green blooms are so gorgeous, I actually squealed in delight the first time I saw them. The petals are incredibly sturdy and the plant are vigorous. A great cut flower Dahlia!
Jowey Winnie
Another “must have” for the cutting garden. “Jowey Winnie” blooms are a larger ball type dahlia and the bright coral color goes well with multiple color schemes. I always reach for these blooms first when I’m making arrangements.
The plants are on the smaller side (2-3 feet) but will produce nice long stems if you cut deep into the plant when harvesting.
Just Peachy

Swoon-worthy blooms in gorgeous “tropical punch” hues. These blooms look delicate, but they are tough and hold up well to handling. The plants are sturdy, vigorous and produce great tubers.
Lark’s Ebbe

Plants are on the shorter side (about 3ft tall), but make up for lack of size with amazing productivity. The warm pink/coral/apricot blooms are exactly what colors I want to see in September and October. She’s a winner!
Mini Cafe au Lait

This Dahlia is a variety that was sold to us years ago as “Cafe au Lait”, but it was mislabeled and we have no idea what it’s actually called.
The blooms are similar coloring to “Cafe au Lait”, but have a different petal shape and the blooms are much, much smaller than the dinnerplate sizes “Cafe au Lait”, which makes them easier to use in bouquets and arrangements. They come in shades of pink and cream. I’ve tried to separate the pink plants from the cream plants over the years… only to notice they will change color halfway through the season! I give up ;) They are all beautiful.
The plants/stems are incredibly strong and sturdy, and they are an excellent tuber producer. The only downside is the petals can bruise easily, which almost made me cull them from this list… but if you can handle with care, they make a great addition to the cutting garden.
They pair perfectly with “Cafe au Lait” and “Bracken Rose”.
Peaches ‘n Cream

“Peaches n’ Cream” is one of the earliest blooming and most prolific bloomers on our farm. The plants seems to tolerate heat and humidity better than other dahlias.
Her blooms are truly magnificent and it’s 100% worth trying to get your hands on some. Stems are thin, yet sturdy and the bloom size is perfect in arrangements.
Robin Hood

Those colors!!! So juicy and delicious, I just want to take a bite! “Robin Hood” is a fantastic cut flower. The plants are incredibly productive and the blooms are perfect for late summer/fall bouquets. You’re going to love this one!
Snoho Doris

“Snoho Doris” is such a fun, playful Dahlia. I love using her blooms in mixed bouquets. They are a little bit funky, but in a subtle way. ;) Each bloom is different and colors change over the growing season.
Snoho Sonia

Snoho Sonia is pure perfection. Long sturdy stems, super productive and long lasting blooms. She’s a dream come true.
Valley Rust Bucket

These adorable little blooms pack a big punch of bright rusty orange color! Their smaller size makes them ideal for tucking into bouquets and bunches.
Woodland’s Wildthing
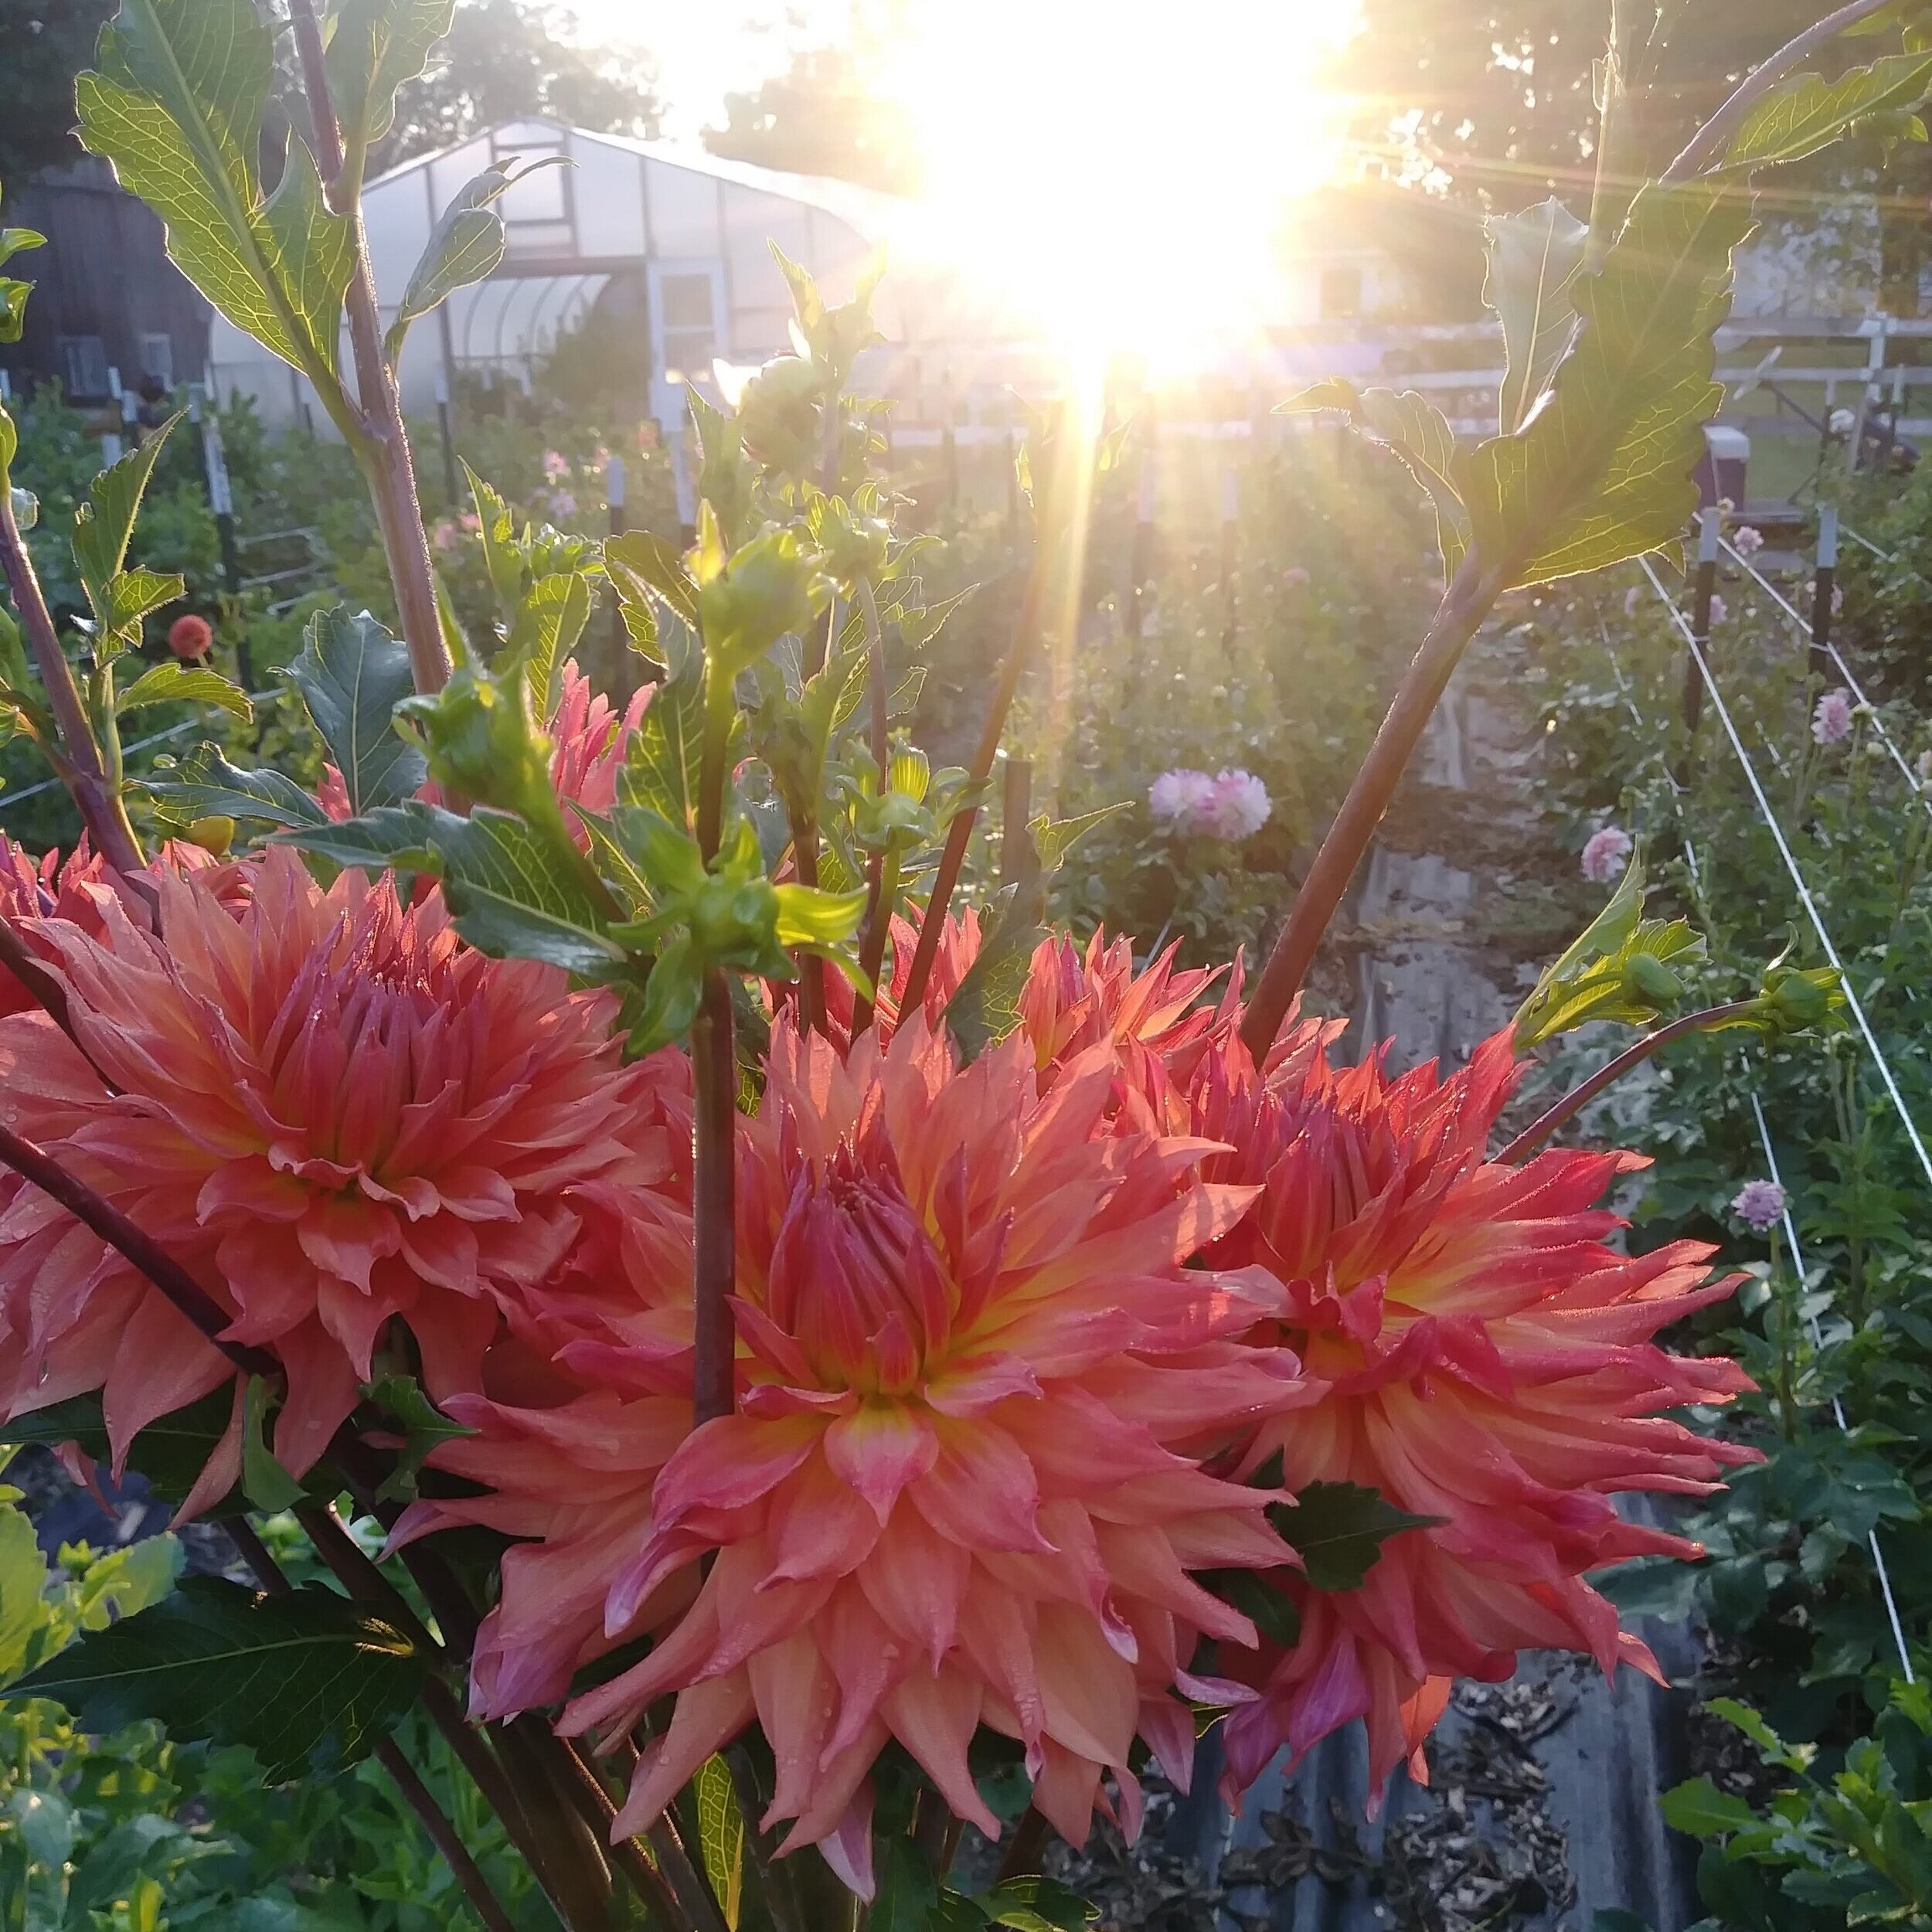
One of the first Dahlias we grew on Three Acre Farm, “Woodlands Wildthing” is like a good friend you’re thrilled to see again each year. She makes me laugh with delight!
Be sure to give her lots of support because she gets wild! Plants can easily reach 6-8 feet tall. Bloom are absolutely gorgeous, on nice long stems. Harvest her blooms when they are in this stage shown above, then watch them open and unfurl. The blooms are at their most stunning stage right before they expire.
Want to know when our Dahlia tubers are available? We offer them in the spring, after we have finishing dividing, inspecting and inventorying all the tubers.
Join our email list using the form below to make sure you don’t miss out!
Want to learn more about Dahlias? Check out these resources:
Three Acre Farm Dahlia Tubers
Beginner’s Guide to Growing Dahlias

Planning Your Garden (for beginners)
Stop putting off your garden plans and get growing already!
Planning Your Garden (for beginners)
“This is the year”, you tell yourself. “I’m finally going to plant that garden I’ve always dreamed of.”
But the same thing happens every year. The more you think about putting in a garden… the more overwhelmed you become.
“How big does it need to be?”
Where should I put the garden?”
“What if I do something wrong?”
“Where do I even start?”
And just like that, your dream of a garden… it’s pushed to the back burner. Again.
But not this year. ;)
Over the past 18 years, I’ve created dozens of new gardening/growing areas and I have a few tips and pointers that can save you time, and reduce the confusion and overwhelm.
Let’s get you started so you can make that garden dream come true!

Location, location, location
The first thing to consider is location. This can make or break your gardening success. When surveying your site, here are some things to look for:
Full Sun: most veggies and cut flowers need 8+ hours of sun.
Access to water: you’ll likely need to water at least once a week, so make sure it’s easy and convenient to get water to the garden.
Good soil: avoid heavy clay or dry sand if possible.
Not all hope is lost if these things are unavailable to you.
Perhaps you have a neighbor or relative who would allow you to use part of their land.
Maybe you could rent a plot at a community garden (and make some new friends!).
If your soil is terrible, you could always build raised beds and bring in new soil.
Mapping your space
Once you’ve chosen a good location, measure your space and start mapping it out on paper. Start small, especially if you are a beginner.
It’s better to start small and learn as you go, instead of biting off way more than you can chew and getting discouraged.
I started my gardening journey 15 years ago with a 10’x10’ garden and so can you!
Personally, I’m a fan of 3’ wide raised bed gardens with 3’ pathways/aisles between beds.
You can get as nerdy as you want here. Some people are happy with simple sketches, others prefer to bust out the graph paper and the ruler. Ultra nerdy folk (like myself! Ha!) may even use software or spreadsheets to create a map. Do what makes sense for your brain and personality.
Below, I created an example of a cutting garden made up of three 3’x12’ raised bed gardens. This size garden is manageable, yet productive.

Deciding what to grow
I understand, friend. When you look through the seed catalogs, you want to grow ALL THE THINGS.
But again, I will suggest you start small. Learn to limit yourself.
CONSTRAINT IS THE SECRET TO SUCCESS!
Every single plant (veggie, flower and fruit) has slightly different growing requirements and it can be tricky to master them all at once. Many people try to do too many things at once, get overwhelmed and frustrated… then quit.
Constrain yourself and commit to 5-10 new plant species each season. Within 5 years, you’ll have mastered 25-50 different plant species! Your skill level will grow each season as you increase your confidence.
Here are a few cut flowers that are beginner-friendly:
For more ideas, read “5 Easy to Grow Cut Flowers for Beginners” and “My Top 10 Favorite Cut Flowers”.
Even better, enroll in “Cut Flower Confidence”, my mini-course designed to help you decide WHAT to grow in just 1 afternoon! It’s jam-packed with printable guides and spreadsheets to help you make a rock-solid plan that works for YOU.
Putting it all together
Once you have your garden map drawn out and have decided what to grow, it’s time to figure out how many seedlings/plants you can fit in your garden.
You can find the plant spacing information either on the seed pack or the plant label for any potted plants you may purchase.
Hint: If you’re planting cut flowers, you can take the spacing requirements as suggestions. I normally plant cut flowers closer together than advised, since tight planting encourages the flowers to grow longer stems.
Once you have your plan, it’s time to start turning your dream into reality.
There are several different ways to physically create your garden. In this blog post, “How to Create a New Growing Area”, I show my favorite method for creating new gardens. We’ve used this method multiple times and it works great.
Need more help? Check out the “How to Grow” series on the Three Acre Farm blog page to learn more about growing specific cut flower varieties.
Happy planning (and planting), friend! I can’t wait to see what you grow this year.
-Lori
READY FOR MORE?
If you’re serious about growing the garden of your dreams this year, register for my online course, “Backyard Cutting Garden 101”.
You’ll find everything you need to plan, grow, harvest and arrange your stunning blooms.
I can’t WAIT to help you grow! Click on the button below for all the details.


How to Start Seeds
Ready to start your own plants from seed? Read on!
How to Start Seeds
Ready to take your gardening to the next level?
Learning how to grow your own plants from seed is fun, rewarding and great therapy during the cold winter/spring months! Green growth is good for soul!
At first, growing your own seedlings may seem intimidating and difficult. Let’s face the harsh reality:
You WILL kill some plants.
Plan on it.
Expect it.
And when it happens… try again!
Don’t feel bad - it happens to everyone.
In this blog post, I’ll help set you up for success. You’ll stumble along the way and make mistakes, but it’s ok. This is how we learn!
We’re going to cover 4 main topics in the blog post:
Supplies You’ll Need (What)
Location Requirements (Where)
Timing of Sowing (When)
Method for Seed Sowing (How)

It never ceases to amaze me that that these tiny seeds turn into….

…. these incredible blooms!
Supplies You’ll need
Seeds: you can find some great cut flower options HERE.
Seed trays or “cell packs”: something to grow the seeds in. You can purchase new trays or reuse “cell packs” from plants you’ve purchased at a nursery.
Tray: to hold the seed trays or cell packs and prevent water spills. “1020” trays work great.
Dome lid: to help retain moisture and aid germination
Seed Starting Mix: “Potting soil” is ok, but try to find something specifically for seed starting. It’s finer and easier to work with. Scroll down to see some suggestions in the photos.
Plant ID marker/stick and Sharpie marker: so you don’t forget what you planted! I use wooden craft sticks and write the name and date with my trusty Sharpie.
Heat mat: to aid germination.
Light: a bright, south-facing window or artificial light, like a shop light with fluorescent or LED bulbs. PLEASE do not overcomplicate this part. People get all in a tizzy about having the “right” lights! If you are growing the plant for its ENTIRE LIFE CYCLE under artificial lights, of course, you’d want to invest in top-quality lights. But your seedling will only spend a few weeks under lights… so just get some lights. It really doesn’t matter what kind!


Location Requirements
It can be tricky to find the right place to start your seeds, but most people are able to find small space that can be used for a couple of weeks.
Please don’t overthink this or feel like it needs to perfect or pretty. Just take a look at my seed starting space! It works, despite crumbling stone walls, stink bugs and spiders. ;) Can you find all 3 of my seed starting buddies in the photo?
We start nearly all our seedlings in our basement under grow lights. When the weather begins to warm up (mid April), we begin transferring the trays to our solarium attached to the south side of our house, where the seedling will live for another month until it’s warm enough to plant outdoors (mid/late May).

Here are some things to look for:
Adequate Light: If you can’t use a south-facing window, or don’t get enough natural light in your climate (a real problem here in cloudy Michigan!), you will need to use artificial lights. Insufficient light will produce leggy, weak plants. The plants need about 16 hours of strong light each day. Again, do not overcomplicate this part. If you are growing the plant for its ENTIRE LIFE CYCLE under artificial lights, of course, you’d want to invest in top-quality lights. But your seedling will only spend a few weeks under lights… so just get some lights. It really doesn’t matter what kind!
Warmth: Many seedlings want to grow in conditions between 65-75 degrees Fahrenheit. While the basement may seem like a good space, many basements are too cold and the plants will grow very slowly. This can be overcome by leaving the plants on a heat mat to provide supplemental warmth.
Air Flow: If the space does not have good air flow, a small fan can provide the necessary air movement to prevent disease problems.
Safe from Pets: This can be a real issue! Cats love to lay on heat mats and flatten your tender seedlings (ask me how I know this. Ha!). They might even think your seed trays are litter boxes. Eek! Dogs may like to eat the soil.
Proximity to Water Sources: You will need to water your babies frequently, so be sure they are in a location that has easy access to water… or else you’ll get lazy and won’t water them enough (oh, is that just me?).
Timing of Sowing
It’s important to know your Average Last Spring Frost Date. Do a simple web search to find the Average Last Spring Frost Date in your area.
This is the date when it’s safe to plant most flowers, veggies and herbs outdoors. If you plant outdoors before this date, you risk losing your plants to a late spring frost. (There are some plants that are “hardy” or “frost tolerant” that can be planted out before this date. Check the seed packet to be sure.)
While it seems counterintuitive, err on the side of sowing seeds a bit later rather than earlier. Seeds that are sown too early can result in plants that are rootbound and stunted or may try to bloom at 2 inches tall. Eek!
Here are some rough guidelines/suggestions for commonly grown flowers, veggies and herbs. You may need to experiment to find the correct timing for your climate.
8-10 Weeks before Average Last Spring Frost
Carnation
Feverfew
Onion/Leek
Pepper (Hot or sweet)
Sweet William
Yarrow
6-8 Weeks before Last Average Spring Frost
Bells of Ireland
Delphinium
Herbs (perennial types, like chives, oregano, sage, thyme, etc)
Poppy
Sweet Annie
4-6 Weeks before Last Average Frost
Ammi (False Queen Anne’s Lace)
Bachelor’s Button
Basil
Broccoli
Cabbage
Cauliflower
Forget-Me-Not
Kale
Lettuce
Marigold
Morning Glory
Sweet Pea
Tomato
2-4 Weeks before Average Last Spring Frost
Cucumber
Melon
Nasturtium
Pumpkin
Squash
Watermelon

A mid-April view of our solarium attached to the south side of our house. Most seedlings are started in the basement, then transferred here to grow for another month before being transplanted outside in mid/late May.
Method for Seed sowing
Moisten seed starting mix until it’s damp but not soaking wet. I like to pour mine into a big Rubbermaid tote and mix it with water in the tote.
Fill your seed trays or cell packs with the seed starting mix. Tap it gently on the ground a few times to make sure it settles. Add more, if needed.
Carefully sow 1-2 seeds per cell, paying attention to the instructions on the seed pack. As a general rule, most seeds are buried twice as deep as they are in size. So for example, a tiny seed like Snapdragon will be barely covered by a sprinkle of soil, while a larger seed, like a Zinnia will be buried about 1/4 inch deep.
Gently tamp down the soil, to make sure the seeds are in contact with the soil.
Place the seed tray or cell pack in a tray and cover with a dome lid.
Place tray on a heat mat… then wait! Seeds can take 3-28 days to germinate, depending on type. Be sure the soil never dries out by using a spray bottle or “bottom watering”. Here’s how to do it: Fill the tray with water every other day (or as needed) and allow the seed tray/cell pack to wick up water for a few hours, then remove and discard the extra water. Do not leave the seed trays/cell packs in standing water.
When most of the seeds have germinated, move the tray to a warm, brightly lit place (window or artificial light). Seedlings need 16 hours of light to grow properly. If using lights, be sure to lower the light (or raise the tray) so the lights are hovering 2-3 inches above the seedlings. This helps prevent “leggy”, stretching seedlings.
Monitor your seedling every single day. The soil should never dry out completely. You’ll likely need to continue bottom watering until the seedlings are sturdy enough to handle overhead watering from a watering can.
About 2 weeks before planting your babies outdoors, begin “hardening them off”. This is the process of acclimatizing your seedlings to a new environment. On day 1, bring them outside for 1 hour, then bring them back inside. On day 2, bring them outside for 2 hours, then bring them back in. Continue this pattern, increasing the time they spend outdoors each day for about 2 weeks.
Now they are ready to plant! Tuck those babies into the ground, preferably on a cloudy cool day to minimize “transplant shock”. Be sure to water them thoroughly after planting and keep them well watered for the next 2 weeks while they establish a robust root system.

These tiny seedlings transplanted in mid May turn into….
… this in mid July!
Not sure WHAT plants to grow in your Cut Flower Garden?
There are so many choices!
And what if you choose the wrong ones and waste your precious time, energy and MONEY?!?
Imagine if:
You could follow a simple, step-by-step process to determine exactly what to grow.
You didn't have to wallow in overwhelm and indecision.
You could feel confident about your flower choices and have everything you need for beautiful bouquets.
With Cut Flower Conference, you’ll learn how to create your custom Growing Plan. You’ll conquer the overwhelm so you can get growing!
Each lesson in Cut Flower Confidence contains a powerful worksheet, guide or template to help you choose the best flowers for YOU.


The Secret for Stunning Bouquets
Creating beautiful bouquets is simple when you have these 3 ingredients.
The Secret for Stunning Bouquets
“When you plant a cut flower garden, be sure at least 1/3 of the plants in the cutting garden are grown for foliage/greenery.”
When I read this years ago, I scoffed at the idea. Yeah right. What did this person know? I wanted to grow a FLOWER garden, not a bunch of boring foliage and greenery.
I went ahead and planted the garden the way I wanted to… because I’m stubborn like that and think I know better than everyone else. Ha!
By mid-season, I was sheepishly standing in my garden with a bunch of Cosmos, Zinnias and Sunflowers, but sorely missing what I needed to make the beautiful bouquets I had imagined myself crafting.
It was a humbling moment… but my daughter and I were having fun and learning.

My bouquets were pretty uninspiring and quite honestly… they looked like something my 5 year old daughter had thrown together. ;) They were a mish-mash of whatever I could find, no structure or design. One of this, one of that… an eclectic, hodge-podge mix.
I’d started growing flowers with the intention of sharing them… but I was embarrassed by my frumpy bouquets that were obviously missing something (they were missing a LOT, actually). I knew I had a lot to learn!
I want to make sure this doesn’t happen to you, friend! I’m going to teach you a simple formula to make sure your “bouquet dreams” match your “bouquet reality”.

THE PROBLEM
It’s SO EASY to page through all the seed catalogs and go ga-ga over the big beautiful blooms… and completely overlook the vital elements you need to craft truly stunning bouquets.
Most new growers go for big and flashy flowers. I get it. The Zinnias, Dahlias and Sunflowers are show stoppers. No wonder they demand all our attention! We can’t take our eyes off of them!
But those flashy flowers alone aren’t enough to give us the full, lush look we’re going after.
We need more. But what?

THE SOLUTION
I like to keep things SUPER simple. When we create bouquets and arrangements at Three Acre Farm, we divide the ingredients in 3 basic categories:
1/3 Focal: The main flowers that capture the most attention.
1/3 Filler: The other flowers that compliment the Focal flowers
1/3 Foliage: The greenery that creates the foundation for the Focal and Filler flowers

My daughter and I taught a class about this topic at Fredrick Meijer Gardens over the summer (she’s all grown up now!).
The audience was delighted when they saw how easy it is to create a beautiful bouquet when you have all your ingredients divided into 3 buckets/categories:
One for Focal flowers
One for Filler flowers
One for Foliage

When my daughter and I make our bouquets together, we begin by pulling out our buckets of Focal, Filler and Foliage “ingredients” to make our bouquet recipe.
We lay all the “ingredients” out in front of us, just like the “mise en place” (French for “put in place”) concept of cooking/baking, which means everything is prepped and ready to go (stems have been stripped of leaves, rubber bands are ready, paper bouquet sleeves are set out, buckets for bouquets are prefilled).
We move down the workbench building the bouquets assembly line style, starting with Focal, adding interest and volume with Filler, and finishing with Foliage.

FOCAL + FILLER + FOLIAGE = COMPLETE BOUQUET
Most beginner growers make the mistake of only growing Focal flowers. They wonder why their bouquets look nothing like the full, lush arrangements they see on Pinterest.
My goal today is to teach you how to show some love and appreciation for the Filler and Foliage ;)
Let’s explore these 3 ingredients and how they work together to create lush, full bouquets.
*NOTE: These are “loose” categories and some plants can actually fit into multiple categories, depending on their size or stage of harvest.
FOCAL FLOWERS
Focal flowers are the big, flashy flowers that everyone loves to drool over. Because they are so big and bold, you’ll only need a few Focal flowers in your bouquet.
Examples of Focal flowers:
Dahlia
Lily
Peony

China Aster

Dahlia

Lily

Peony

Sunflower

Zinnia
FILLER FLOWERS
Filler flowers don’t get enough credit! The word “filler” makes them seem insignificant, but that couldn’t be farther from the truth.
Filler flowers complement and enhance the Focal flowers and make up the bulk of the bouquet. We grow entire fields of Filler flowers to make sure we have enough.
Examples of Filler flowers:
Ageratum
Ammi (False Queen Anne’s Lace)

Ageratum, Amaranth, Ammi (False Queen Anne’s Lace), Celosia

Cosmos, Globe Amaranth, Salpiglossis, Scabiosa

Snapdragon, Statice, Stock, Strawflower

Field full of Filler Flowers
FOLIAGE
Foliage is structure, the foundation that supports the bouquet (figuratively and sometimes literally).
If you ever look at a bouquet and think “Something is missing…”, 9 times out of 10, it’s missing Foliage. The Foliage enhances the beauty of the Focal and Filler flowers.
Examples of Foliage:
Assorted Shrubs/Bushes/Trees (Baptisia, Eucalyptus, Ninebark, Sem False Spirea, Smoke Bush, Spirea, Viburnum, etc)
Herbs (Lemon Basil, Lemon Balm, Mint, Oregano, Sage, etc)
Ornamental Grasses (Frosted Explosion, Green Drops Grass, etc)
Scented Geranium

Shrub (Sem False Spirea)

Herb (Lemon Basil)

Peppergrass

Ornamental Grass (Frosted Explosion)

Scented Geranium

Buckets of Focal, Filler and Foliage prepped for our Stunning Centerpieces Class
Want to learn how to choose the best Focal, Filler and Foliage to grow in YOUR garden?
Join “Cut Flower Confidence” , where you’ll learn to use my exclusive D.R.E.A.M. Framework to choose the best cut flowers for YOUR skill level, YOUR climate and YOUR resources.

USING THE 1/3 RULE TO PLANT YOUR GARDEN
This Focal + Filler + Foliage Formula is not just for bouquet making.
I use this same formula for selecting seeds and planning my garden layout… AND YOU CAN TOO!
Plant 1/3 Focal flowers
Plant 1/3 Filler flowers
Plant 1/3 Foliage
When you’re paging through your seed catalogs and eagerly circling all the Focal flowers… I’m here to gently remind you to put down the Sharpie, friend, and start considering some Filler flowers and Foliage too ;)
I know, I know… growing Filler and Foliage isn’t as exciting as growing the Focals… but TRUST ME. Your future self will be so glad you had the forethought and wisdom to do it anyway.

GET STARTED
Now it’s time for you to get to work!
1. Read this blog post again to make sure you understand the importance of “Focal, Filler and Foliage”.
2. Start your seed/plant “Wish List”, divided into 3 categories: Focal, Filler, Foliage.
3. Order your seeds and get growing!
READY FOR MORE?
If you’re serious about growing the garden of your dreams this year, but you’re confused about what Focal, Filler and Foliage options to choose…
Then you need Cut Flower Confidence! It’s packed full of lessons, printable resources, spreadsheets and more to help you decide WHAT to grow, so you can build beautiful bouquets! Click the button below to get started today.

2024 Potager Garden Report
We built a Potager Garden! Read about it here!
This past summer, we created a Potager Garden at Three Acre Farm.
Over the growing season, I posted loads of photos and updates on my Instagram Stories, with the promise that I would eventually share a detailed Blog post illustrating the process of creating, building and planting the Potager Garden.
Ready to learn about the Potager Garden?
Let’s begin!
Warning: This is a LOOOOOOOOOONG post with lots of photos. ;)

August 17, 2024
WHY WE BUILT A POTAGER GARDEN
Before we started Three Acre Farm in 2017, we were homesteaders.
Homesteading has many definitions, but for us, it meant growing as much of our own food as possible. I trained as a Master Gardener and learned how to grow dozens of different fruits and vegetables. It was a full-time job managing my garden during the growing season!!!

Half of my original vegetable garden back in 2015 before I started Three Acre Farm
When I started flowering farming in 2017, working for Three Acre Farm became my full-time job… and I could no longer homestead and manage my giant vegetable garden. After years of neglect, we abandoned my old vegetable garden. It was just too much work.

Neglected vegetable garden. So sad! This is the space we transformed into the Potager Garden.
But I couldn't imagine life without a vegetable garden. Just like many of you, gardening is my hobby.
After a long day of farming, I look forward to spending time relaxing in my garden!
So we begin to reimagine what a “hobby” vegetable garden could look like for me…
I wanted it to be smaller, more manageable and most importantly, I wanted it to be BEAUTIFUL.
I wanted it to be a space of refuge and relaxation to help me unwind from the stress of farming.
I wanted it to be a place to nourish my body, mind and soul.
WHAT IS A POTAGER GARDEN?
I began researching different types of gardens and came across the concept of the “Potager Garden”.
“Potager” is a French word that literally means “for the soup pot”. It’s pronounced po-ta-jé.
These types of gardens are sometimes called “Kitchen Gardens”, since they are:
often planted close to the kitchen, almost as an extension of the home
full of veggies, fruits, herbs and flowers for the kitchen table
Another distinguishing feature is the emphasis on symmetrical design, a tradition that goes back to Medival times. Not only do these gardens value “function” (producing food), but they also value “form” (design, layout, aesthetics, beauty, etc). In other words, the perfect intersection of function and form, which is the ultimate goal in design.
I purchased the book “Designing The New Kitchen Garden” by Jennifer R. Bartley and I was absolutely mesmerized by the history, design concepts and functionality of the Potager Garden (I believe this book is out of print, so check your local library).

Fantastic book that includes the history of Potager Gardens
DRAWING THE PLANS
It took me about 2 years of sketching, dreaming and scheming to finally come up with the final plan for my new Potager Garden.
In the end, I went with a design that focuses on a central element (the fountain), 4 smaller beds and 4 larger beds.

Original Sketch, complete with coffee stains and dirty finger prints ;)
The inner smaller beds are 4’x4’.
The outer “L”-shaped beds are also 4’ wide but we adjusted the length on some of them to accommodate the grape arbor that would be installed at the entrance of the garden.
The entire garden is roughly 40’ x 40’.
We had a list of “must-have” elements to consider:
Proximity to the house. Ideally, I’d be able to walk out to the garden and harvest herbs and produce while cooking dinner.
Full sun and fertile soil
Spacious layout (we made sure we could easily navigate wheelbarrows around all the beds)
Raised beds made from long-lasting materials (we chose Oak beams. My husband found someone on Facebook Marketplace selling rough-sawn beams)
Central water source
Vertical elements, such as arches and obelisks to create a “garden room” space that would feel 3 dimensional
A fountain. It’s so soothing and relaxing to listen to the fountain while working in the garden!
BREAKING GROUND & BUILDING DREAMS
In Michigan, where I live, most people plant their vegetable gardens in mid May.
Springtime on a flower farm is absolutely INSANE and we knew there was no way we’d be able to get the Potager Garden built in time for May planting.
So we decided to wait until AFTER the majority of the farm planting was done to begin working on the Potager Garden.
This means that construction started around late May and planting began in mid-June, about a month late.

1st Bed being constructed on May 27, 2024

2nd Bed construction on May 30, 2024
My birthday is in May. All I wanted for my birthday was a fountain for my garden… but they are quite expensive! My husband, the “King of Facebook Marketplace Finds”, found this used fountain for me for my birthday. It doesn’t look like much when it’s in pieces but it’s beautiful when it’s arranged!
Sorry, I can’t tell you where to buy a fountain. You’ll likely have to look locally, as they would be incredibly expensive to ship.

The fountain!
As soon as John finished the outer beds, he began filling the beds for me so I could get plants in the ground ASAP. I was chomping at the bit to get my tomatoes and peppers planted!
He filled the raised beds “lasagna style” with a mix of the following ingredients:
Sand - for drainage. We used sand from our property, since our farm’s “soil” is pretty much like sand box sand ;)
Old leaves - we keep a gigantic pile of old leaves for planting and mulching, because leaves are INCREDIBLE organic matter
Native Soil - when we took apart the old vegetable garden, we set the soil aside to create the new Potager Garden beds
Goat & Chicken Compost - we keep goats and chickens on the farm. Their manure and bedding is composted for about 2-3 seasons before we use it. This stuff is BLACK GOLD and plants love it.
Leaf Mulch - we keep separate piles of old leaves. After 2-3 seasons, it breaks down into beautiful light airy mulch, full of beneficial bacteria, minerals and organic matter
Woodchip Mulch - our local arborist/tree trimmer drops off loads of chipped leaves, branches, trees

Filling beds on June 8, 2024

Putting Tomatoes and Peppers in on June 12, 2024.
The woodchip mulch on top serves 3 purposes:
Conserves moisture. They help keep the soil from drying out in the hot sun.
Weed deterrent. Bare soil WILL grow weeds, so always keep the soil covered with some sort of mulch
Soil Improvement. As the chipped twigs, leaves and woodchips slowly break down over the years, they add fertility to the soil and improve the soil structure.
Once I finished planting the outer beds in mid June, we started working on the inner beds and the bed for the fountain. During this time, we did a lot of walking around the garden, feeling it out, to make sure we left enough space between beds for wheelbarrows, benches for sitting, etc.
It looks like we could have made the pathways smaller, but by the time the garden was fully mature, I was SO GLAD we’d left more space!

Setting up the inner beds on June 20, 2024

The inner beds on August 26, 2024. Good thing we left enough space between the beds!
By June 27, we finally had most of the plants in the garden beds. It was finally time to start making the garden look pretty. We spent a lot of time weeding the pathways, then putting down a thick layer of mulch.
Some people may choose to lay down stone or pea gravel, but I prefer the look and feel of woodchips. We may add stepping stone or brick paver pathways some day… but for now, woodchips fit the budget ;)

Mulching the pathways on June 27, 2024
Even though we planted this garden 4-6 weeks late, we were SHOCKED at how quickly it grew. I was always worried about getting my garden in too late, but now I know better. Planting a few weeks before the Summer Solstice is fine! The long sunny days help the plants grow fast!
VERTICAL ELEMENTS IN THE GARDEN
Since this new Potager Garden was much smaller than my previous gardens, I wanted to make use of all available space to grow… so that meant growing UP! Instead of OUT.
I made use of vertical elements in a couple different ways:
Cattle Panel “walls” - I’ve been using this method for growing cherry tomatoes for years. We purchase “cattle panel” fence panels from our local Tractor Supply Co and secure them to rebar stakes driven into the ground. This trellis system creates a “wall “ of tomatoes.
Obelisks - these metal trellis structures are great for climbing plants.
Cattle Panel Arches - We used the 16’ long cattle panels from TSC and bent them into arches between the beds. We simply zip-tied or wired them to rebar stakes.
CATTLE PANEL “WALLS”

Cattle Panel “walls” on June 25, 2024. Cattle panel secured to rebar or t-posts using Velcro or wire. Cherry tomato plants are trained to grow on the wall using clips.

“Wall” of tomatoes in the outer beds by August 3, 2024.
GARDEN OBELISKS

Garden obelisk on July 10, 2024

Same garden obelisk on August 26, 2024
CATTLE PANEL ARCHES

Cattle Panel arches on July 2, 2024

Cattle Panel arches on July 17, 2024. Look at how much the plants grew in 2 weeks!

Tomatoes growing on cattle panel arches
PLANTS FOR THE POTAGER GARDEN
As a Master Gardener and flower farmer, I’m well aware of the rules about “plant spacing”. This refers to how much space should be left between plants.
Well, in the case of the Potager Garden, I completely ignored proper plant spacing and stuffed as many plants as I could in the beds. Ha!
I wanted to garden to feel lush, overflowing and abundant.
And it certainly did! It also led to a few issues, such as shorter planting being crowded out by taller plants and my tall plants getting SO big that their supports collapsed under the weight of them. Oh well!
Since I’m no longer homesteading and trying to grow our own food, I could be a little more discriminating in what I decided to grow. This garden is for feeding the body, the mind and soul… not just the body.
Mostly, I wanted to grow the ingredients for my favorite summer food, this AMAZING Cucumber Salsa. So naturally, I grew a lot of cucumbers, tomatoes, peppers and herbs.
Just for fun, I planted a wide variety of vegetables, herbs and flowers in the Potager Garden.
Basil
Tomatoes
Jalapeno Pepper
Lettuce
Mouse Melons (Cukamelons)
Nasturtium
Nicotiana
Parsley
Poblano Peppers
Pole Beans
Scarlet Runner Beans
Sorrel
Swiss Chard
Thyme
Verbena
Verbena
Here are some of the notable standouts, in no particular order.
Swiss Chard - When I designed the garden, I envisioned beds with colorful Swiss Chard spilling out of them. The reality exceeded my fantasy! Even when the rest of the garden died after the frost in mid-October, it still looked amazing. Swiss Chard is gorgeous, productive, tasty, cold-hardy, heat-tolerant and long-lasting. I harvested it from June - December. What’s not to love?!?
Cucumbers - I’ve been growing the Japanese variety called “Shintokiwa” for a few years now and I’m convinced it may be the BEST cucumber ever. I harvested for over 3 months from the same 6 plants. You can find the seeds at Nature & Nurture Seeds in Dexter, MI.
Nicotiana - This beautiful blooming plant was super popular with the hummingbirds. I love coming out to the garden each morning to watch the hummingbirds feed.
Lettuce - Marvel of the Four Seasons. This delicious lettuce is more heat tolerant than most types of lettuce. It’s great for spring, summer, fall or winter growing. It truly IS a marvel!
Verbena - These violet blooms are loved by pollinators.
Tomatoes - I’ve tried dozens of tomatoes over the last 20 years and here are my favorites: The Bumblebee Cherry Series (Pink, Purple and Sunrise), Growing in Place (currant type from Nature & Nurture Seeds), Early Detroit (from Nature & Nurture Seeds) and Cherokee Purple.
Nasturtium - I planted these along the edges of the beds so they would spill out. They added so much whimsy and playfulness to the garden!

Gorgeous Swiss Chard

Nicotiana, Verbena and Zinnias… a pollinator’s paradise!

An eclectic mix of flowers, herbs and vegetables

“Growing in Place” tomato plants. Only 2 plants were grown on this arch! They are prolific!
A GARDEN FOR ALL FOUR SEASONS
What I love most about the Potager Garden is the structural elements.
Unlike a tilled-up patch in the dirt that looks nice for just a few months (a traditional garden), a Potager Garden has year-round appeal.
Because the beds are permanent, the Potager Garden can become a home for perennial herbs, flowers and vegetables.
The structure of the garden is pleasing to the eye, no matter what season or what is growing (or not growing) in the garden.

Spring in the Potager Garden

Summer in the Potager Garden

Fall in the Potager Garden

Winter in the Potager Garden
WHAT’S NEXT
We still have quite a bit of work to do to “complete” the Potager Garden project, including:
Fencing it in so my chickens don’t eat all my tomatoes ;)
The glass greenhouse featured in so many of these photos needed to be removed. We built a new garden shed and that will need to be incorporated into the Potager Garden.
Adding a few more small beds to the west for perennial herbs (in front of the new garden shed).
Rebuilding the grape arbor and training the grapes to grow on the Potager Garden fence.
Adding more vertical elements, such as a cable system suspended over the garden to encourage birds to linger in the garden (and eat all the pests that try to eat my veggies!).
But that’s the joy of gardens… they are always a work in progress, never fully complete.
They are full of endless opportunities for change and growth!
I hope you enjoyed this report on the Potager Garden.
I’m sure I’ll be adding more updates in the future!
-Lori