
How to Grow: Bells of Ireland
How to Grow: Bells of Ireland
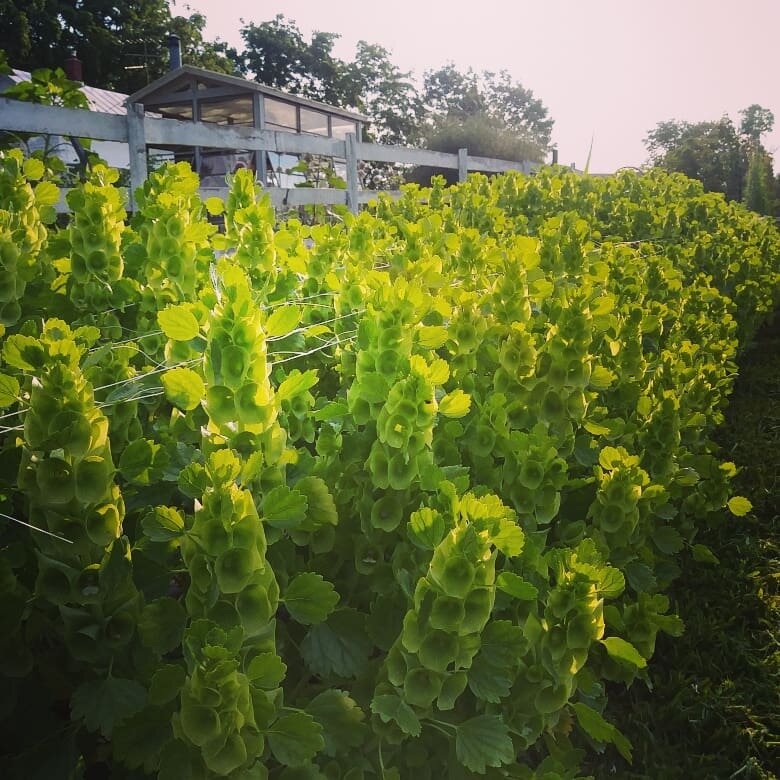
Bells of Ireland have to be one of my favorite foliages/greenery to grow on the farm.
Not only do they add incredible texture and color to arrangements, they are also long-lasting in the vase... and bonus! They smell delicious! To me, they smell exactly like lime flavored Skittles.
Bells of Ireland are often considered a “Hardy Annual”, which means they prefer cooler weather and have some frost tolerance. This also means they are a late spring/early summer blooming flower (they usually die out by mid/late July, when it gets hot).
Let’s look at the Pros and Cons of growing Bells of Ireland for cut flower use.
PROS
They last a long time in the vase (in fact, they can even be dried and used as an “Everlasting Flower”).
They are an excellent foliage/greenery for bouquets and compliment nearly every flower type.
They smell good - clean and fresh, with a hint of citrus.
They are beautiful, unique and provide visual interest.

CONS
They can be notoriously tricky to start from seed. If you’re a beginner, maybe put this one on hold until you have more experience.
They need to be supported with netting or they will be flattened in a rain/wind storm.
They develop “spines” that can prick your hands if they are not harvested early enough.
The plants are not particularly long lasting. They are finished on our farm in mid-July. We pull up the plant and put in sunflowers to fill the beds.
They prefer cooler weather and do not handle heat well. For those living in climate with weather extremes, growing Bells of Ireland successfully can be difficult. Here in Michigan, it’s not uncommon in the spring for our temperatures to fluctuate over 60 degrees in a matter of days. Bells of Ireland do not handle these extremes well - they can get stressed and succumb to disease.
CHOOSING SEEDS
Choosing seeds is easy, because there is only one variety of Bells of Ireland (Moluccella laevis) that is generally used for cut flowers.
HOW TO SOW
The most difficult part about growing Bells of Ireland is starting the seeds.
They seem to be quite unpredictable and in all my research, I can’t seem to find a “Fool-Proof” method for germination. Instead, I’ll share some suggestions that may help.
First of all, storing the seeds in the freezer until you are ready to sow them is a smart idea. The freezer mimics the natural cold/dormant period the seeds need to germinate properly.
*Side Note: I store all of my seeds in the freezer, with no ill effects. I figure that if the Svalbard Global Seed Vault, the world’s seed saving experts that are preserving seeds for humanity in case of major global disaster, can store all their seeds in a freezer, so can I. As a bonus, all my hardy annual seeds are always chilled and ready to go.
Another tip is to soak the seeds in water for 24-48 hours before sowing. This helps to soften the tough seed casing.
Here is my method for germinating. It’s a bit of work and seems a little fussy…. But I’ve had good success!
1.Soak seeds in water for about 24 hours. Place seeds in a damp paper towel. Put the paper towel in a plastic bag and set it on a heat mat or in a warm spot (on top of your fridge).

2. In just a few days, the seeds will begin to sprout.

3. Carefully transfer the sprouted seeds into seed trays, tucking the "tail" (root) into the soil.

4. Seedlings can grow the trays for a few weeks until they have 2-3 sets of leaves.
Transplants or Direct Sow?
Transplants should be started indoors 6-8 weeks before the last spring frost.
Some people have better success direct sowing Bells of Ireland and don’t even attempt transplants. If you live in a mild climate, you may be able to sow the seeds in the fall or very early spring. They need a cold/dormant period to germinate properly. The freeze/thaw activity also helps to break open the tough seed casing.
For people living in colder climates, I recommend trying both methods. Start some indoors and also direct sow some seeds outdoors as soon as the soil can be worked.
Bells of Ireland can also be grown using the Winter Sowing method. Find out more about Winter Sowing.
PLANT SPACING
Bells of Ireland should be spaced 12-18” apart.
GROWING on
Bells of Ireland prefer rich soil, with plenty of nutrients and plenty of water.
If you live in a place with cooler summers, the plants may continue to produce for a few weeks. In Michigan, the summers get too hot and the plants stop producing mid-July. Enjoy them while you can!

STAGE OF HARVEST
You’ll know the Bells of Ireland are ready to be harvested when you see the tiny white flowers inside the “bells”.

Cut deep down into the plant to get long stems. You may notice the plants begin to develop “spines” as they mature. Watch out!
Strip off the leaves/bells at the bottom of the stem.

POST HARVEST CARE
Bells of Ireland don’t require any special care after harvest.
Like all flowers, store in a cool, dark place after harvesting and allow stems to rest for a few hours before arranging.
Some people like to remove all the leaves. It’s personal preference whether you do this or not. Sometimes, the leaves will turn brown or spotted, but the bells are still in great shape - in this case, simply remove the leaves.

QUESTIONS?
Ask them here and I’ll get back to you!
Ready for More?
If you’re serious about growing the garden of your dreams this year, register for my online course, “Backyard Cutting Garden 101”. You’ll find everything you need to plan, grow, harvest and arrange your stunning blooms. I can’t WAIT to help you grow! Click on the button below for all the details.