

Top Tips for Longer Lasting Flowers
Want to make your bouquets last longer? Read this!
Top Tips for Longer Lasting Flowers
When people visit our farm, they often ask “How do I make these flowers last the longest?”
I can’t wait to share some great tips with you, but first… let’s talk about expectations.
With proper care and cutting techniques, flowers can be be expected to last anywhere from 3-21 days in a vase. Yup, I know that’s a HUGE range!
In the flower farming world, we use the term “vase life” to describe how long a flower should last. Vase life differs for EVERY. SINGLE. TYPE. OF. FLOWER (and even amongst one type of flower, different varieties might last longer than others).
For example, a Dahlia typically has a vase life of 3-5 days, while I’ve had Snapdragons, Feverfew and Lisianthus that still look acceptable after 21 days.
5-7 days is considered a “good vase life”, so if you notice flowers beginning to decline after 5 days, this is totally normal.
Now that we have realistic expectations, here are some helpful techniques to tip the odds in your favor and make those blooms last as long as possible!

1. Cut Early or Late in the Day
I know it sounds dreamy to wander around in a field of flowers on a bright sunny summer afternoon, cutting a bouquet... but don't.
JUST DON'T. A hot sunny afternoon is pretty much the worst time to cut flowers, so avoid it as much as possible! Flowers cut in the heat of the day expire MUCH FASTER than those cut in the cool parts of the day.
Dawn and dusk are the best times to cut, preferably before the sun is up or after it has set.
If you are having problems with a certain flower wilting immediately and never recovering, or flowers that don't last long, I would suspect you are not cutting at the correct time of day.
Certain flowers/foliage need to be cut earlier than others. For example, if I try to cut Lemon Basil after the sun has risen over the horizon, it will immediately wilt. I know I need to get out there early and cut before sunrise. You will need to do some trial and error to figure out what works!
Moral of the Story: Get your buns out of bed before the sun is up. ;) It's truly the VERY best way to start your day and the flowers will thank you with days of beautiful blooms!
2. Keep It Clean
Cleanliness is VITAL. Bacteria is often what causes cut flowers to wilt and wither prematurely.
Your clippers/scissors/shears should be clean and sharp. Wash or wipe down your clippers with rubbing alcohol periodically, ideally before every cutting session.
Your buckets and vases also need to be sparkling clean. No nasty gunk or dust or dirt.
If you wouldn't drink out of it, then it's not clean enough! This is not a joke.
Yup, I’m going to say it again. Your bucket MUST be clean enough to drink out of. Trust me. It makes a big difference (and yes, we spend a TON of time scrubbing buckets in hot soapy water and yes, I would drink out of them. Ha!).
If you put those freshly cut stems into dirty water in a dirty bucket, you’ve pretty much guaranteed the stems are going to get clogged up with gunk and expire way faster.
KEEP YOUR BUCKETS AND CLIPPERS IMMACULATE. Got it? ;)
3. Cut at the Correct Stage
“Stage of cutting” refers to how open the flower should be at harvest time.
Should it be fully open? Barely open? Halfway open?
Lots of people are cutting flowers way too late (too open) and naturally, not getting the longest vase life.
Unfortunately, there is no “one-size-fits-all” rule for the ideal stage of cutting. It varies with EVERY. SINGLE. TYPE of flower. Again, there is going to be some trial and error here!
With some flowers, such as Poppies, Sunflowers and Cosmos, you want to cut them right when they are beginning to open/bloom, in order to have the longest vase life. Cut these flowers earlier than you think and enjoy watching the flowers open up in the vase!
On the opposite spectrum, Dahlias and Zinnias don’t open much after being cut, so they must be allowed to bloom fully on the plant before being cut.
Most flowers are somewhere in between. Foxglove, Snapdragons and Delphinium, for example, are best harvested when the bottom 2-3 blooms on the stem have opened up.
For some flowers, especially Zinnias and Black-Eyed Susans, it's helpful to perform "The Wiggle Test". Grasp the stem about 8" below the flower and wiggle it. If the flower flops around, it's not ready to be cut. If the stem remains firm, cut away!
4. Make Deep Cuts and Remove Foliage
When you are out in the field, be sure to make "deep cuts" - that is, cut your stems at least 12"-18”.
Elbow to fingertip length is perfect. You can always cut them shorter later!
Cutting deeply will actually signal the plant to produce even MORE long stems, so don't be shy about cutting deeper than you think. As long as you leave 2-3 sets of leaves near the base of the plant, you should be good!
Immediately after cutting, gently strip or cut off all the foliage from the bottom 2/3 of the stem. Leaves/foliage will muck up the water quickly, so get rid of any leaves that will touch water.
I repeat - NEVER, EVER allow leaves/foliage in the water!
5. Hydrate Properly
After cutting and stripping off the foliage, immediately place the stems in cool, CLEAN water in a CLEAN bucket or vase.
It's best to cut stems at an angle, so they don't sit flush with the bottom of the bucket. An angled cut also creates a larger surface area for the stem to draw up water.
If possible, it's best to allow the flowers to rest in a cool place out of the sun for a few hours (or overnight) before arranging. Some flowers need a few hours to "re-hydrate" and perk up. They just went through a lot of stress, so give them some time to literally “chill out”.
(If you find the water in your bucket is dirty after harvesting your flowers, I recommend transferring the flowers to a new clean bucket with clean water when it’s time for them to rest and rehydrate.)
Give those flowers plenty of time to rest before trying to arrange them into bouquets. Here’s a sample cutting schedule if I need some arrangements for a Friday evening:
Thursday - cut in the evening
Thursday overnight - allow flowers to rest and rehydrate in CLEAN water in a cool location
Friday morning - arrange flowers and store in a cool location until event time
Friday evening - display flowers
6. Avoid Sun and Heat
After you’ve arranged your flowers and want to display them, DO NOT set your bouquet in direct sun. While sun is necessary for flowers to grow, once they are cut, they need to be kept AWAY from the sun. A windowsill might not be the best location!
Heat also causes flowers to expire more quickly, so be aware that a bouquet picked and displayed in the heat of the summer will not last as long as a spring or fall bouquet... unless you keep your house very cold with air conditioning!
7. Keep Flowers Away from Fruit
Ripening fruit, like bananas, apples, avocados, peaches and pears, produce ethylene gas, which causes flowers to expire and wilt prematurely. If you have fresh fruit on your kitchen counters, the kitchen is not a great place to display your flowers.
Some flowers, like Sweet Peas and Dahlias, are particularly sensitive and can expire nearly overnight if subjected to ethylene gas.
8. Change Water Daily and Re-cut Stems
Fresh, clean water and a sparkling clean vase will significantly extend the life of your bouquet. Dirty water breeds bacteria and clogs the stem end of the flower, reducing water intake.
Again, make sure there are no leaves/foliage in the water!
Re-cutting the stems every few days will also allow the flowers to keep "drinking" properly.
There are a few types of flowers that make the water murky almost immediately. If any of these are in your arrangement, you’ll likely need to change the water every single day and possibly even add a drop of bleach to the water. Just a drop! Not a teaspoon. Ask me how I know this ;)
Flowers that muck up water:
-Zinnias, Black-Eyed Susans, Yarrow, Stock, Ornamental Kale/Cabbage, Oregano
9. Choose Water Wisely
Depending on where you live and what type of water you have, it might be helpful to use filtered water for your bouquets.
If you have softened well water, the salts in the water could cause your flowers to expire faster. Try filtered water instead. I don’t have scientific evidence to prove this, but I’ve noticed my bouquets in softened water don’t last as long.
10. Use Flower Food
Search the internet and you will find about a bazillion different “Awesome hacks!” for keeping your flowers fresh. Some work, some don't. Take everything with a grain of salt or do like I do… just skip this part ;)
Yup, I hardly ever use flower food. But if you want to, I recommend a commercial flower food like FloraLife, because it contains:
Sugar (to feed the flowers)
Acid (to maintain correct pH)
Bleach (to kill bacteria)
Soda (like Sprite) comes in a close second to flower food. The sugar and acid in the soda mimic the effects of flower food. Choose a clear soda to keep the water looking clean. Add a few tablespoons each time you change the water.

There you have it! With these tips and techniques, you’ll be equipped to get the best and longest vase life out of your flowers!
Now get out there and go cut some blooms!
-Lori

How to Eliminate Weeds in Your Garden
Tired of constant weeding? Transform the way you garden and set yourself free from weeds!
How to Eliminate Weeds in Your Garden
Every year about this time, I get desperate messages like the following:
”Help! I planted my garden 3 weeks ago, but now it’s a sea of green and I can’t tell what are weeds and what are plants! What do I do?”
Unfortunately, once the garden gets to this point, it’s really hard to reverse it. I’m sorry to say that there is not much to do other than hand weed relentlessly.
Like many areas in life, PREVENTION is key. A little bit of forethought and effort goes a loooooong way. Think of it as investing in your future self!
Eliminating weeds in your garden requires a new way of thinking that may seem foreign to you at first.
Here is the main idea I want you to remember:
BARE SOIL IS AN INVITATION FOR WEEDS
Yup, any time you leave soil bare, you are rolling out the welcome mat for weeds to invade and take over.
Let’s take a look at nature and the purpose of weeds.
Soil erosion is bad. We all know this. So does nature. To prevent soil erosion, nature came up a brilliant defense: Weeds.
Weeds are designed to grow quickly and completely cover areas to prevent soil erosion. They do their job incredibly well and honestly they deserve a standing ovation. Weeds DO have a purpose! And no, it’s not to make your life miserable ;)
Think about it. When was the last time you walked around nature and saw a giant bare spot of soil? Never? Yeah, that’s right. You’ve probably never encountered truly bare soil in nature. It generally doesn’t exist.
Everywhere you look, you’ll see something covering the soil, be it grasses, weeds, dead leaves, pine needles, etc.
Your job as a gardener: Mimic nature and COVER THE SOIL. If you don’t cover it, weeds will come and do the job for you.
COVER THE SOIL.
COVER THE SOIL.
COVER THE SOIL.
Got it? ;)
If you drive around a neighborhood, you’re likely to see houses with beautiful landscaping in the front yards. Do people plant their landscaping plants and leave bare soil exposed around them? NO!!!! They cover the soil with mulch… to prevent weeds.
YOU CAN DO THE SAME THING WITH YOUR GARDEN!
Yes, you should mulch your garden, just like you would mulch your landscaping.
Mulch does 3 things:
1. Prevents weeds. Mulch does the job of covering the soil, so weeds are not needed.
2. Retains moisture. Mulch helps hold in water and keeps the soil from drying out, so you can water less often and conserve resources.
3. Fertilizes the plants and improves soil structure. As the mulch slowly breaks down, it’s adds nutrients and organic matter to the soil. Your soil will get better and better each year!

So, what is “mulch”? Mulch has a very broad definition and basically refers to any organic (nature based) material that is used to cover the soil. Depending on where you live, you could use the following materials for mulch:
Straw
Grass Clippings (if you have a mower with a grass clippings attachment, be sure to collect these and use them. CAUTION: Only use clippings from lawns that are NOT treated with herbicides or other chemicals.)
Pine needles
Dried leaves (especially if you can run them through a shredder first)
Tree trimmings/chips from an arborist/tree trimming company (usually a mixture of chipped branches, limbs and leaves)
Shredded bark mulch from a landscape supply company (do NOT use treated or colored mulch around vegetable plants)
Cardboard or newspaper
Sawdust/wood shavings
Gravel or Pea Stone
Inorganic mulch can also be used. This usually refers to landscape plastics or fabrics that are used to suppress weeds. These are very helpful, but generally do not help to improve soil structure, like organic mulches do.
Inorganic mulch:
Landscape Fabric
Plastic Ground Cover
Tarps (yup, you could lay down a tarp and simply poke holes in it where you want to plant. Works best if you install soaker hoses UNDER the tarp before planting, since you won’t be able to water from above effectively)
On our farm, we use organic mulch and inorganic mulch.
For our flower/non-food crops, we generally use landscape fabric.
For food crops, we use tree trimmings/chips.
Our vegetable garden is comprised of several raised beds that are never roto-tilled. Instead, we simply add more mulch each year as needed.
After 8 years of gardening this way, our soil has become rich, productive and nearly weed-free. When we plant tomatoes, we generally throw a scoop a composted goat/chicken manure in the hole. This year, my husband and I realized that our existing garden soil is even better than the compost!
Because we have built up such rich soil and cover it with a thick layer of mulch, we generally only water the vegetable garden at planting time, then maybe once a month during the summer, only if there is drought. Generally, rain fall is sufficient. Even if we haven’t had rain in 2-3 weeks, the soil is still damp under the layer of mulch.

We keep a giant pile of tree trimmings/chips on the farm at all time, so we always have material on hand to cover the soil. You can sign up for Chip Drop online, or just do what we do… run out into the street and wave down any tree trimming trucks that drive by house. Ha! ;)
Here is our chip pile/heap, affectionately called “Mount Chipmore”.

In our flower garden, we mostly use landscape fabric with holes burned into it for proper plant spacing. The fabric is called DeWitt Sunbelt Ground Cover/Weed Barrier and it comes in several different sizes.
My husband bought pieces of sheet steel and made templates with different plant spacing:
6” x 4” (single stem sunflowers, cress, flax, stock, etc.)
9” x 9” (pretty much everything else…)
12” x 12” (cosmos, amaranth, etc.)
18” x 18” (branching sunflowers, dahlias, etc.)
We lay down the sections of fabric in our raised beds, pin them in place with landscape staples, then plant the seedlings/direct sow into the holes.
While we still have to do some weeding in the holes when the plants are tiny, eventually the flowers get so big they take over and weeds become a non-issue.
Below is a photo of what the flower garden looks like in the spring as we are preparing, amending the soil and covering beds with fabric….

… and here is what it looks like 2-3 months later. Lots of flowers with very few weeds.

So there you have it! Yes, eliminating weeds from your garden requires some up front work and dedication… but the results are worth it! Imagine having a garden you ENJOY being in, instead of feeling stressed out and upset every time you look at it.
Repeat after me: BARE SOIL IS AN INVITATION FOR WEEDS.
COVER THE SOIL.
Got it??? Good. Now get out there and cover your soil… and start creating the garden of your dreams!
The Great "Kiddie Pool" Tulip Experiment (A.K.A. "Lori vs Voles: Part 3")
The results of my tulip planting experiment!
The Great “Kiddie Pool” Tulip Experiment
***This is my original social media post I published on November 26, 2019.***
***Read all the way to the bottom to see the results of the experiment!***
Welcome to another episode of “Lori vs. Voles”. 😂👊
Don’t know what voles are? Lucky you.🐁 They are mouse-like critters that tunnel around under the snow all winter long (where the barn cats can’t find them), decimating everything in their path.
One of their favorite foods? Tulip bulbs.🌷
We have a TERRIBLE time with voles around here. I’m about to give up on planting them altogether, but my Dutch blood wants tulips SO BAD.
Here's my track record for "Lori vs. Voles".
1st Cut Flower Tulip Planting Attempt: 125 bulbs planted. Voles ate 122 bulbs. 😭
2nd Cut Flower Tulip Planting Attempt: 500 bulbs planted. Covered with wire mesh to prevent voles. Voles still managed to eat 250 of them. 😭
This year, I’m trying ONE LAST TIME. This method will prove to be either a brilliant success 🙌🙌🙌🙌... or a spectacular failure 💥💥💥. Tune in next spring to find out! 😂
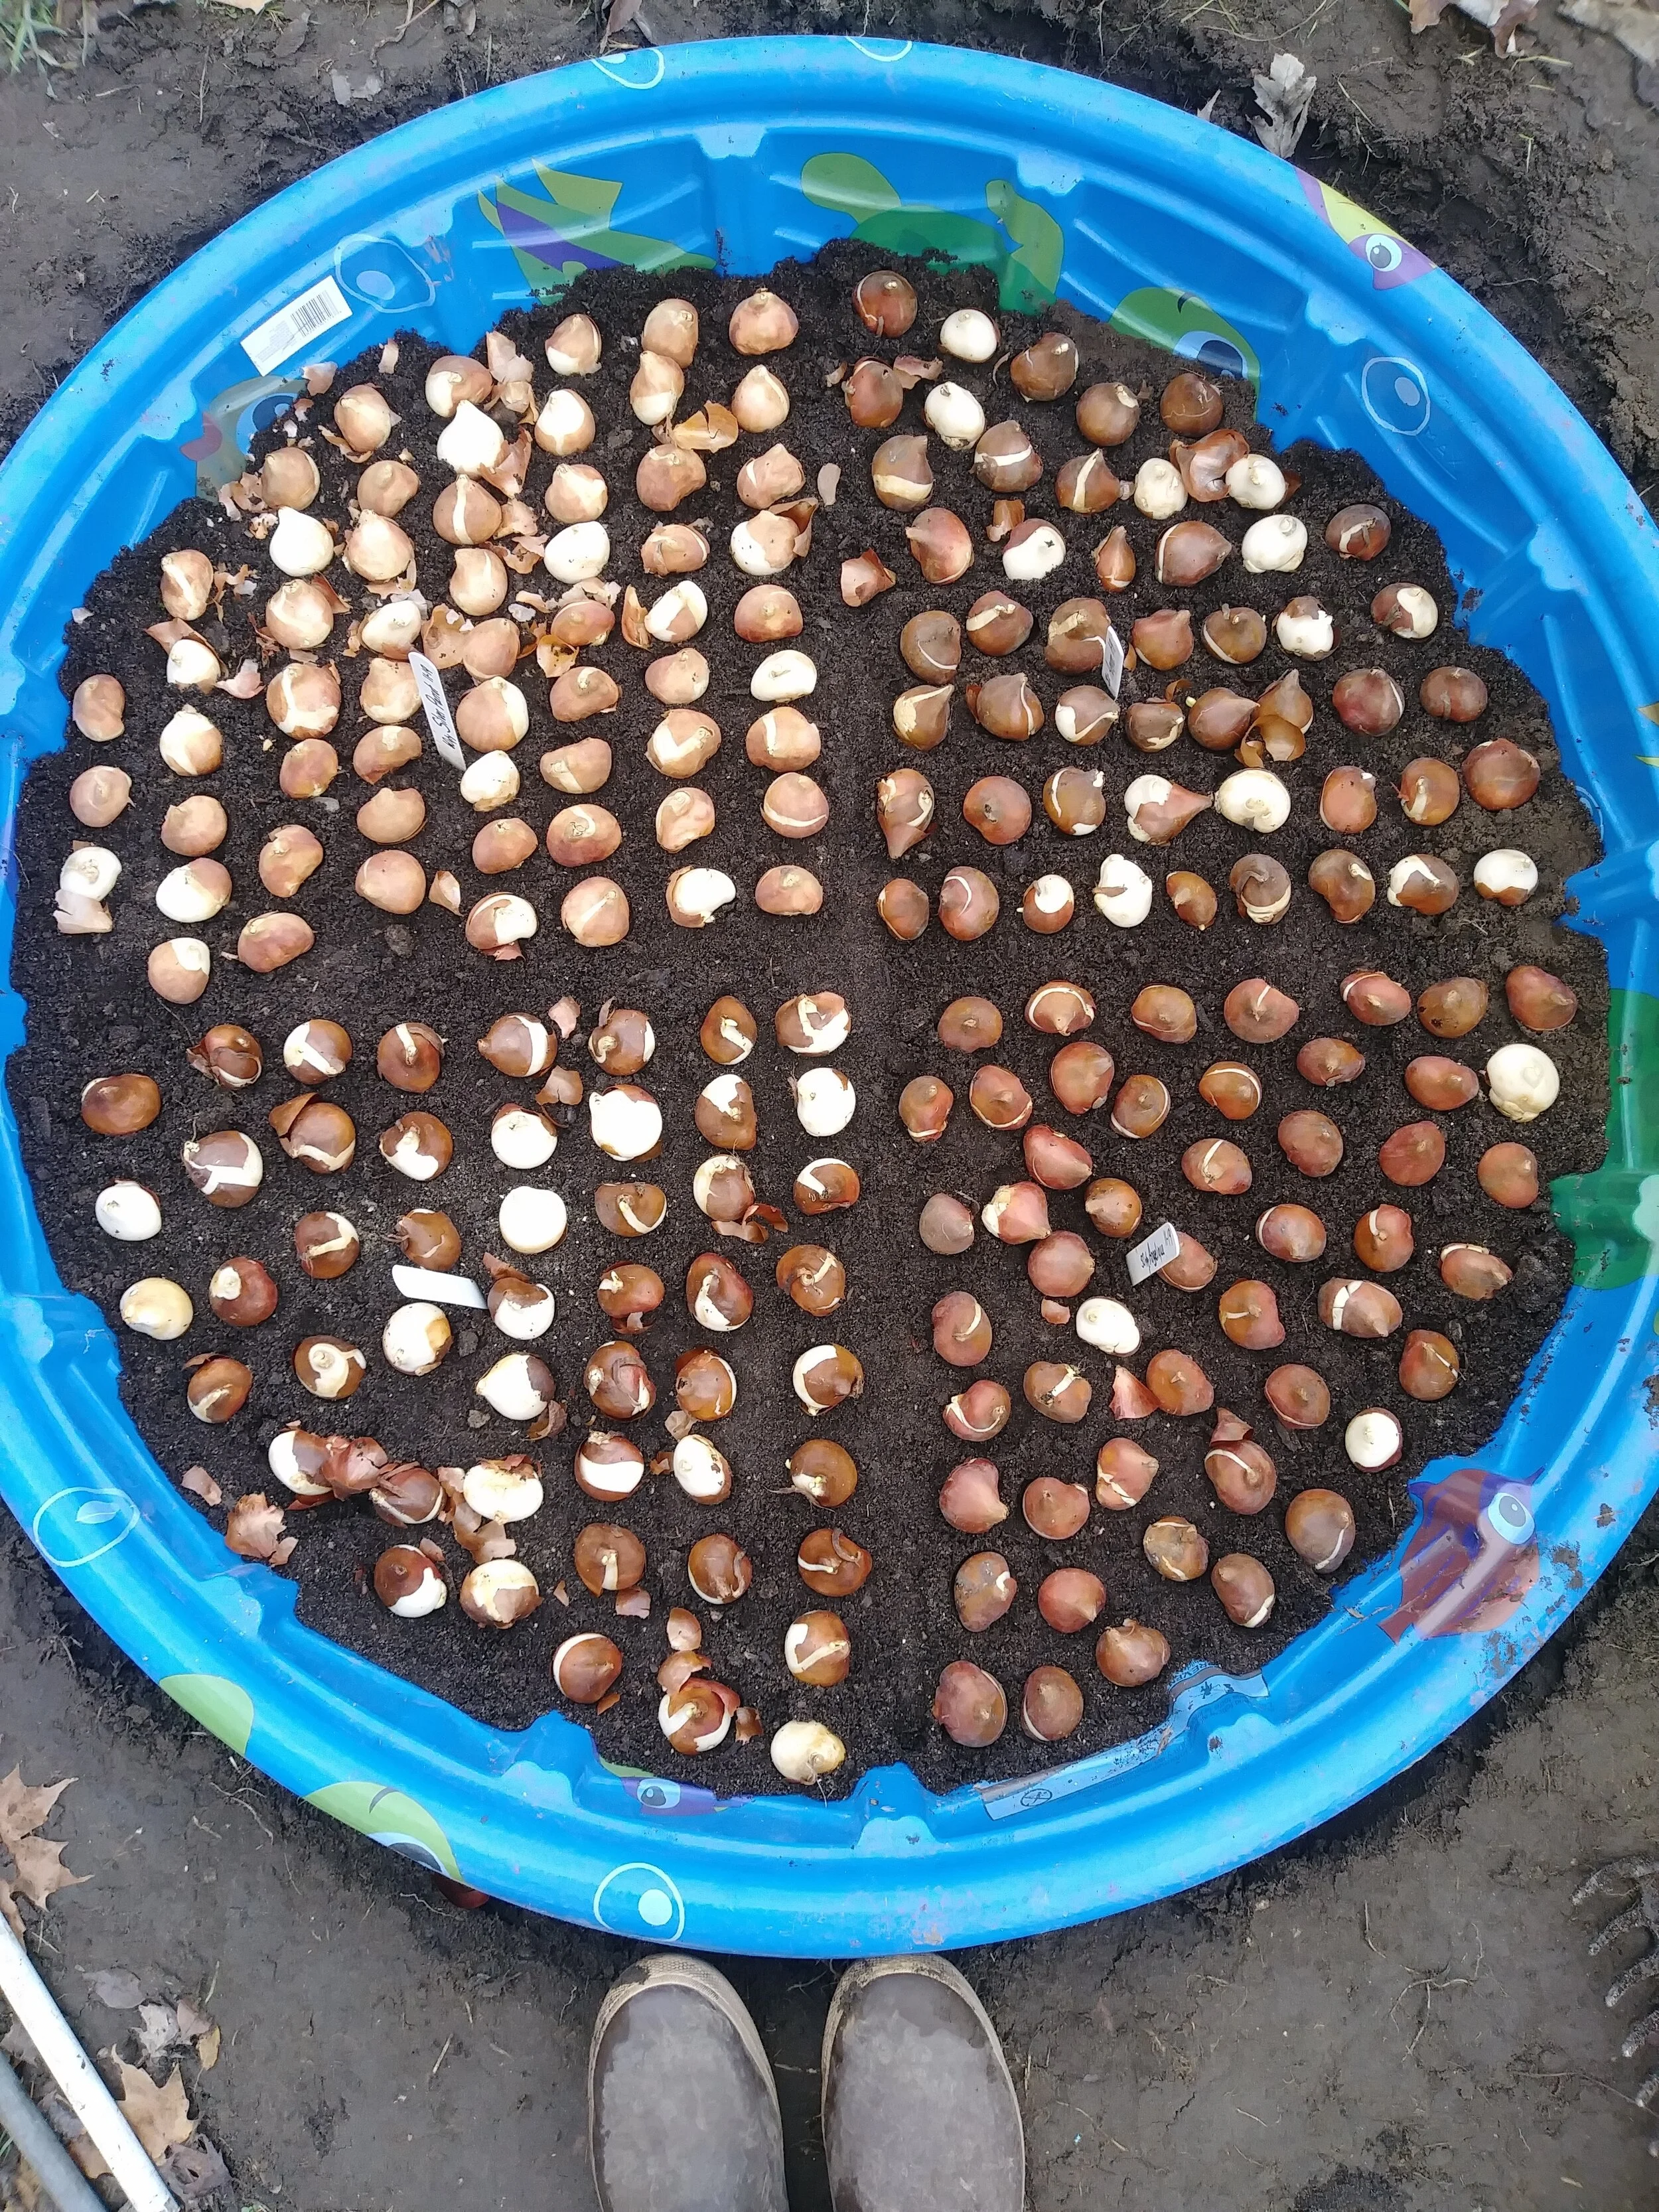
I’m trying the “Kiddie Pool Method”. Actually, it’s not a method. It’s just something I made up. 😉 The tulips will be completely protected on the top, sides and bottom.
Here’s what I did:
🌷Dug a shallow hole for the kiddie pool, so I could sink it to ground level.


🌷Drilled drainage holes in the bottom of the pool.

🌷Filled the pool with a few inches of soil.
🌷Added a bucket of compost and some bone meal fertilizer. Mixed it all up.

🌷Planted the bulbs (they are planted close, like eggs in a carton).

🌷Backfilled the pools with remaining soil until bulbs were covered with a few inches of soil.

🌷Mulched with leaves.
🌷Drilled holes on the edges of the pool and zip-tied wire mesh “hardware cloth” on top of the pools.

Early next spring, I will remove the wire mesh hardware cloth so the tulips can emerge (once the snow is gone, the barn cats can patrol for me 🐱🐱🐱).
Oh, my goodness people. This is a lot of work for tulips and I’m not recommending you try this. 😵 I hope I actually have something to show for all this work!
I keep muttering “I WILL outsmart you, stupid voles….”
Did I mention that not only do Dutch people have incredible love for tulips, but they are also incredibly stubborn? ;)
And the final results in the spring of 2020…..
NOT A SINGLE BULB LOST TO THOSE BLASTED VOLES!!!!
But I do wonder…. was it the kiddie pool method? Or was it the fact we barely had any snow this winter and our barn cats were able to hunt all winter? Usually, we have about a foot of snow and the voles hide under the snow cover, safe from the kitties.
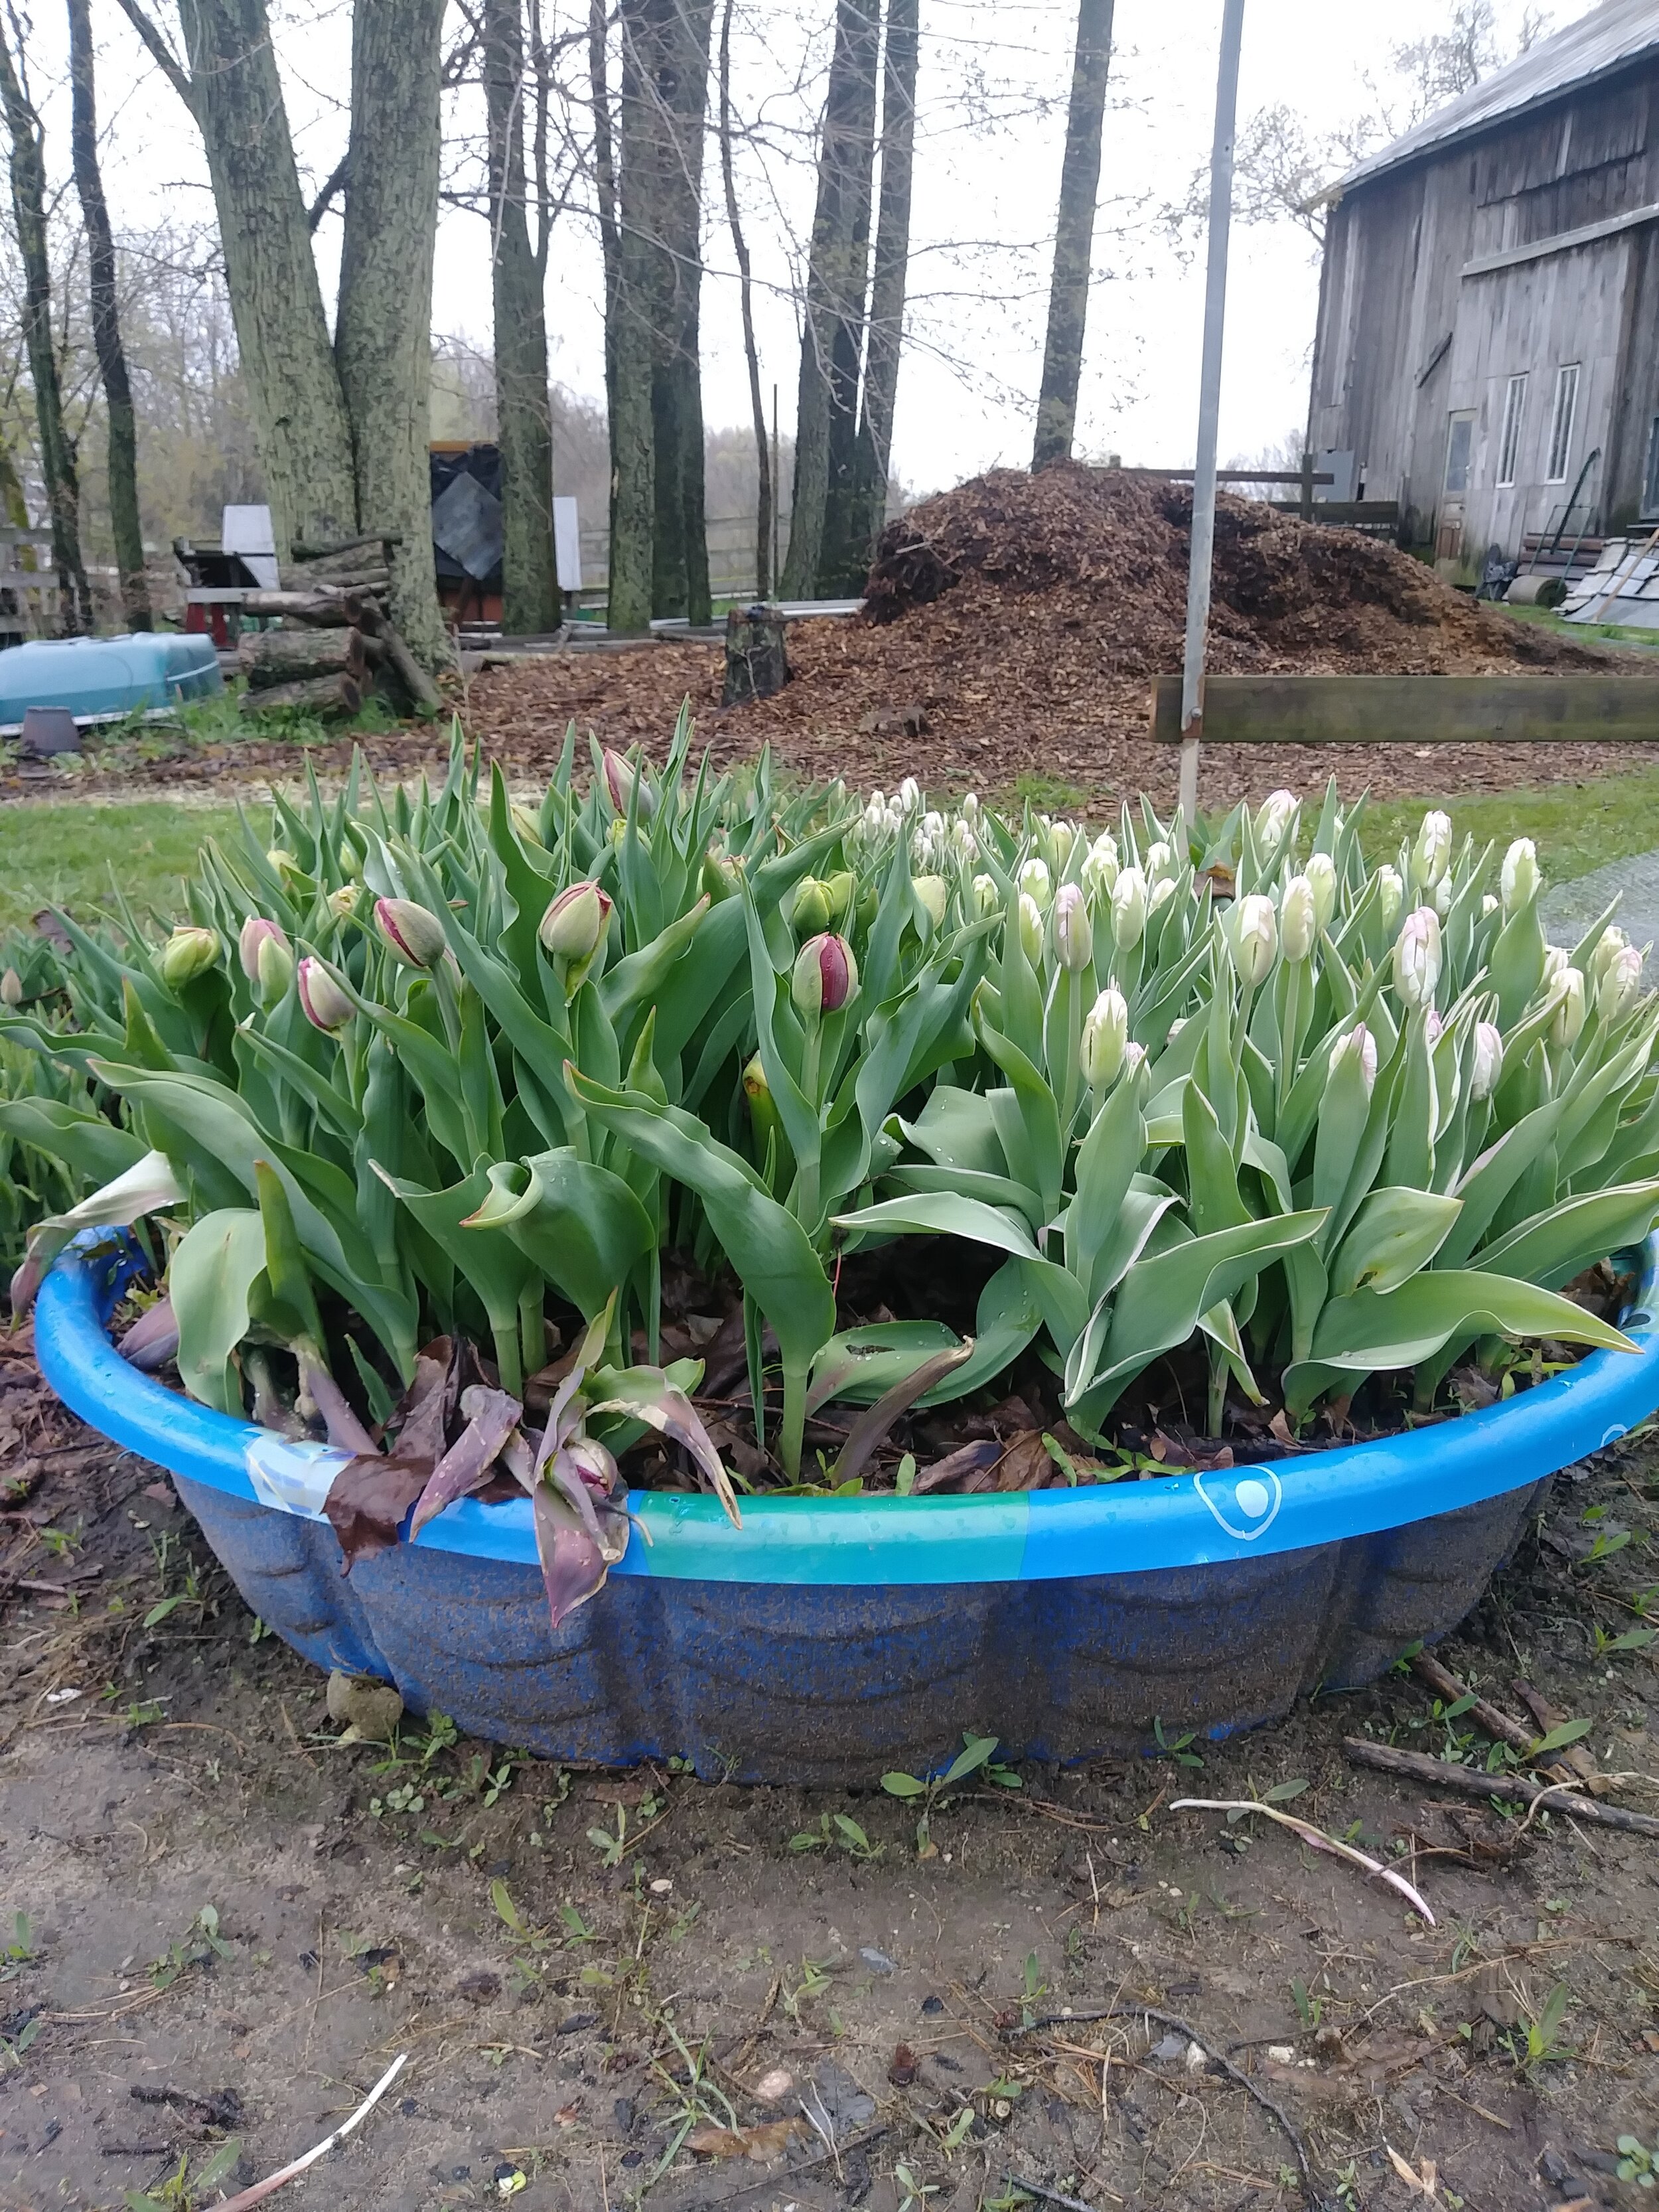
Just for fun, I sunk 1 pool in the ground and left other other ABOVE the ground. I planted the same exact types of bulbs in the 2 beds, hoping to compare them side by side (which one blooms earliest, which one has the longest stems, etc.)

There really was no huge difference. The tulips in the “sunk in the ground “ pool had slightly longer stems, likely because they were colder (tulips need cold temperatures in order to create long stems).

Hope you enjoyed reading about The Great “Kiddie Pool” Experiment!
Would I do it again? Maybe… ;)

Foliage - The Secret to Fabulous Bouquets!
Want to know how to make your bouquets truly shine? It’s all about the foliage!
Foliage - The Secret to Fabulous Bouquets!
When I first started growing flowers, like most people, I was completely enamored with all the beautiful blooms. I would go out into my garden and cut loads of flowers in different colors and drop them all in a jar. Voila! Perfect!
But eventually, something didn’t seem quite right. Why did my homemade bouquets look so… well, homemade? I wanted to make them look classier, a bit more polished looking.
That is when I discovered the importance of FOLIAGE.
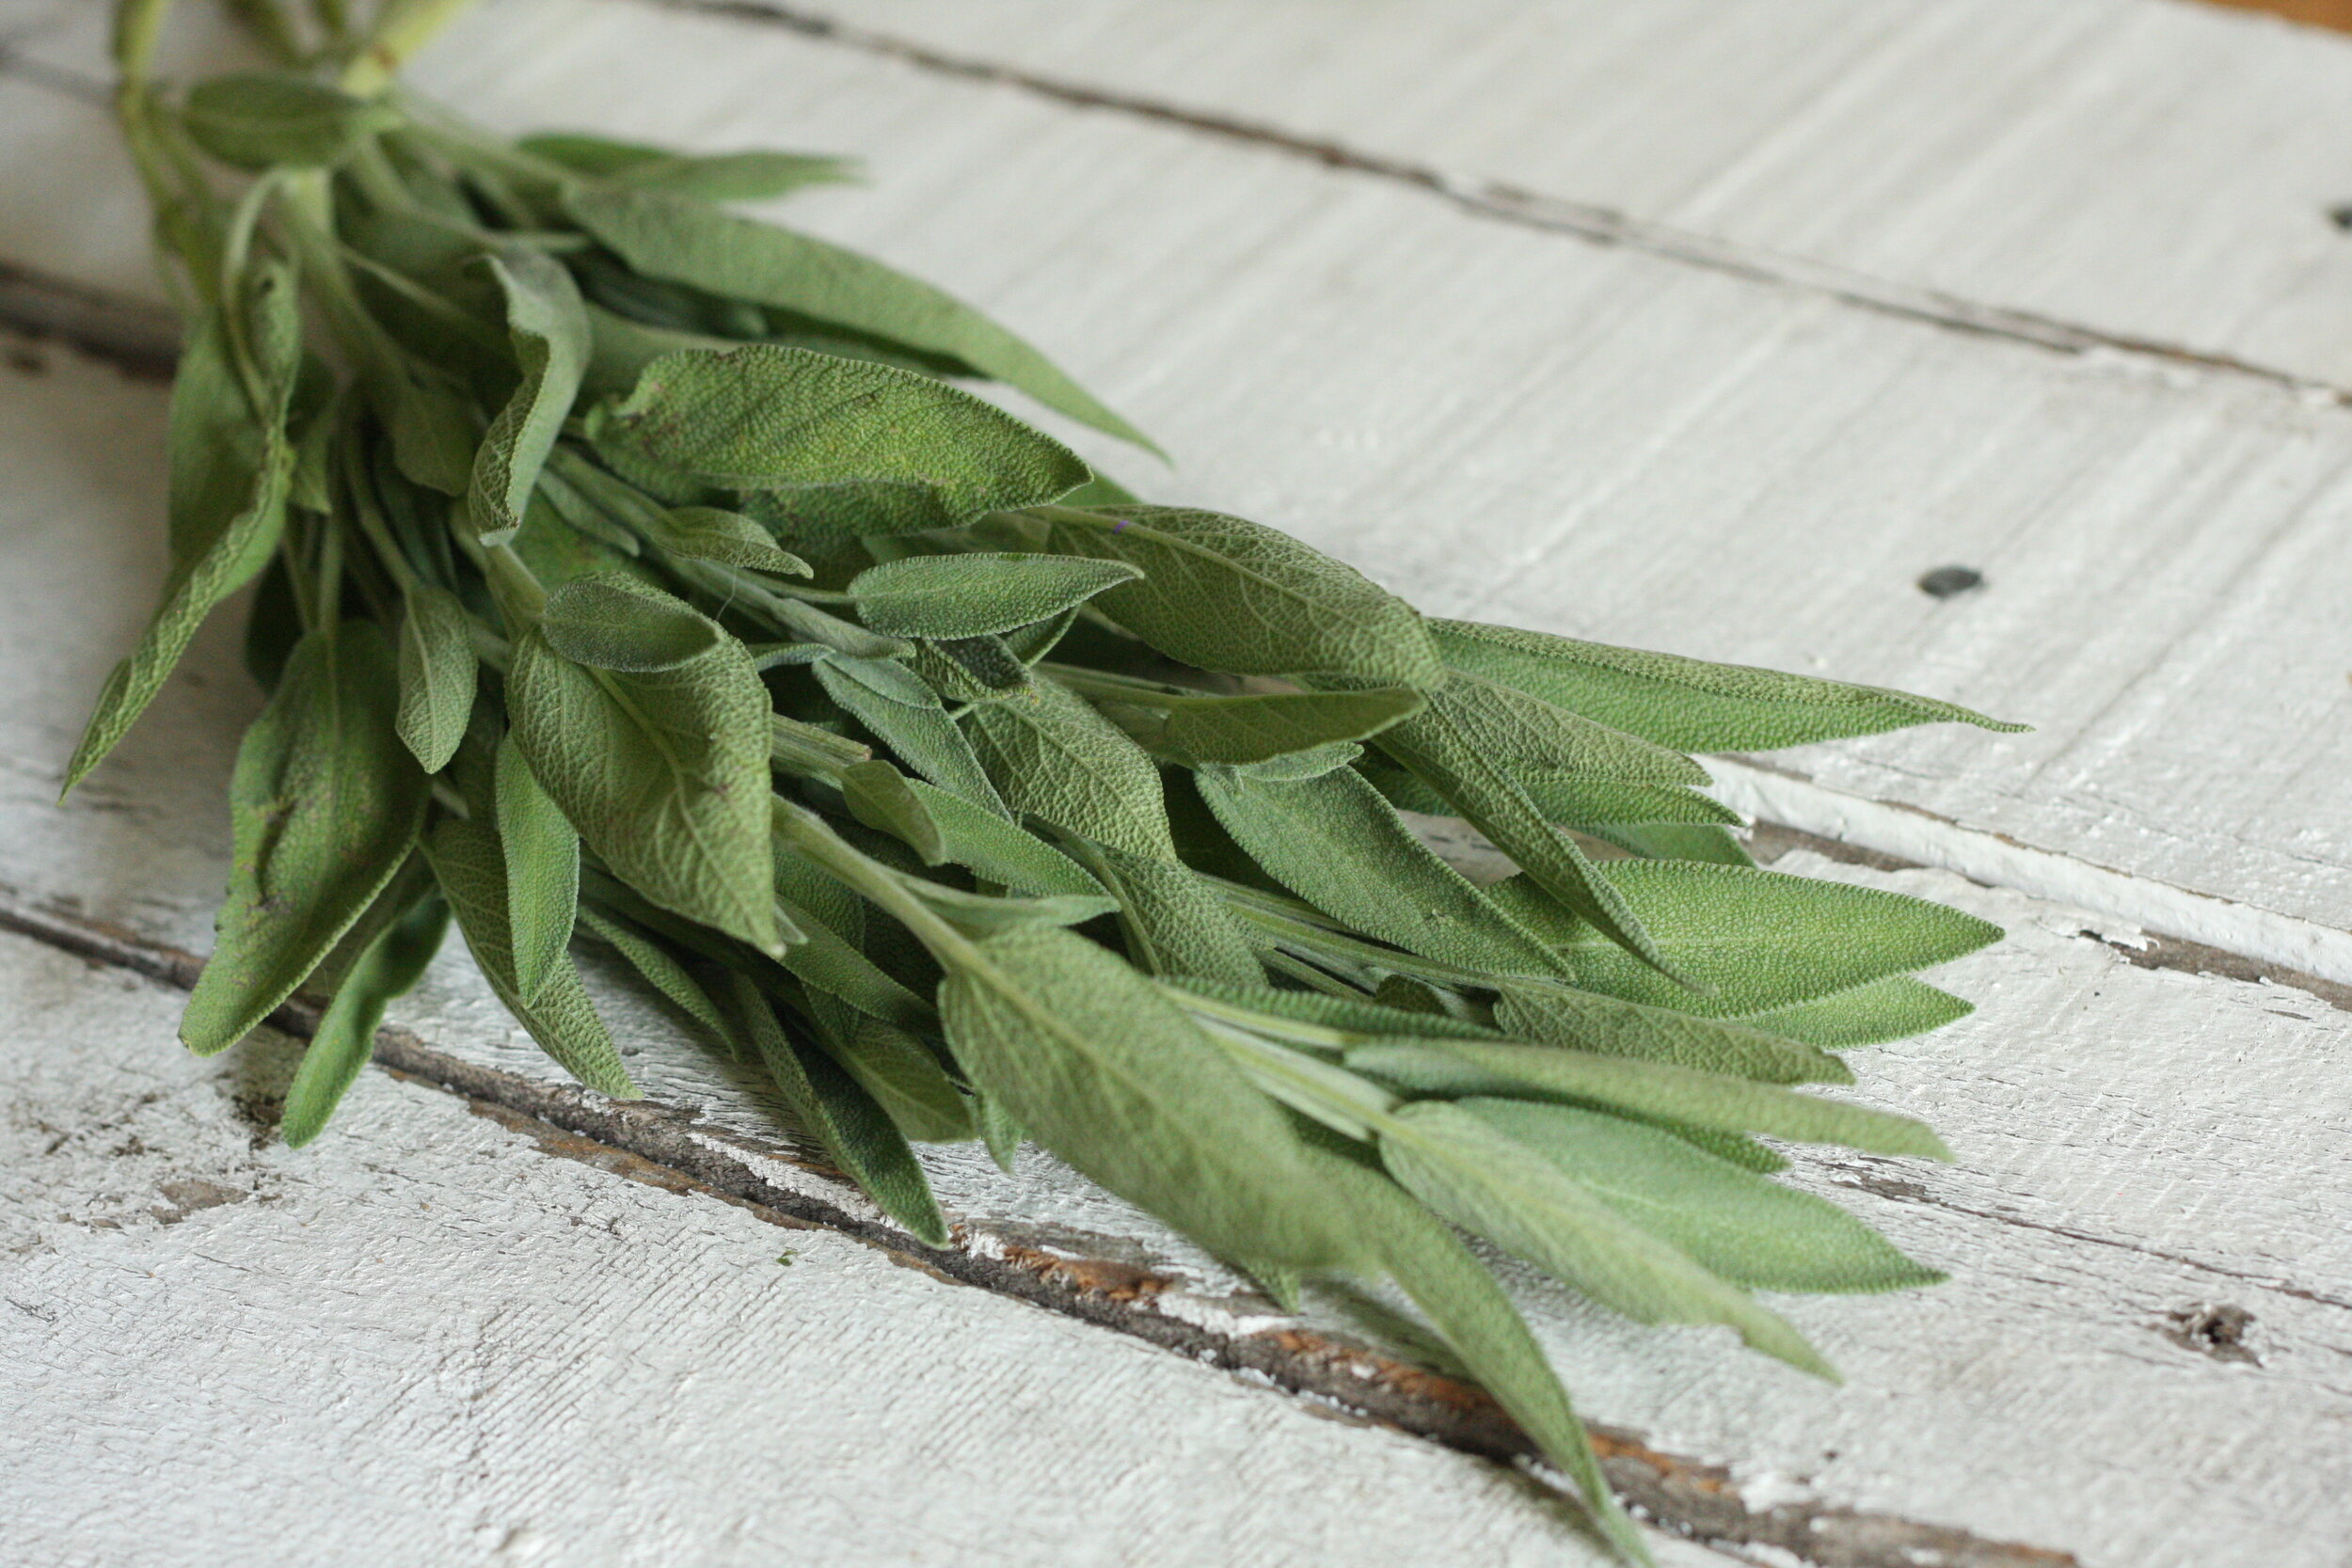
While out cutting flowers one day, I noticed all the sage growing in my herb garden. I clipped a few stems, added them to the flowers and WOW!!! The sage provided a wonderful backdrop to highlight all the blooms and I began to realize that foliage might even be MORE important than flowers!
At my U-Pick Flower Garden, I often have visitors come up with their flowers and say “Help! I feel like I’m missing something.” I lead them over to my beds of foliage, cut a few stems for them and watch their eyes light up with joy as they see what a difference it makes!
Early on, I was advised that half of my cutting garden should be foliage. That seemed pretty extreme to me and I thought I knew better than the experts.
Silly me. That first season, I was always scrambling for more foliage. Since then, I’ve made it a point to grow WAY more foliage each season. I’ve now reached the point where I get more excited about foliage than I do about the blooms!
I hope when you’ve finished reading this blog post, you’ll feel the same way… or at least have a new appreciation for all that luscious greenery!
Anatomy of a Bouquet/Arrangement
To achieve a full, lush, professional looking arrangement, it’s helpful to pay attention to the 3 main parts:
Focal: The center of attention, usually 1-3 main blooms. The rest of the arrangement is built upon the focal flowers.
Filler: The majority of the arrangement. These smaller flowers/plants compliment the focal flowers.
Foliage: The backbone/foundation of the arrangement. Provides structure, mass and enhances the flowers.
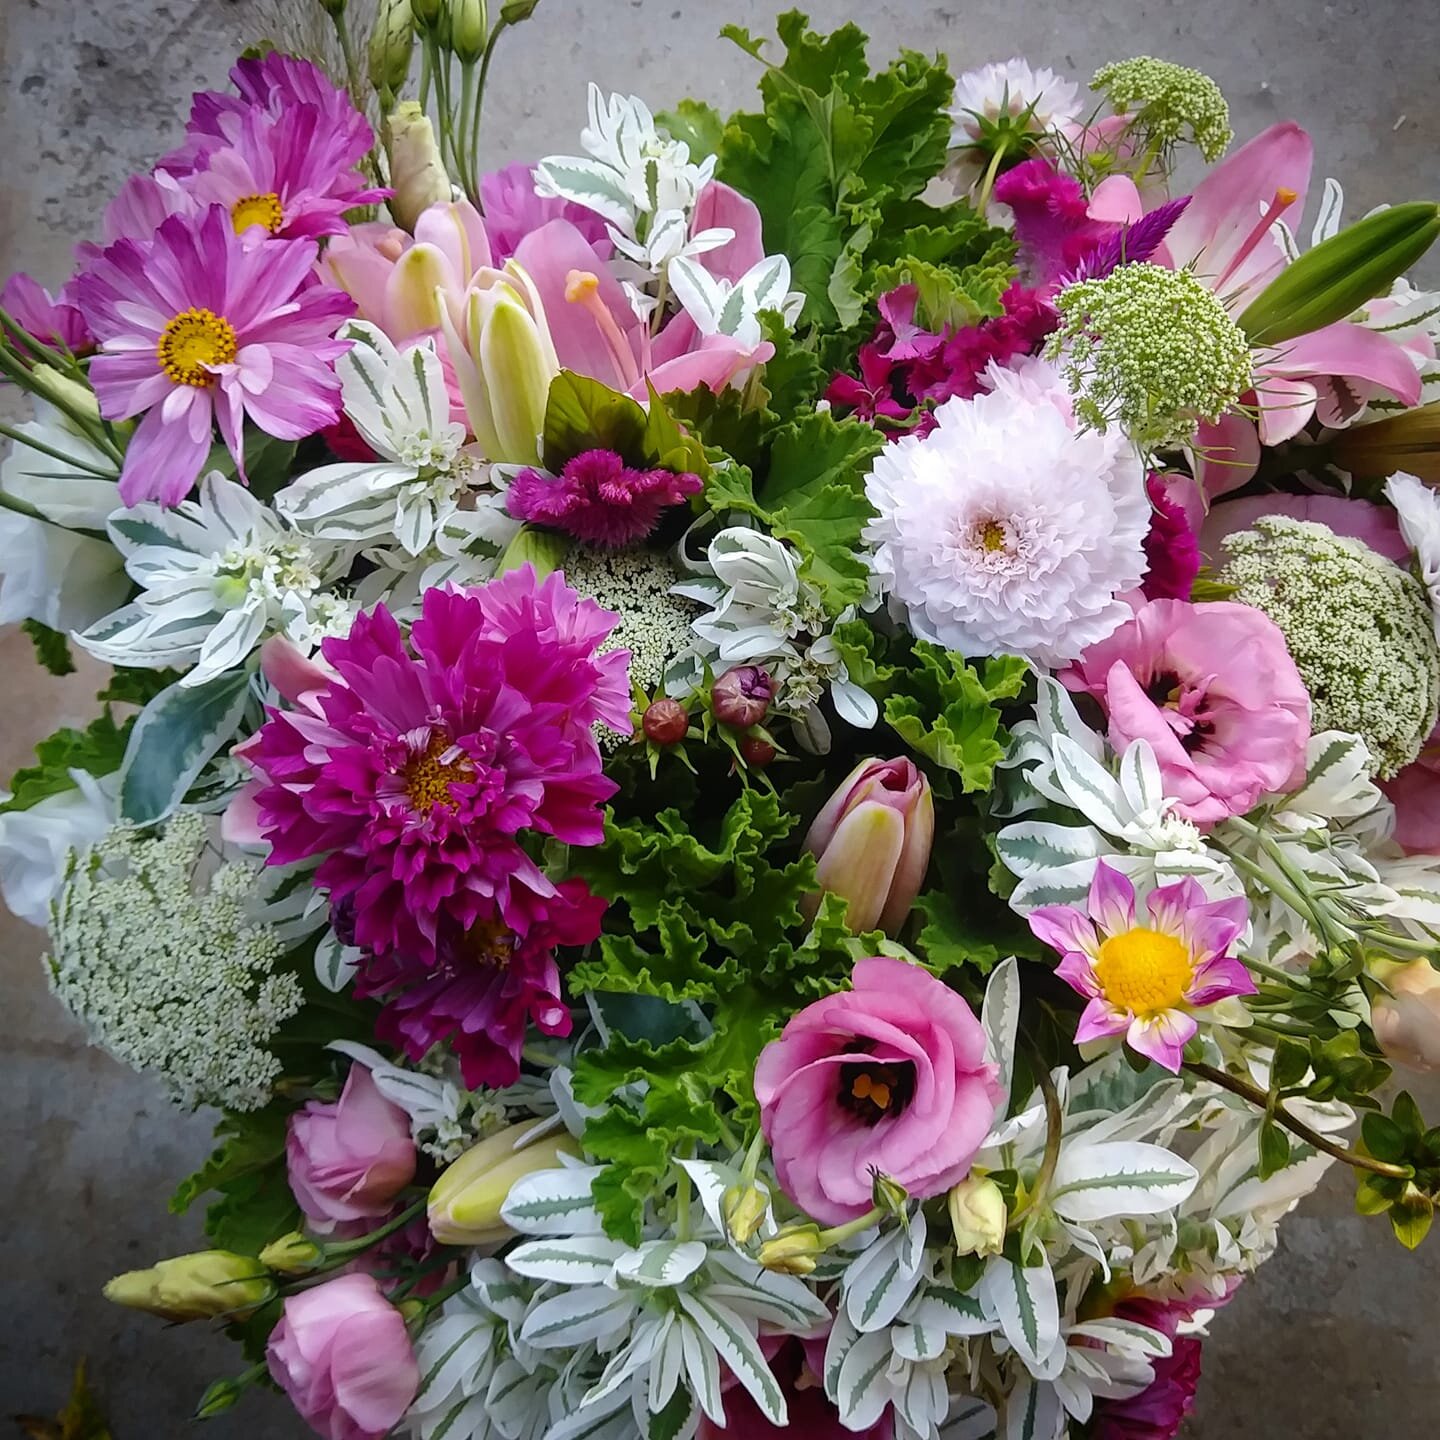
Here’s an example below….
Focal: Dahlia
Filler: Ammi, Celosia, Cosmos, Statice
Foliage: Lemon Bee Balm, Scented Geranium
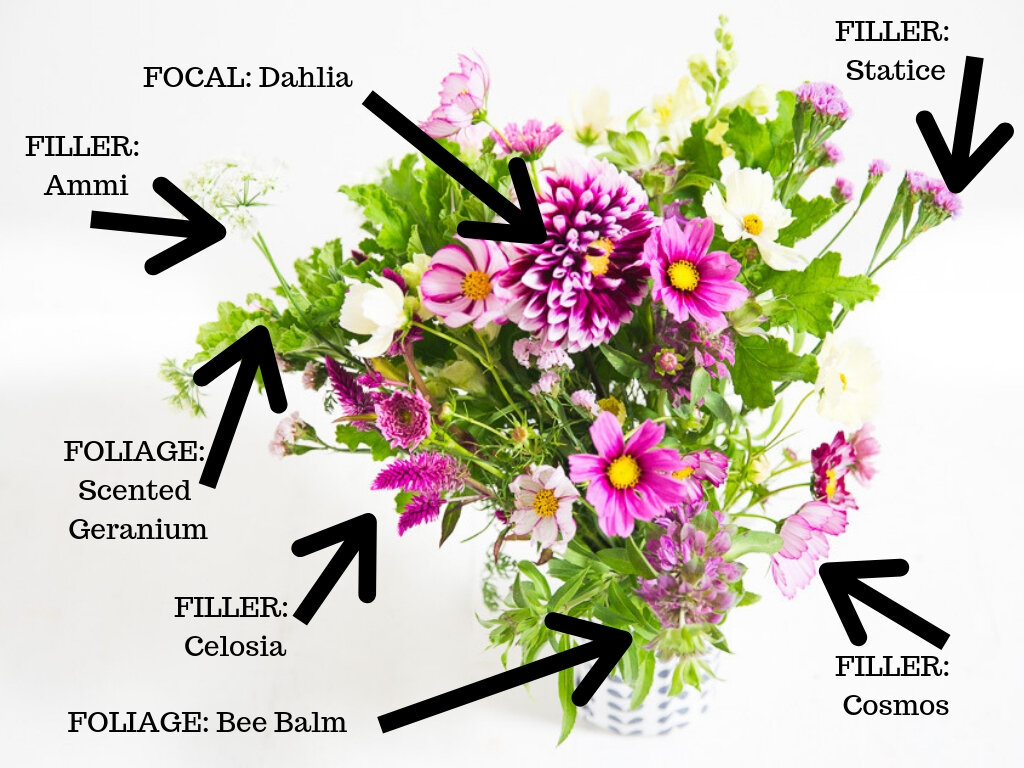
See how the foliage and filler really compliment the focal flower?
Here is a list of some of the foliage we grow at Three Acre Farm to get you inspired!
Asparagus
Every spring during planting season, I walk past my asparagus bed about 18 million times a day and think “I really need to harvest that asparagus!” And then I don’t. And then the asparagus spears transform into these huge towering ferns… that actually look awesome bouquets! It makes me feel not quite so bad about missing asparagus season… again. ;)

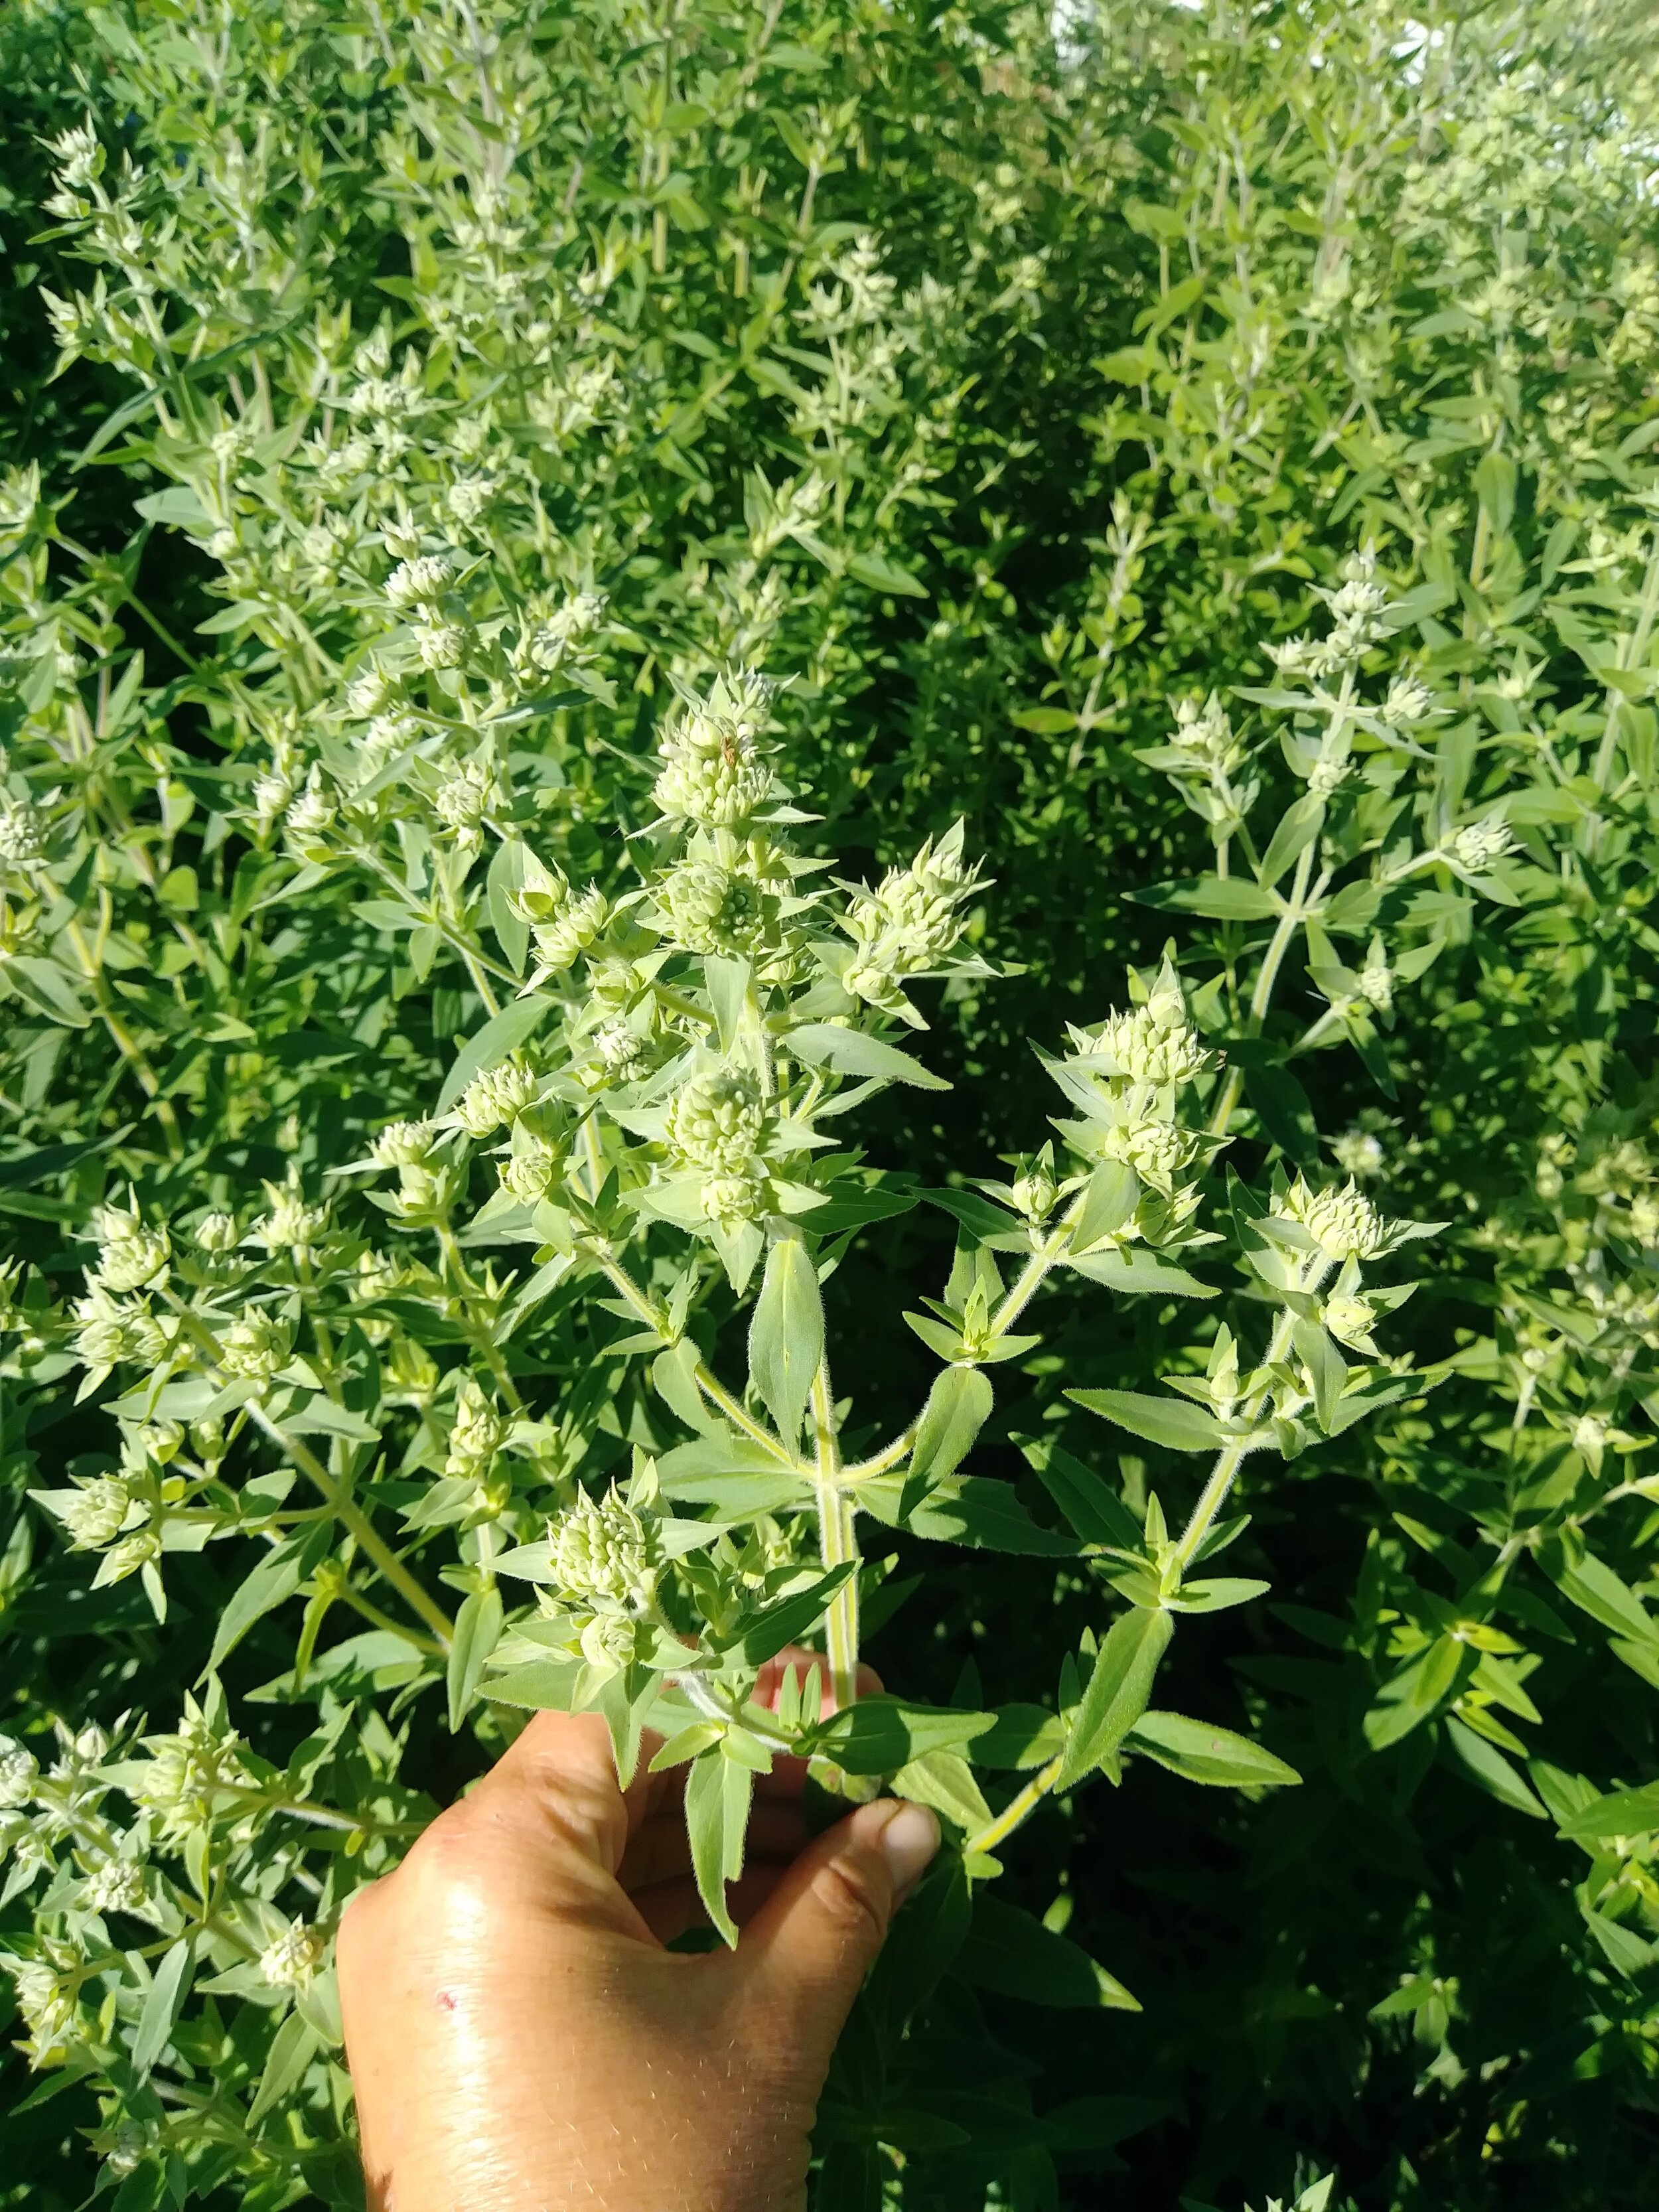
Basil
Basil makes a wonderful, long lasting foliage if cut at the proper stage and time of day. Be sure to cut it after the stems have become “woody” and cut very early in the day or in the late evening (coolest parts of the day). Basil cut in the heat of the day will wilt almost immediately and has a hard time recovering. “Mrs. Burn’s Lemon” is delightfully scented and a lovely lime green. “Amoratto” is a beautiful mixture of dark green/violet.

Bells of Ireland
One of my favorite foliages! Harvest when you see the tiny white flowers inside the “bells” begin to open up.

Blackberry Foliage
If you have blackberry plants, they can do double duty as a fruit and foliage plant. Double points if you grow “thornless” blackberries, like I do ;)

Bupleurum
When this is in season, I start every single bouquet with a stem of Bupleurum. The wiry, sturdy stems are the perfect base for weaving other flowers into. The bright cheery lime green color compliments nearly every color scheme.

Dill
Perhaps Dill belongs in the “filler” category, but I wanted to mention it because it’s so fantastic. Allow the head to shed the little yellow flowers and wait until they form bright green seed pods. They truly sparkle in bouquets!

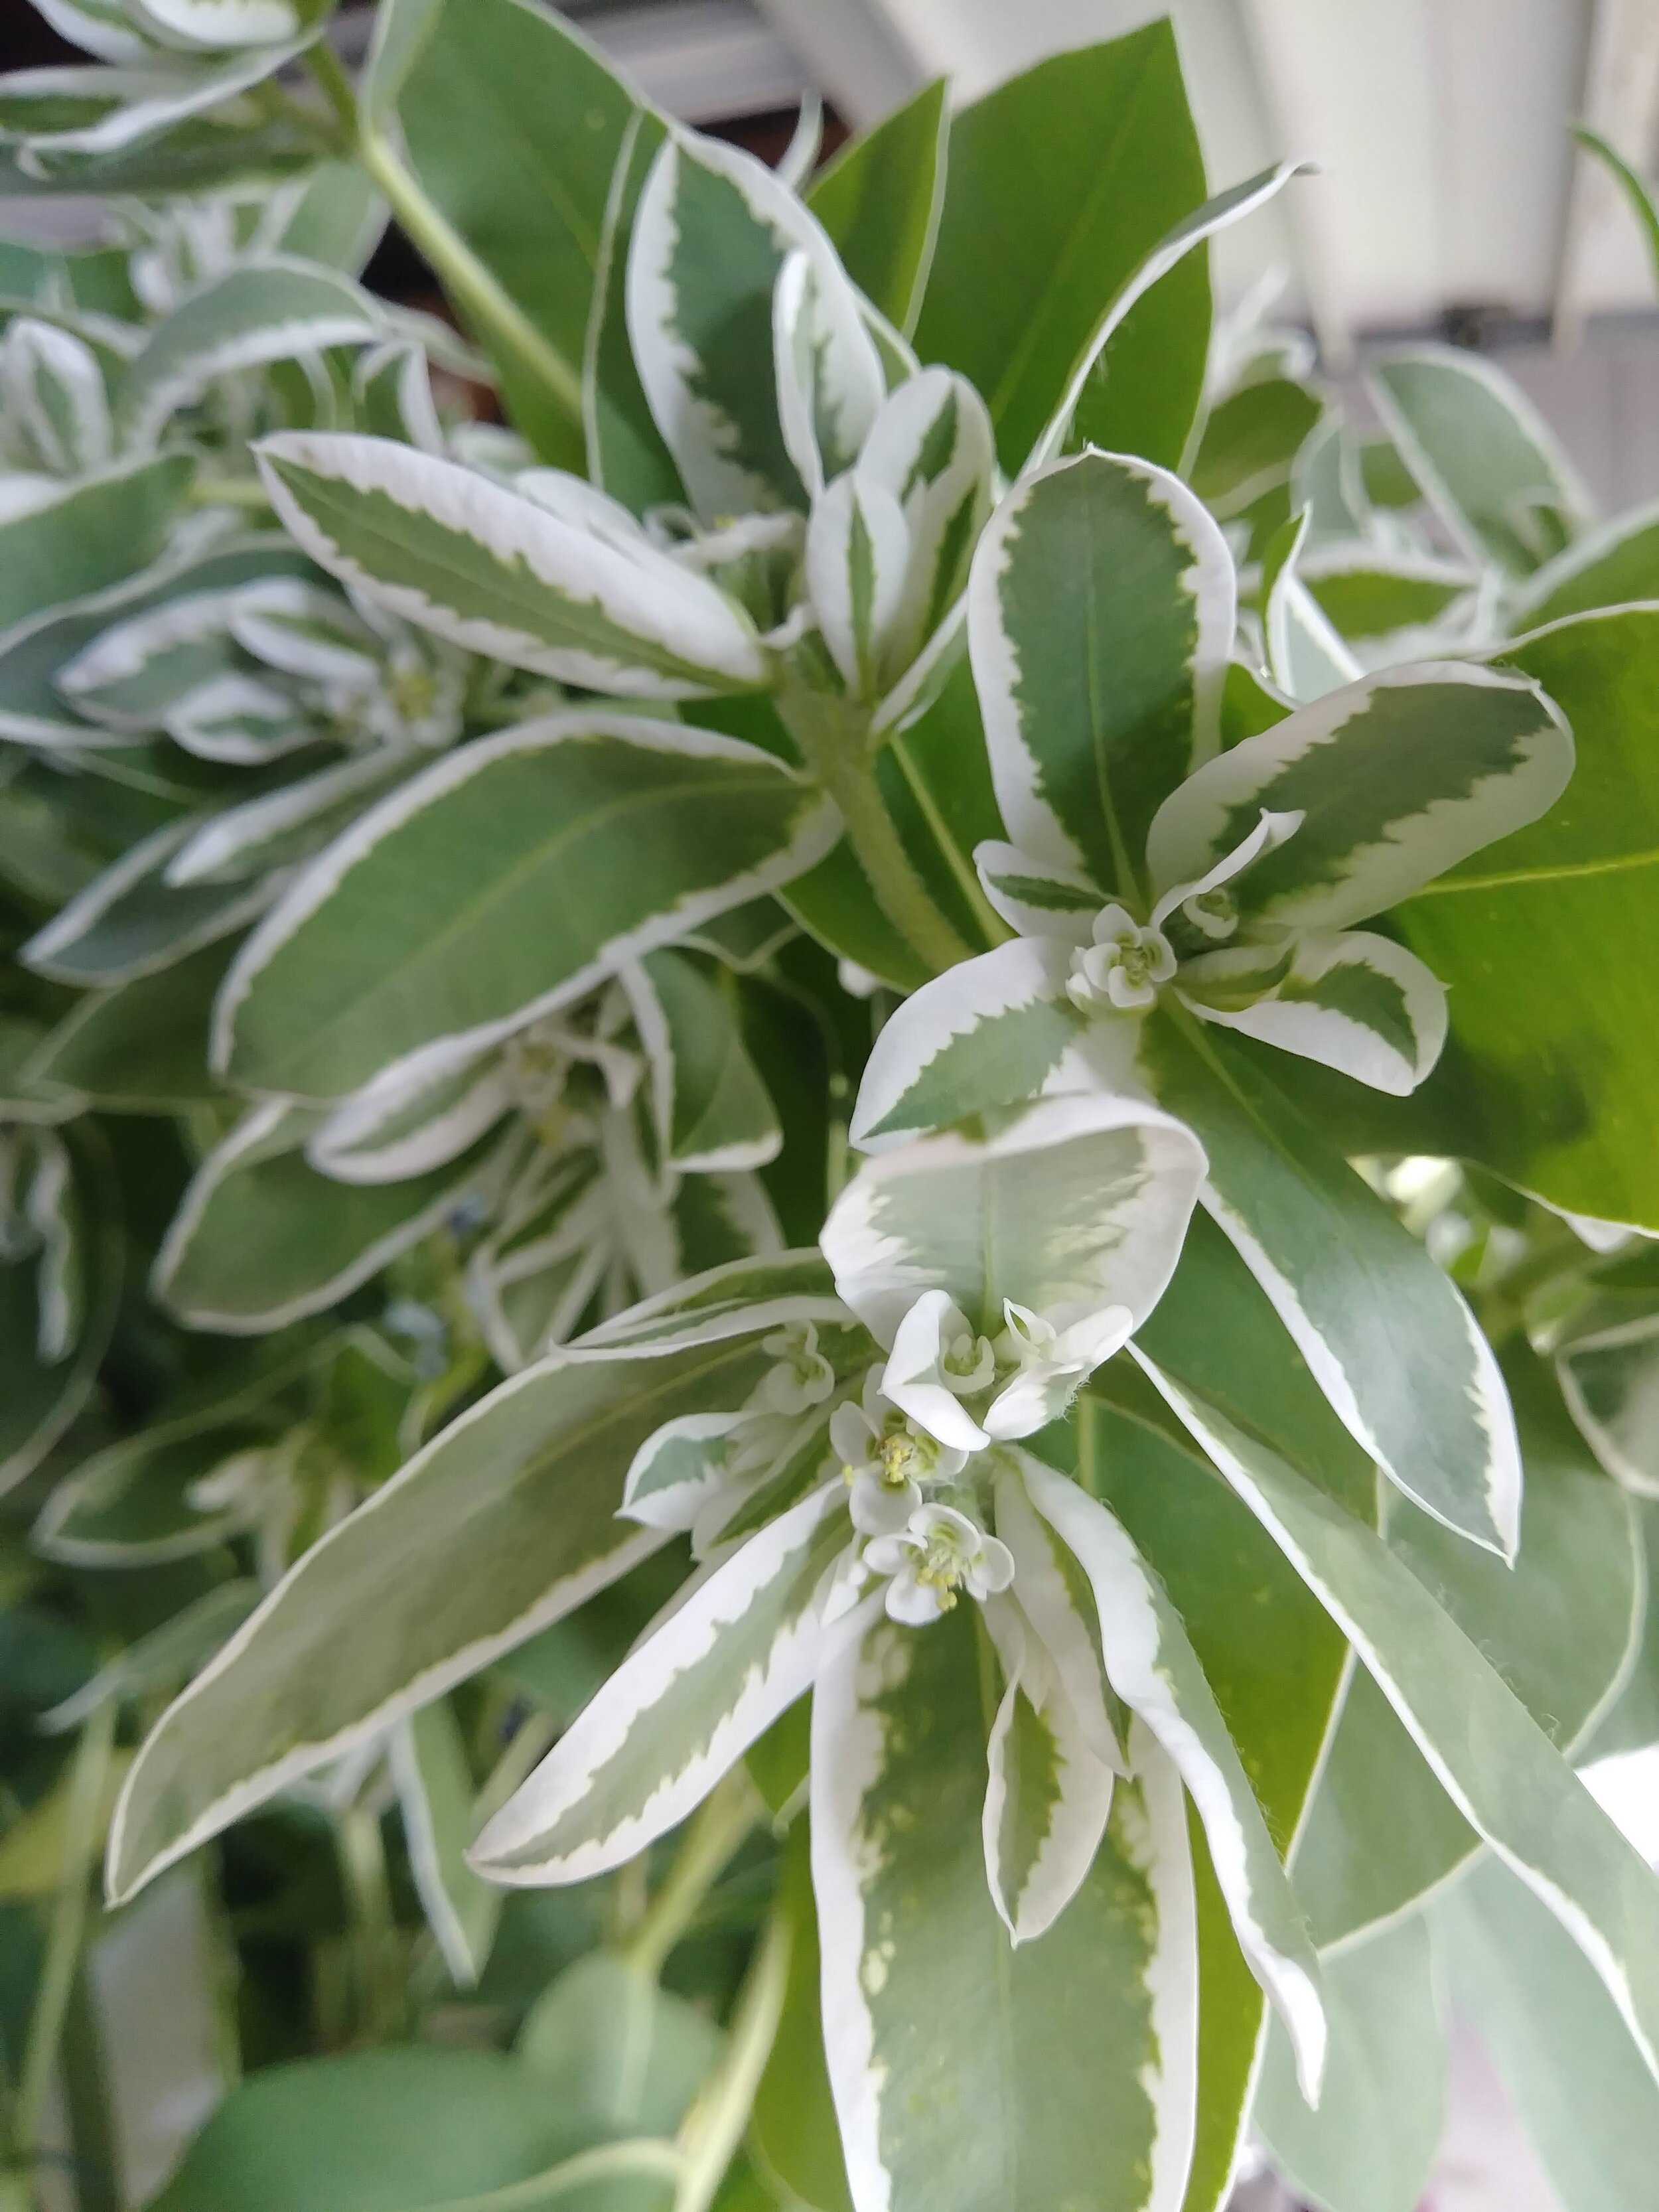
Euphorbia (“Snow-on-the-Mountain”)
I grew this for the first time this year… and I’m torn. The foliage is STUNNING and everyone swoons over it. But…. I feel like I need to wear a hazmat suit while harvesting it. The stems leak sticky white sap that irritates skin. And can cause major eye irritation. And it gets SUPER wilty if I cut if after the sun is up. Not sure if I’ll grow it again.
Flax
Yes, this is the same plant you get “flax seed” from. The plant sends up little blue flowers, but I wait until those are gone and harvest the seed pods instead. They look so sparkly and playful in bouquets!

Frosted Explosion/Sprinkles Grass
This grass is magical. A few stems here and there, and your bouquet shimmers.

Grapevine
We grow Concord grapes in the garden for eating/juice…. but the foliage is beautiful too! It looks lovely with the fall blooming flowers.

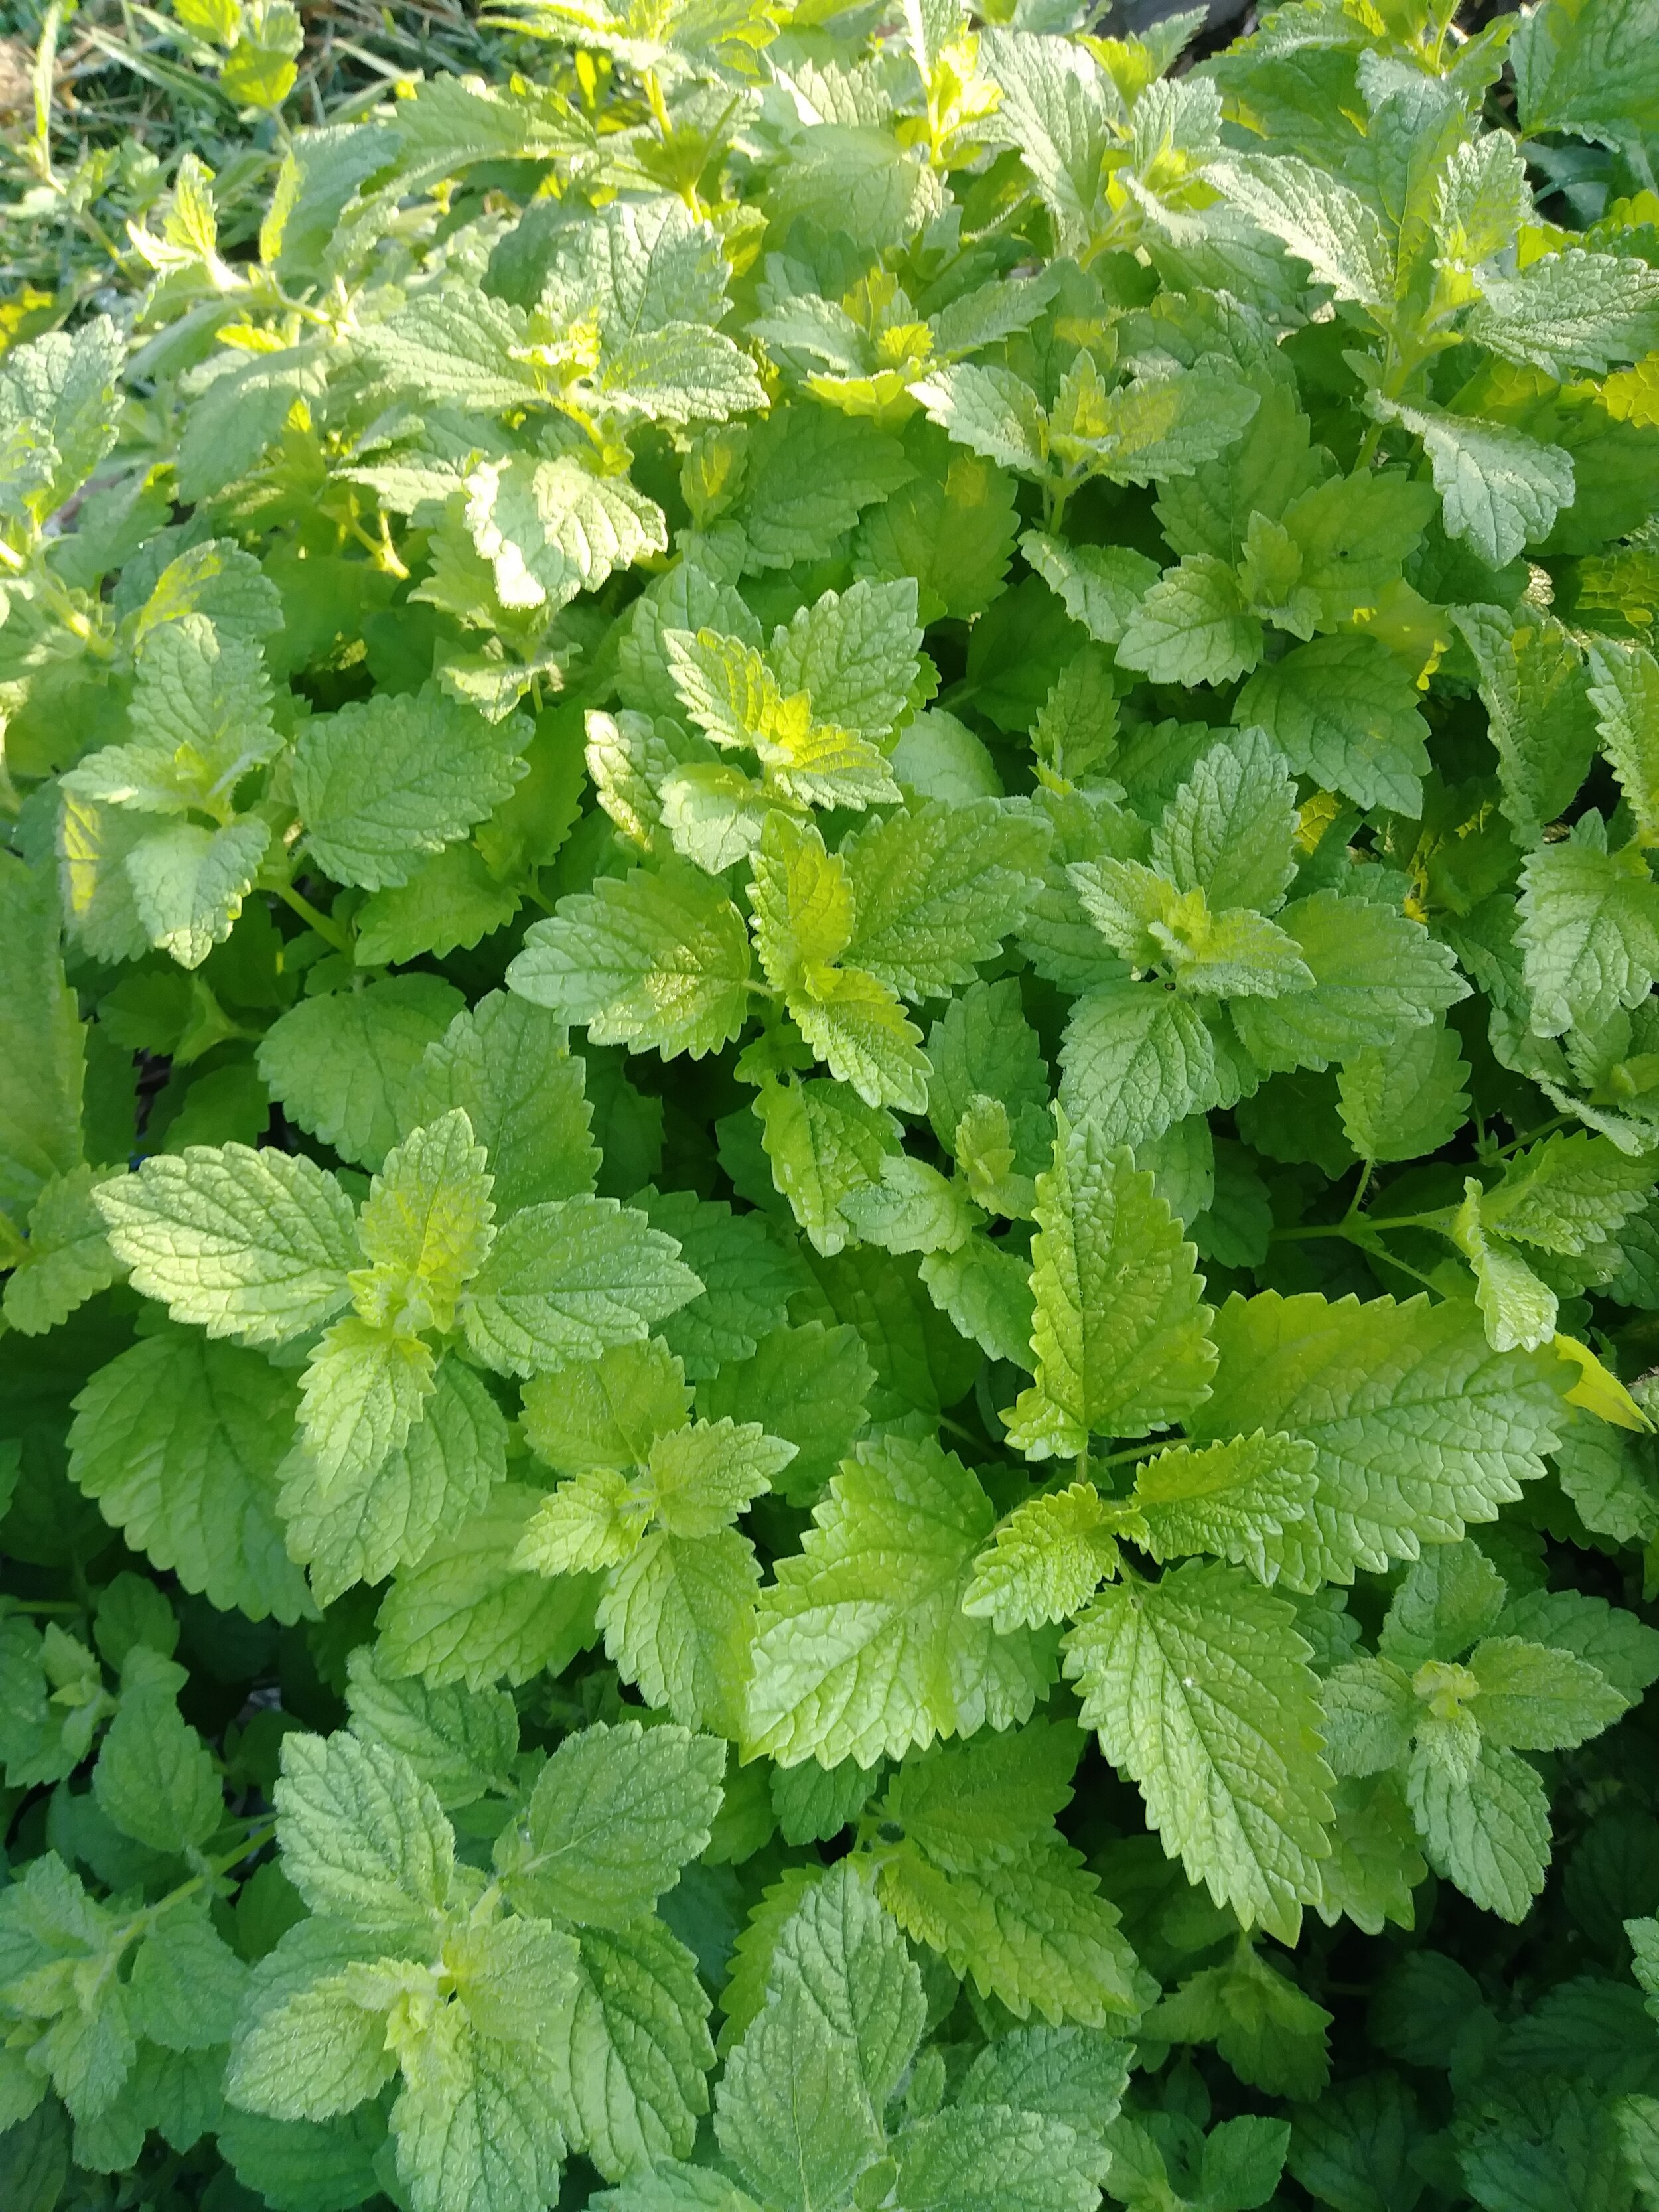
Lemon Balm (Melissa officinalis)
A member of the mint family, this stuff will spread like crazy. The good news is it smells AMAZING and you can dry the leaves to make tea. Not so bad after all! Wait until the stems are “woody” and firm before cutting, and cut only in the cool of the day.
Lemon Bee Balm (Monarda citriodora)
This is a fun looking plant that can double as a flower or foliage. The gray/green/pink color scheme looks great with almost anything. It has a tendency to wilt, so harvest in the cool of the day and wait until the stems are “woody” and firm.

Love-in-a-Puff
This dainty, delicate looking vine is so much fun. The little lantern-like seed pods are adorable, playful and festive. Inside each seed pod are 3 round seeds with hearts on them. No joke! “Love-in-a-Puff” indeed! The tiny white flowers are adored by pollinators.

Mint
Mint spreads like CRAZY, so be forewarned…. But it’s lovely in bouquets… and mojitos ;) “Apple Mint” is a great variety for cut flower use.

Mountain Mint (Pycnanthemum pilosum)
Apparently there are other types of Mountain Mint that flower farmers swear by… but I planted the wrong kind. Ha! Anyway, I’m glad I made the mistake. I adore this Mountain Mint. It smells fantastic, doesn’t spread aggressively like regular mint, and the stems form beautiful flowers later in the season. A winner in my book!
Ninebark
When I first started flower farming, I asked a florist what was her favorite foliage to work with. Without hesitation, she said “Ninebark. Plant as many as you can. They are AMAZING.” She was right. Ninebark is actually a large shrub, so you’ll have to find one at your local plant nursery. Be sure to not cut more than ⅓ of the plant each season. “Autumn Jubilee” is my favorite.

Orach (Atriplex)
This is actually a type of spinach. Instead of harvesting the greens, allow the plant to “bolt” and go to seed. The seed pods look like glitter in bouquets!

Oregano
Oregano looks unassuming until it forms it’s lovely little while flowers later in the season. They look fantastic in bouquets and add a nice herbal scent.

Penny Cress
These “weedy” looking plants form fun, playful looking seed pods that add great textural interest to bouquets. They can also be dried! This is a “once and done” plant - you get one stem per plant.

Persian Cress
The more sophisticated cousin of Penny Cress, Persian Cress looks elegant and sparkly in bouquets. They grow fast and it’s best to plant/sprinkle more seeds every week for a continued harvest.

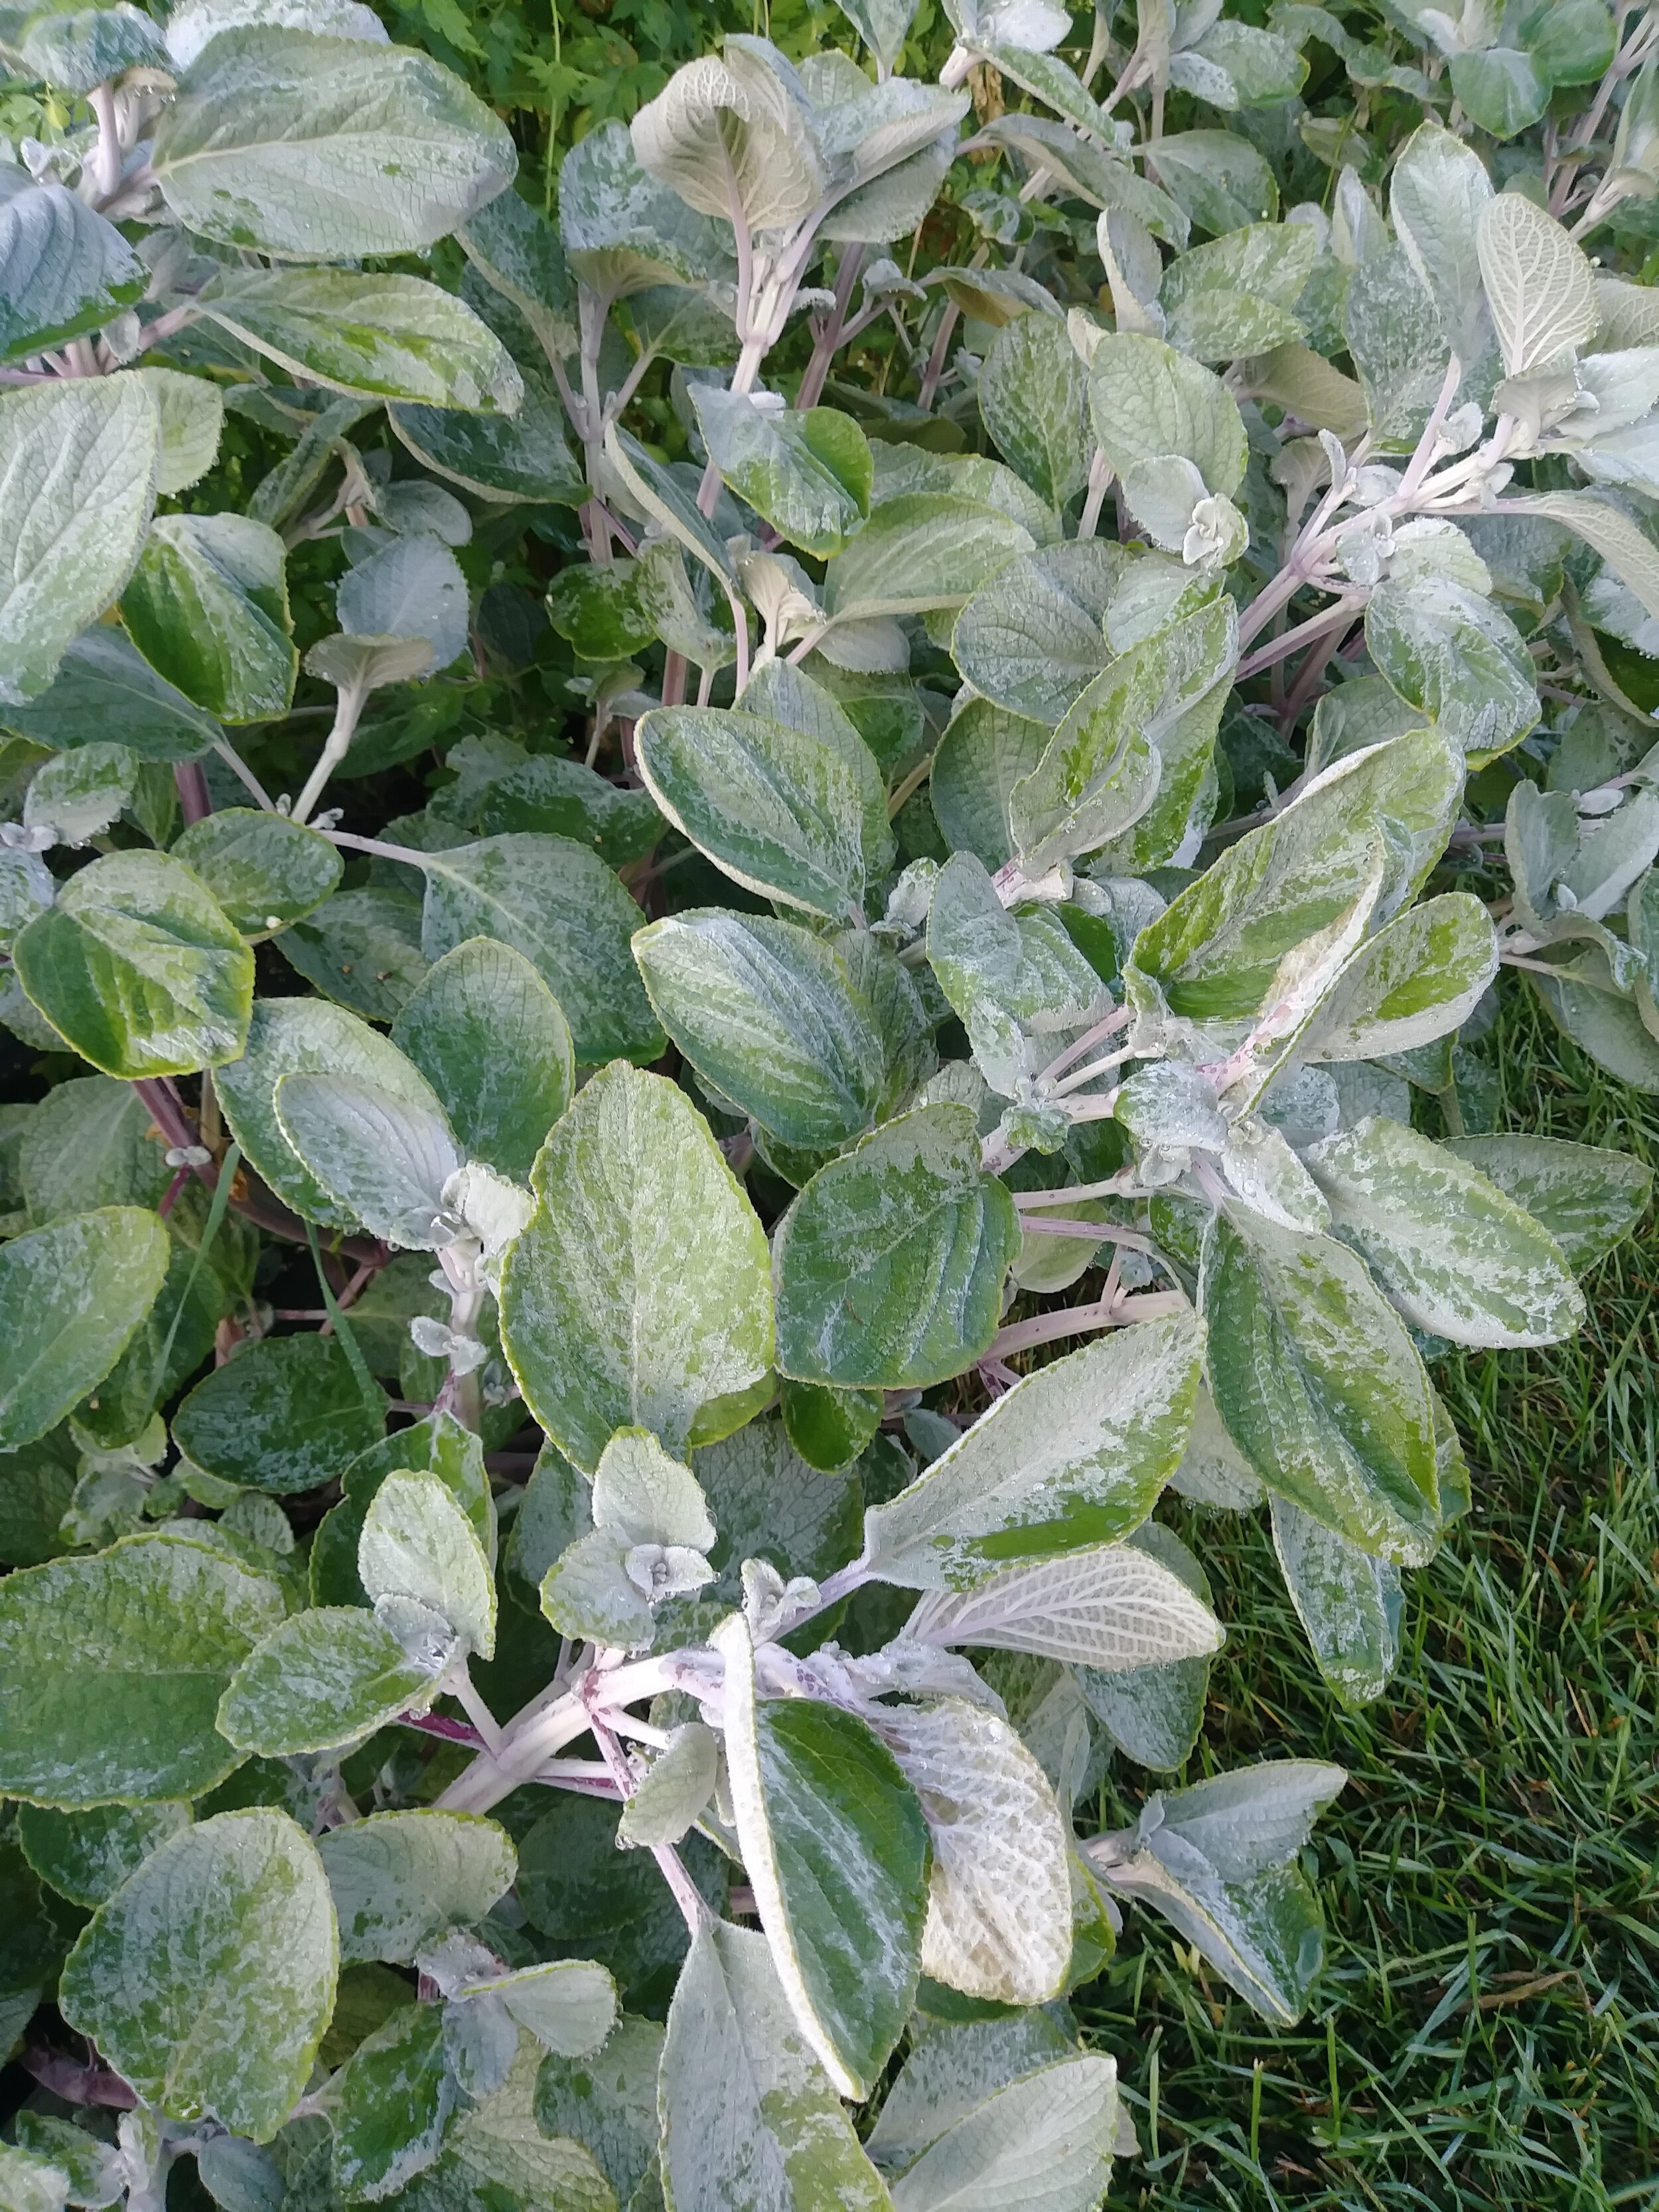
Plectranthus
I’ve grown Dusty Miller for years now, but can never seem to get it to grow tall enough to use in bouquets. I’m so glad I found “Silver Shield” Plectranthus instead! The stems easily get 18-24” long and they hold up well (over 2 weeks!) if harvested in the cool of the day and when the stems are more mature. The beautiful silver-green color is fantastic!
Sage
Regular old garden sage is a lovely plant to work with. In the spring, they send up beautiful violet blooms. If you cut the plants back after blooming, they will reward you with gorgeous silver-gray foliage. Cut in the cool of the day and when the stems are “woody”.
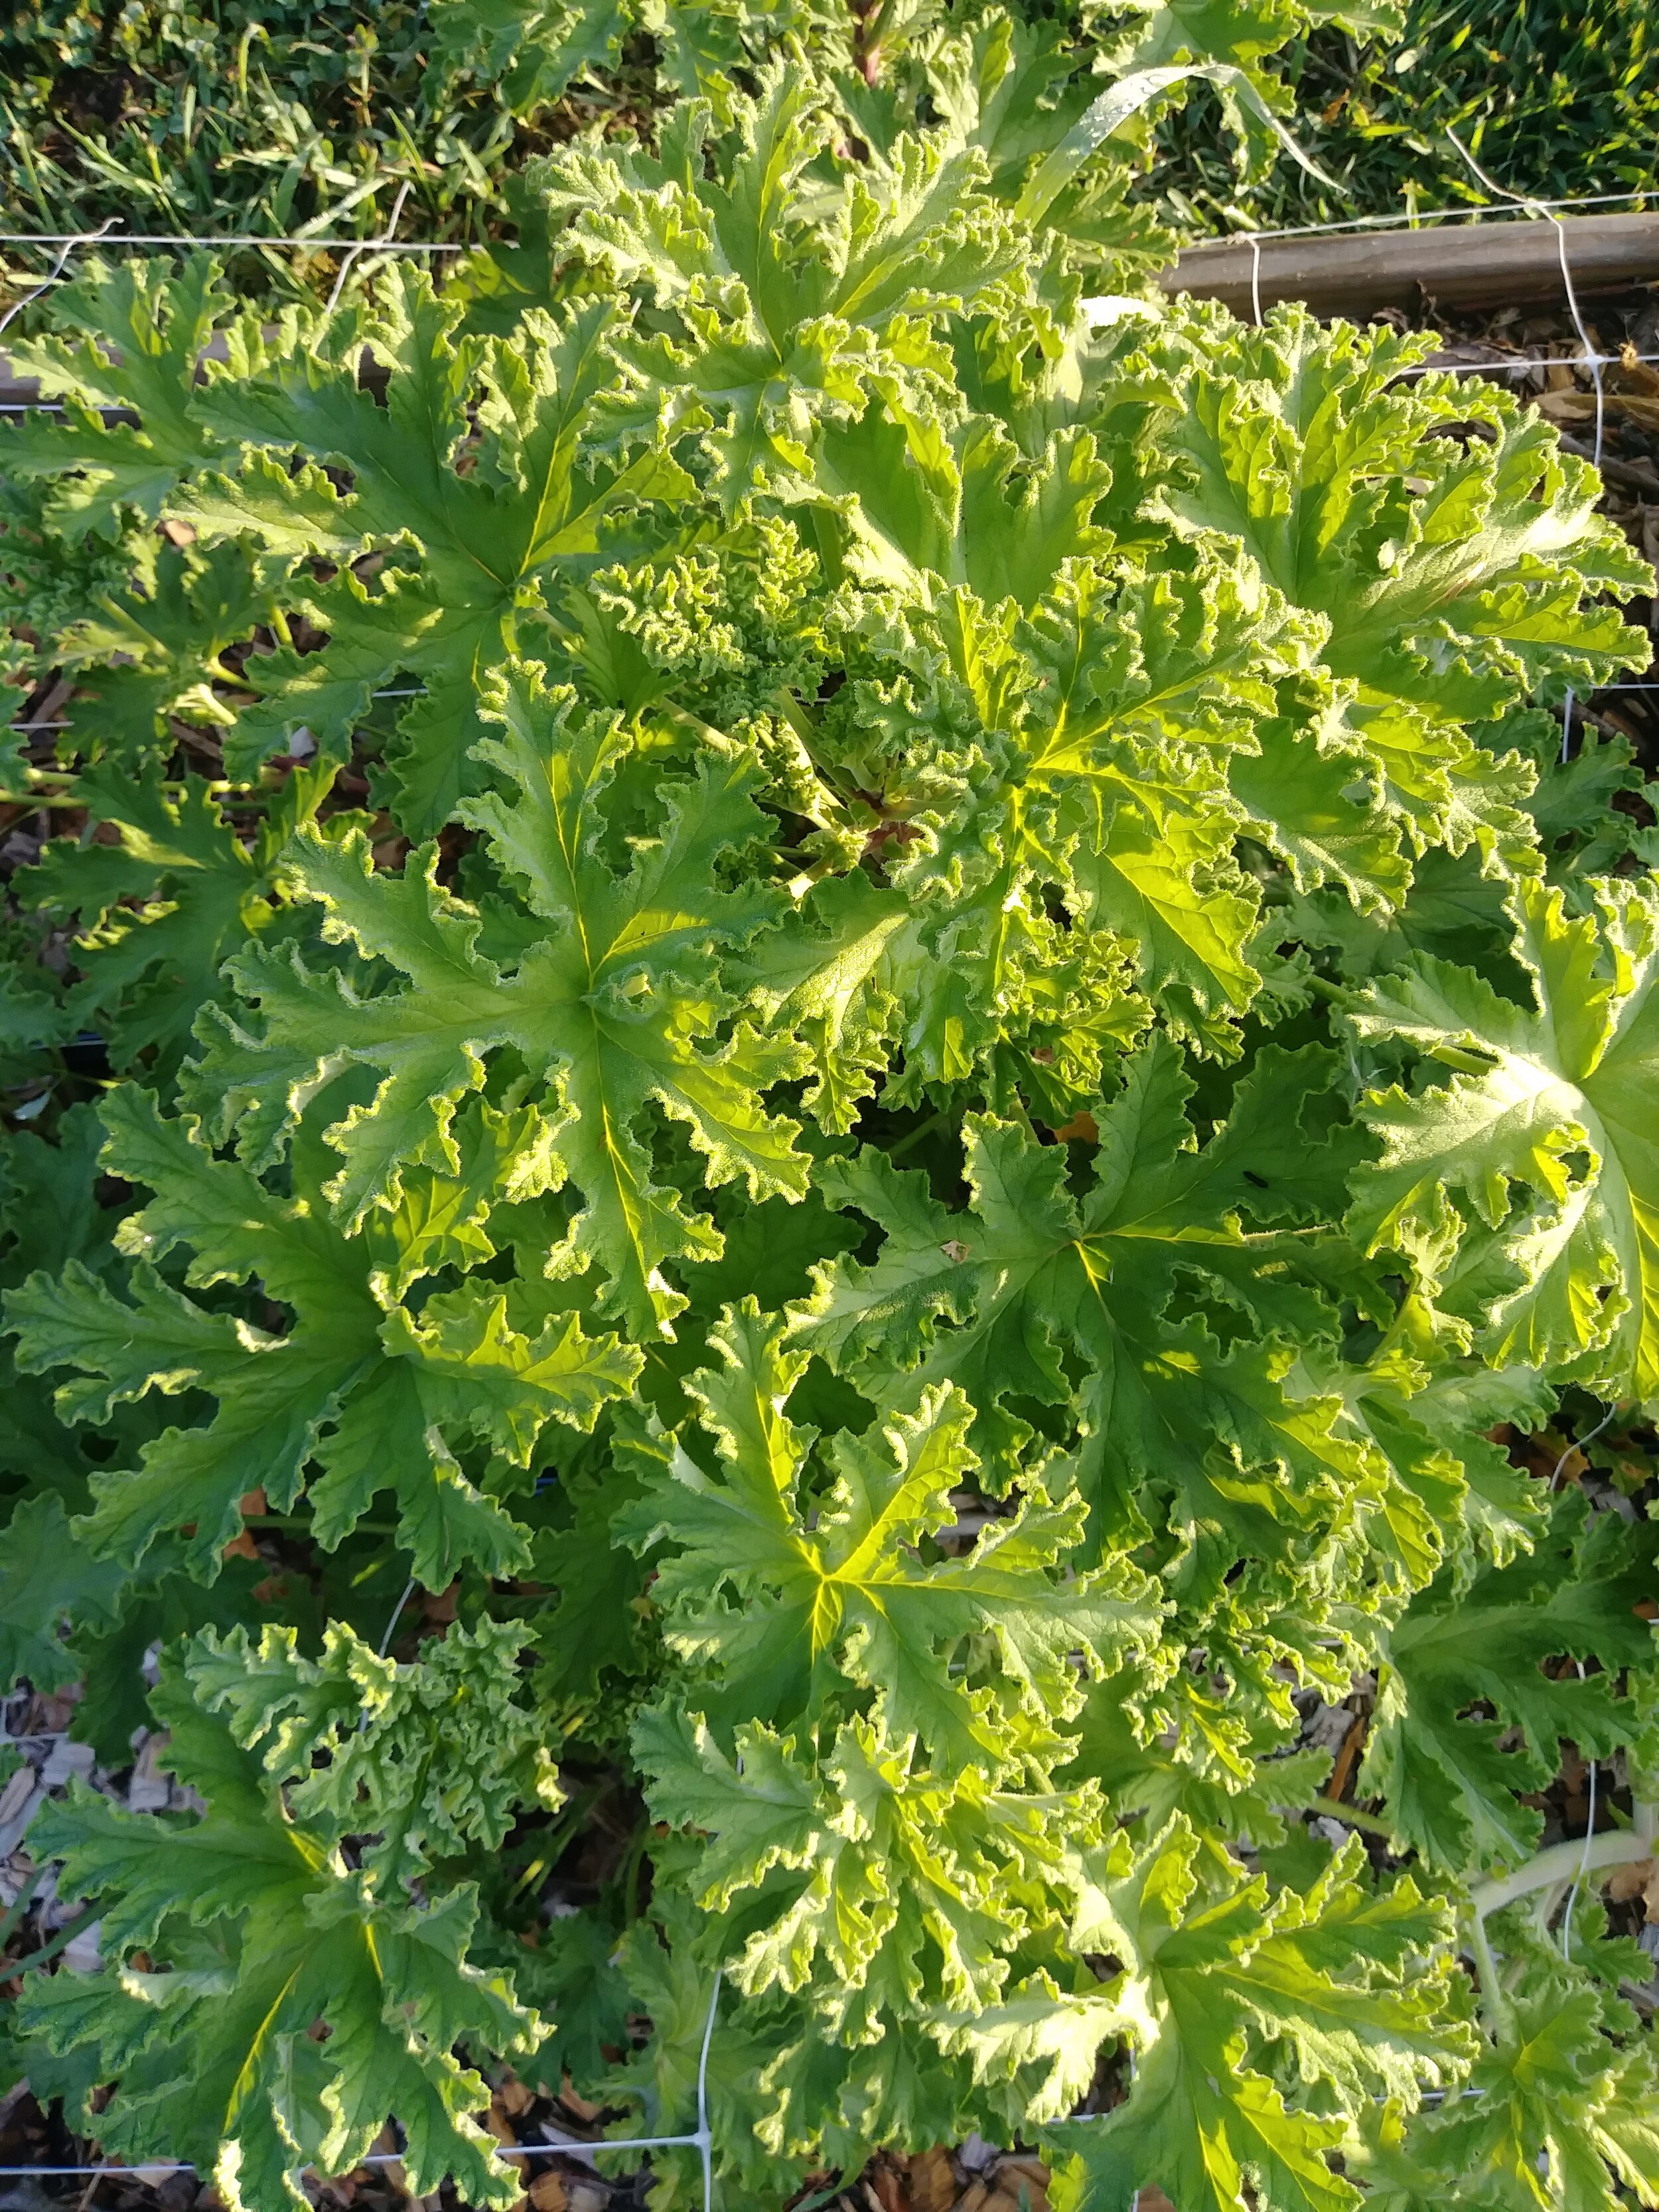
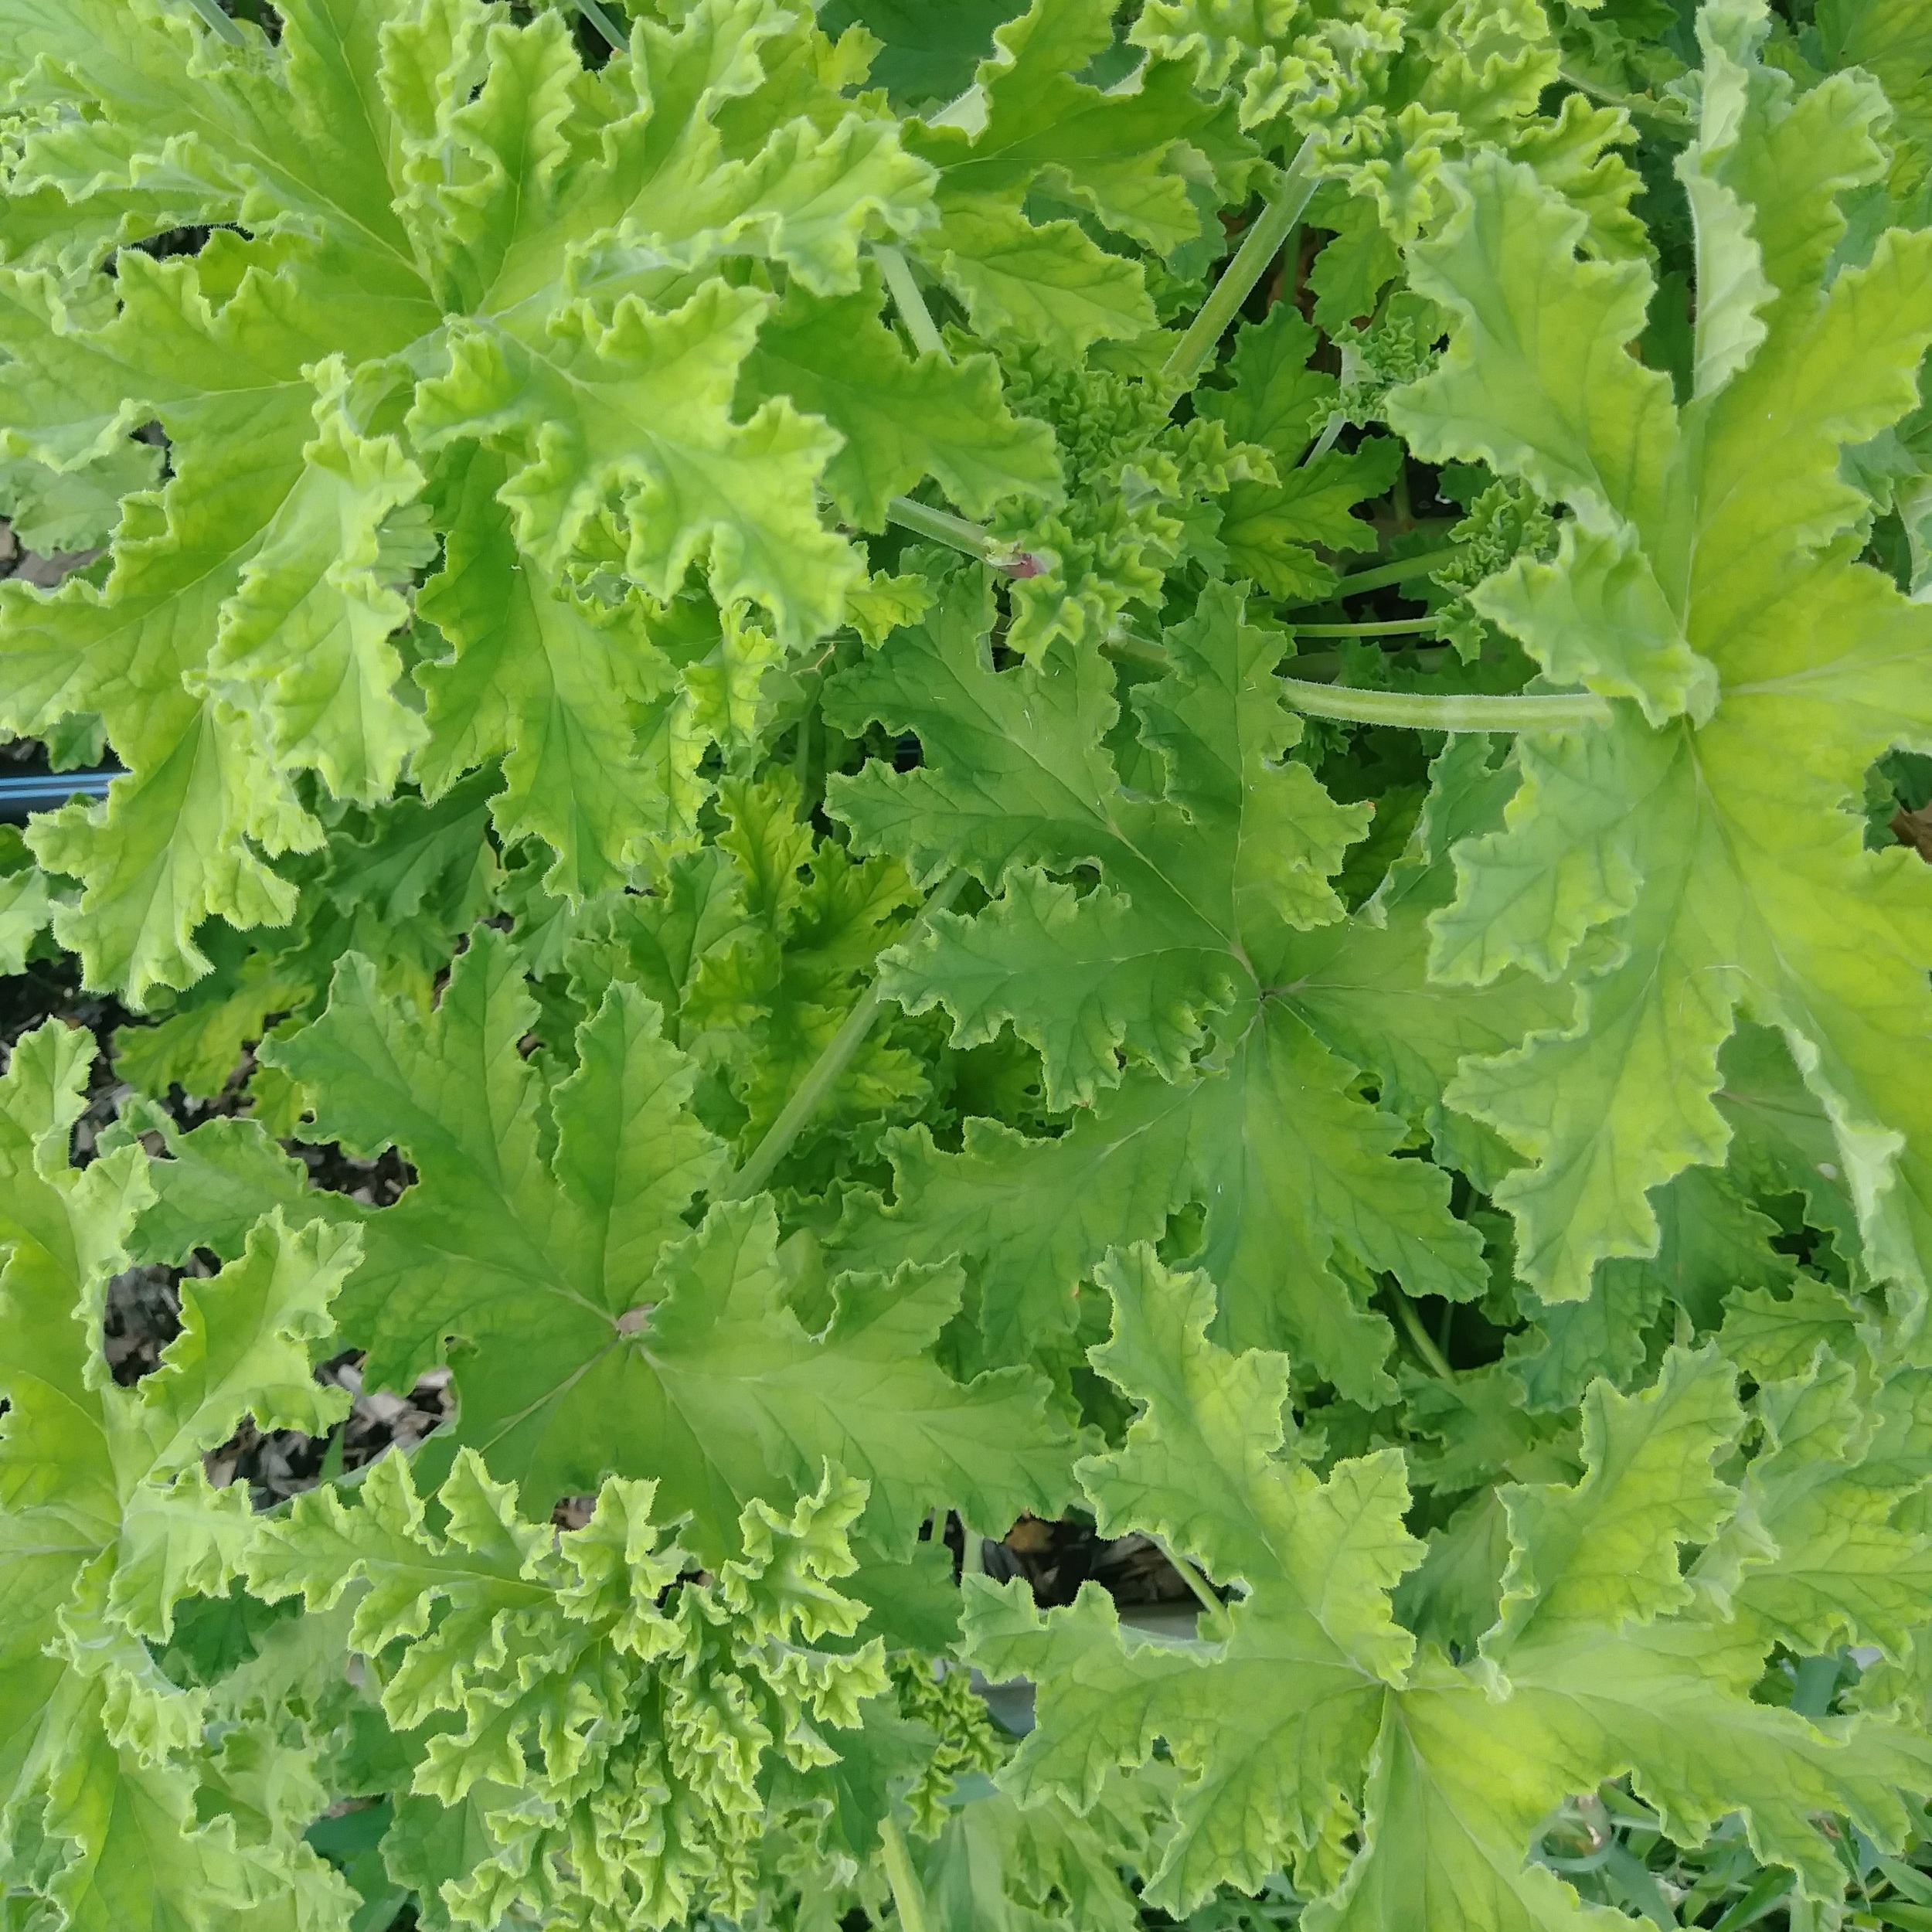
Scented Geranium
Hands down, Scented Geranium is the MVP on my farm. People are always surprised when I show it to them because it looks so unassuming…. But add just one stem to a bouquet and WOW! That’s exactly what it needed.
Most flowers have no scent and that is a real bummer. So, instead, I always try to add some scented foliage to the bouquet to delight the senses. Scented Geranium plants come in a HUGE variety of scents. My favorites are “Attar of Rose” (rose scented), “Orange Fizz” (orange scented - for real!) and “Sweet Mimosa” (earthy, floral scent).
Scented Geranium is grown via cuttings, not seed, so you’ll need to buy a plant at a nursery.
Shiso/Perilla
This culinary herb widely used in Japanese culture also looks beautiful in the vase! Allow the plants to mature and begin forming flowers/seed heads, otherwise they will wilt. Harvest in the cool of the day.

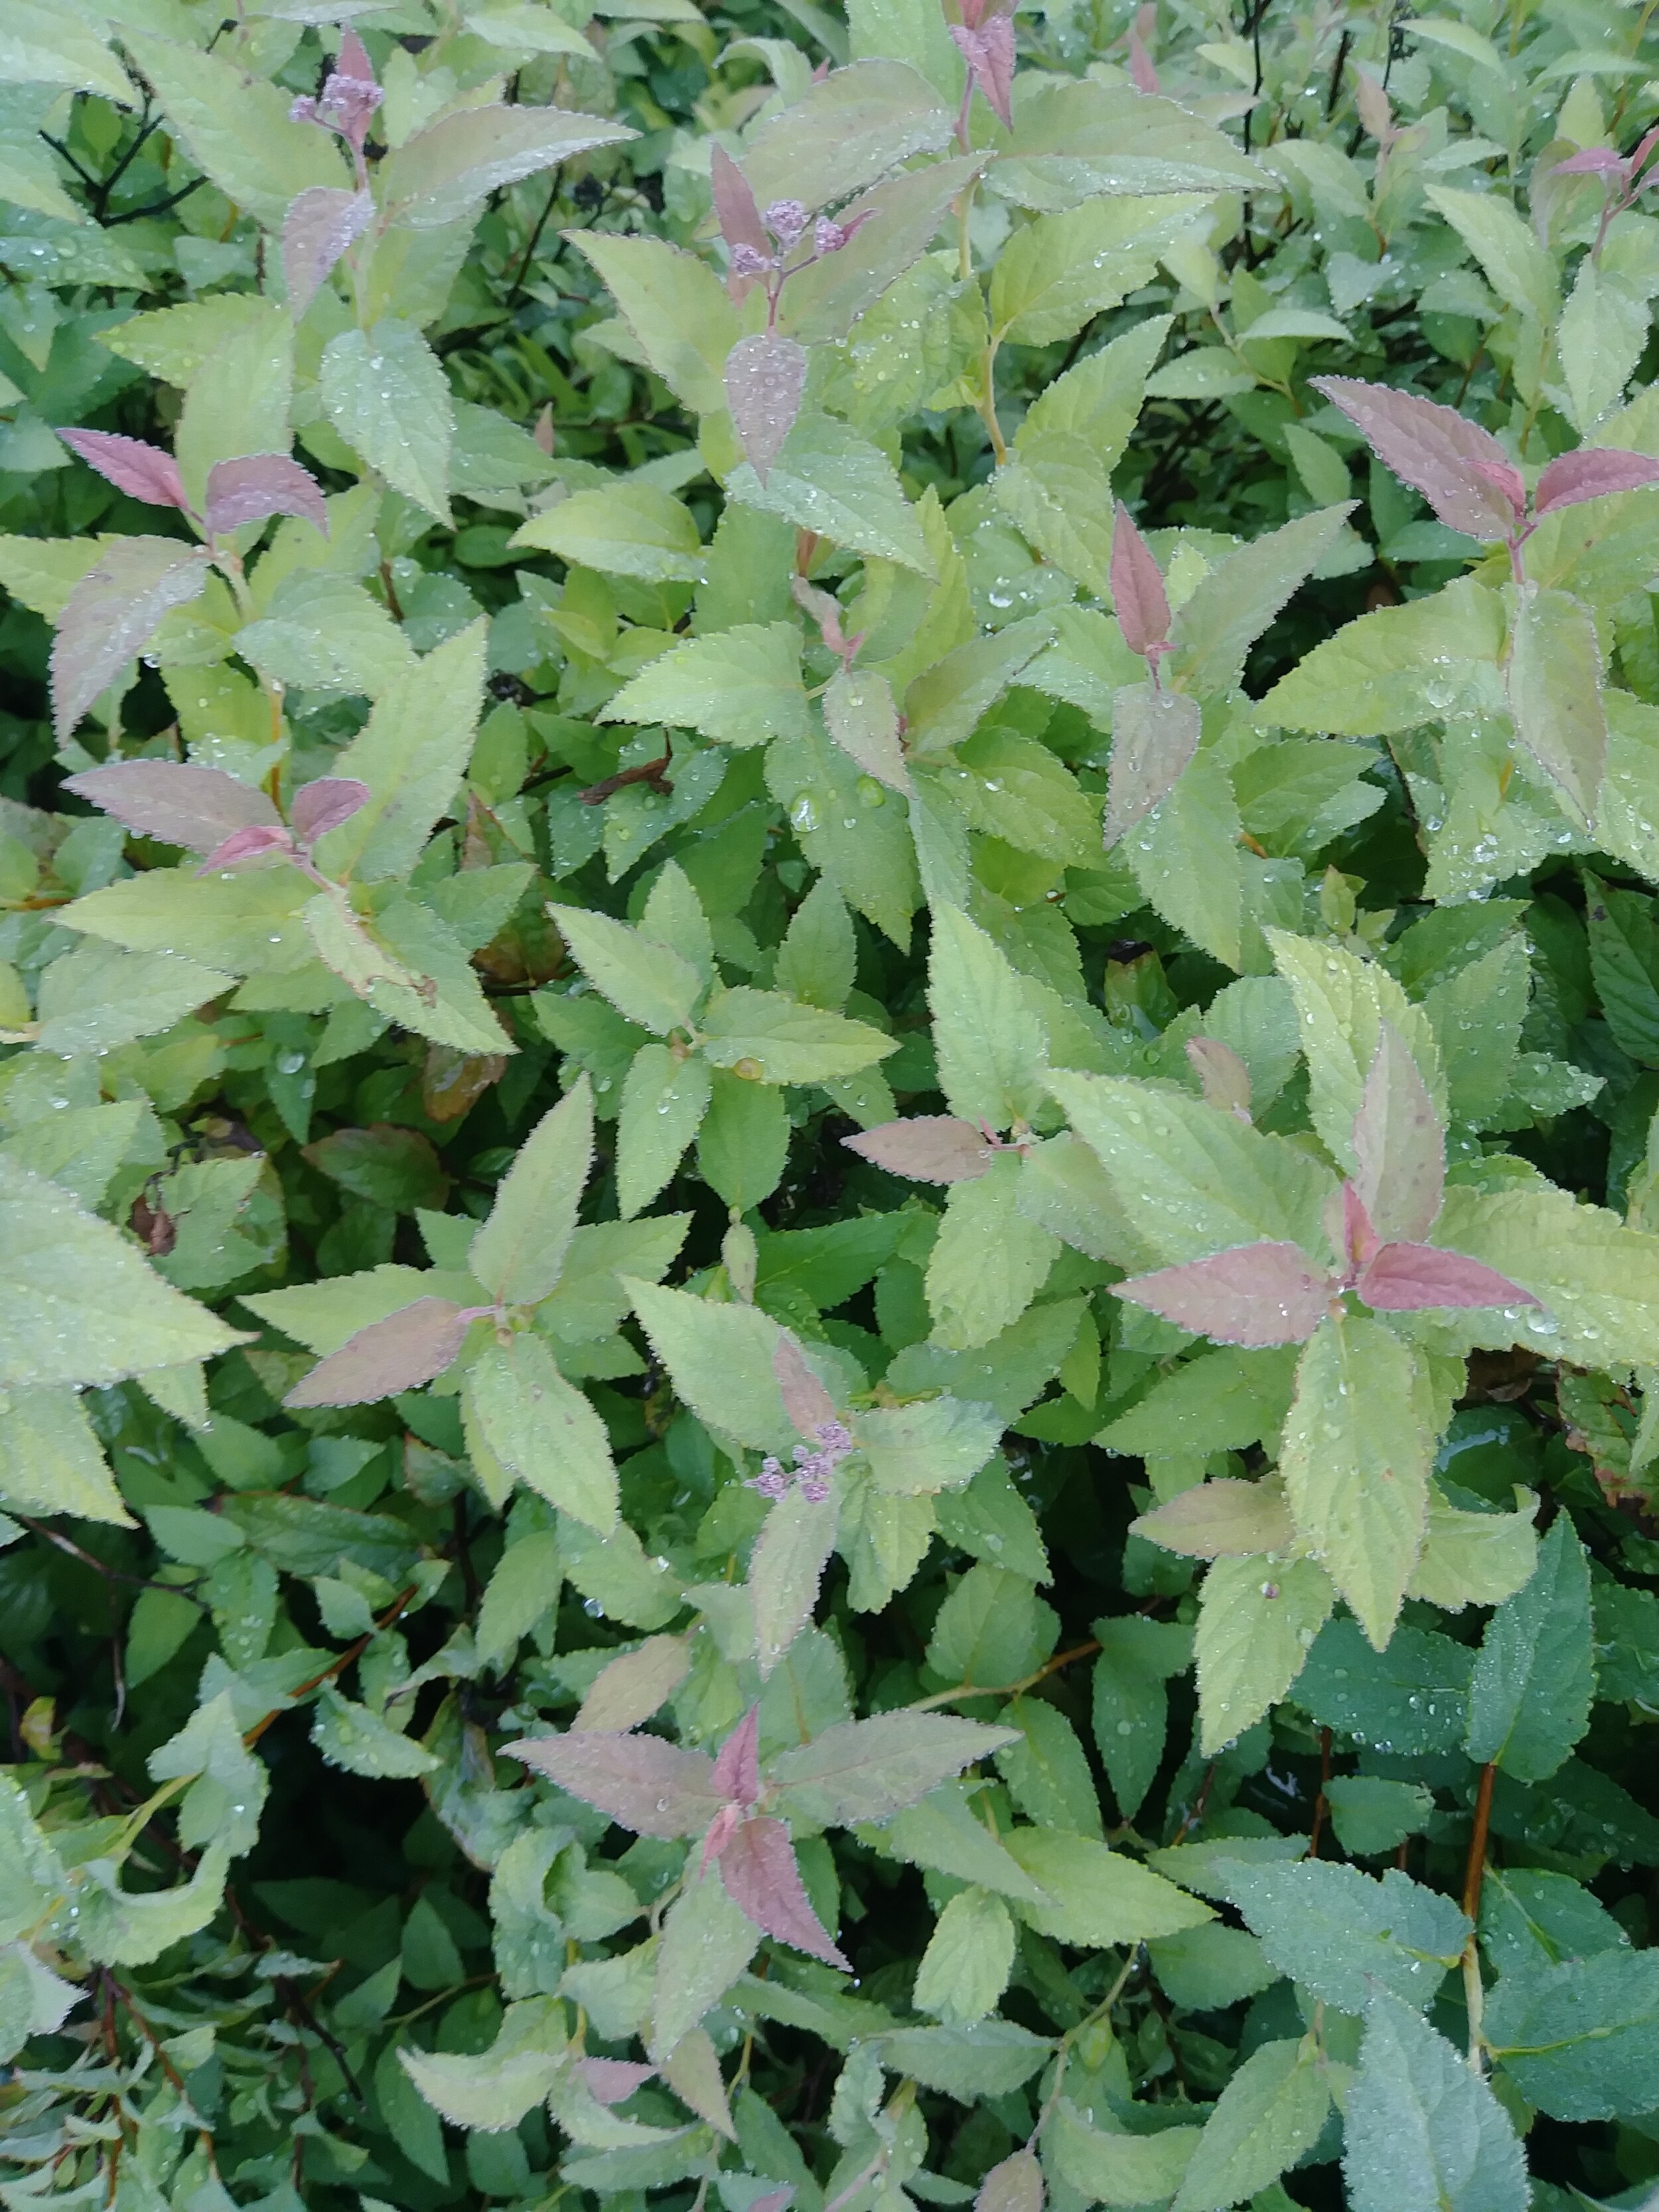
Spirea
If you have any of these shrubs in your landscaping, they are great for foliage… and even their spring blooming flowers look beautiful!
Sweet Annie (Artemisia)
This herb has a delightful sweet scent. The lacy foliage develops tiny yellow flowers later in the season. Can be dried for herbal wreaths.


My Top 10 Favorite Cut Flowers
It was hard but I did it… here are my Top 10 Favorite Cut Flowers!
My Top 10 Favorite Cut Flowers
I was recently asked “If you could only grow 10 types of cut flowers, what would you grow?”
What a fun question! I looked at her and said “Wow, that sounds like a GREAT blog post idea!” ;) So here you go!
On our farm, I grow over 60 varieties of flowers and foliage (probably lots more than that, but who has time to count?!?). It was a real challenge to narrow down my list of favorites to 10.
If you grow cut flowers for arrangements, it’s helpful to know that a bouquet is generally made up of 3 basic parts:
1. Focal: This is your big flashy flower that sets the tone/feel for the whole bouquet.
2. Filler: These are all the other types of flowers that make the majority of the bouquet. They compliment and enhance the focal flower.
3. Foliage: These are the leafy greens that fill out the bouquet and make all the colors pop. I was once told that 1/3 of a cutting garden should be foliage. I thought that was extreme, but turns out I was DEAD WRONG. Don’t forget to grow enough foliage!
*Please note that these are loose categories and some flowers can fit into multiple categories. For example, a large Zinnia would make a great Focal, while small Zinnias are perfect Fillers.
For my Top 10 List, I made sure to choose a few from each category in order to have a well balanced bouquet.
1. Dahlia (Focal)
Dahlias are the flower that started it all at Three Acre Farm. There is no other flower that captivates me quite as much as the dahlia. Yes, they can be a bit temperamental. Yes, they are a TON of work for me to dig up every fall, store all winter and replant each spring.
But when I see their gorgeous blooms, I don’t care about all the work.
Dahlias are not the longest lasting flowers, averaging 3-5 days… but those 3-5 days are GLORIOUS.
Favorite Varieties: ”Jowey Winnie”, “Lovely Lana”, “Rosemary Webb”, “Prince Noir”, “Nicholas”, “ Alpen Diamond”, “Ferncliff Copper”, “Linda’s Baby”, “Woodland’s Wildthing”, “Bracken Sara”, “Bracken Rose”

2. Sunflower (Focal)
There is nothing quite as bright and cheery as a sunflower! They are easy to grow and come in a variety of shapes, sizes and colors.
Sunflowers fall into 2 categories: Single Stem or Branching. Single Stems produce one flowers per plant and can be planted close together (about 6” apart). Branching sunflowers produce multiple stems and should be planted about 18” apart.
Favorite Single Stem: “ProCut Gold Lite”, “Sunrich Summer Provence”
Favorite Branching: “Starburst Panache”, “Starburst Lemon Aura”, “Cherry Rose”, “Autumn Beauty”

3. Zinnia (Focal or Filler)
Ok, I must be honest. Zinnias are NOT actually one of my favorite flowers, so I almost didn’t add them. Not sure why… I think I’m just ruined by the dahlias and the zinnias simply can’t compete. Ha!
However, they are so versatile and easy to grow, it seems like a shame to leave them off the list. I’m well aware that most people simply adore Zinnias!
Large Zinnias are an excellent Focal flower (like “Uproar Rose” or “Benary’s Giant”), while smaller ones are perfect as Filler (like the “Oklahoma” series, “Jazzy Mix” and “Sunbow Mix”)
Favorite Varieties: “Uproar Rose”, “Queen Series”, “Oklahoma Salmon”, “Oklahoma Carmine Rose”, “Benary’s Giant Series”

4. Snapdragon (Filler)
These flowers are so underappreciated! I always wonder if it’s because they are “spike” shaped instead of round/disk, like so many other flowers. The spike shape add visual interest and height to bouquets.
Here in my garden, they bring me endless delight and I adore them. They make every bouquet pop and their sweet scent is lovely.
Favorite Variety: Any of the “Madame Butterfly” series, but especially “Bronze with White”, “Rocket Bronze”, “Rocket Rose Shades”

5. Ammi/Queen Anne’s Lace/Dara (Filler)
While it’s totally fine to use the wild Queen Anne’s Lace that grows as a ditch weed around here (a gorgeous ditch weed, I must add! And did you know it’s actually a wild carrot?!?), there are similar types of flowers that have been grown specifically for cut flower use.
Ammi makes every bouquet look lush, full and romantic. I feel lost without it!
Dara or Daucus (or Chocolate Lace Flower) is unique version of Queen Anne’s Lace that comes in shades of wine, deep pink, pale pink and white. It’s stunning!
Favorite Varieties: Ammi “Select White”, Ammi “Green Mist”, Daucus “Dara”

6.Cosmos (Filler)
Dreamy. Swoon worthy. Magical.
Cosmos are all of those and more… and they are easy to grow and produce like crazy. I’m in love. Grow some. You'll be in love too.
Flowers last longer if they are harvested before the bees pollinate them, so harvest them just as the buds are about to open up.
Favorite Varieties: “Double Click” Series (all the colors are beautiful!), “Versailles”, “Tip Top Picotee”, “Afternoon White”

7. Feverfew (Filler)
These cheery little button flowers are one of the best Fillers out there. Bouquet looking a little drab? Add a stem of Feverfew. Boom. Instant fabulousness (is that a word?).
In some climates, Feverfew will act like a perennial and come back each year. Whoo hoo!
Favorite Varieties: “Magic Single”, “Magic Yellow”

8. Statice (Filler)
“The 90’s called and they want their Statice back.” ;)
Ok, bear with me. Statice reminds me of those stuffy dried flower arrangements you used to see in the late 80’s/early 90’s. When I first grew it, I thought it was horribly out of style and worthless.
And then I found a pack of “Apricot” Statice seeds… and I fell in love. It fills out a bouquet so nicely… and bonus! It’s an “Everlasting” flowers (read more about them HERE), which means it pretty much lasts forever if you dry it.
A few stems of Statice in each bouquet and you’re on the right track! It has a nice structure that supports other flowers and allows them to shine.
Favorite Varieties: “QIS Apricot”, “Seeker Rose Shades”, “Seeker White”,

9. Buplureum (Foliage)
I’ve been growing this flower/foliage for years now and still don’t know exactly how to say it. Ha!
Boo-plur-um? Bup-ler-um? Who knows… I wish someone would come up with a better name…
Anyway… this plant is incredibly unique and makes a FANTASTIC filler. When I’m making bouquets, I always reach for this first, as it creates a great structure/base to weave all the other flowers into.
I love the bright lime green leaves and cheery little yellow flowers but the plants even look beautiful as they start to fade and turn brown. Buplureum is self-seeding, meaning it will drop it’s seeds and keep coming back each year if you allow it (leaving the soil untilled).

10. Scented Geranium
Last, but certainly NOT least… Scented Geranium is probably the most useful plant I grow on the farm. When it’s in season, pretty much every bouquet I make has Scented Geranium in it. ;)
Most cut flowers have no scent, which is a real bummer. We all want our fresh flowers to smell beautiful and floral… and Scented Geranium is how we achieve this on our farm It’s intoxicating scent is perfect!
There are many different varieties of Scented Geranium, including the most well known variety called “Citronella” (which I probably would NOT recommend using, unless you like bouquets that smell like bug spray!).
The thick leaves transform a bouquet from ho-hum to stunning. Scented Geranium is my “Go-To” foliage.
Scented Geranium is not grown from seed. Instead, it’s divided/propagated by making cuttings. The best way to get your hands on Scented Geranium is to purchase a plant at a garden center.
The stems will wilt if cut in the heat of the day, so be sure to harvest very early in the morning, or late in the day.
Favorite Varieties: “Attar of Rose”, “Sweet Mimosa”, “Orange Fizz”, “Apricot”
Not convinced? Here’s what it looks like in bouquets…


There you have it! My Top 10 Cut Flowers… although I’m sure this list will change over time!
Now I’d like to know… what are YOUR top 10 favorite cut flowers??? Or maybe just your top 5. ;)
Can’t wait to hear them!
Ready for more?
If you’re serious about growing the garden of your dreams this year, register for my online course, “Backyard Cutting Garden 101”. You’ll find everything you need to plan, grow, harvest and arrange your stunning blooms. I can’t WAIT to help you grow! Click on the button below for all the details.