

How to Grow: Sunflowers
Everybody loves Sunflowers!
How to Grow: Sunflowers
Sunflowers. Does anything shout “Summer!!!!” more than bright, sunny sunflowers?!?
They are eternally cheerful and loved by many…. Including our animal friends. Birds and bees adore sunflowers as a source of pollen and seeds. Be sure to plant a few extra just for them!
Years ago, I planted several different types of sunflowers in my vegetable garden to attract pollinators. The next spring, I noticed sunflowers sprouting all over the garden. How about that! The birds had sowed the seeds for me! I let them grow and watched all the beautiful flowers grow, and feed the birds… and this cycle continues today.

I grow lots of sunflowers to harvest for cut flower use, but I always leave all the ones in my vegetable garden for the birds and the bees ;)
Let’s look at the Pros and Cons of growing Sunflowers for cut flower use.
PROS
They come in a multitude of colors and sizes, from 2 foot tall dwarf varieties to 12 foot tall Mammoth varieties.
They are easy to grow, perhaps the easiest of all flowers.
They provide pollen for pollinators (honeybees, bumblebees, butterflies, etc.)... unless you purchase “pollenless” varieties.
They are bright and cheerful in bouquets.
They have a good vase life of 5 -7 days, with proper harvest and care.
CONS
They are a “once and done” type plant, meaning once they bloom, they are finished and will not bloom again.
They tend to muck up the vase water quickly.
They transition from “not quite ready” to harvest to “too late!” very quickly… sometimes in just hours.
They don’t last long in the vase if you allow the flowers to be pollinated.

CHOOSING SEEDS
There are so many different Sunflowers to choose from. It can feel very overwhelming, so let’s break it down a bit.
It’s important to know:
1. Not all Sunflower varieties make good cut flowers. When you see photos of HUGE sunflower fields, those are usually sunflowers grown for bird seed or sunflower oil. These do not make good cut flowers.
You want to look for “Ornamental” sunflowers. This is the kind you will find in most gardening seed catalogs. Some types are better than others for cut flower use.
2. Ornamental Sunflowers can be divided into 2 main categories:
Single Stem: This type produces one flower on one stem.
Once the bloom as been harvested, it will not send up another bloom.
Some are available as “pollenless”. This is helpful for people with allergies.
They grow extremely fast, some varieties going from seed to bloom in 55 days!
Because they are a “once and done” type flower, you will need to plant new seeds every 10-14 days May - August if you want blooms all summer into fall.
Branching: This type will send out multiple blooms. The blooms will mature over a few weeks, extending the bloom time of the plant.
Most Sunflowers grown for garden or decorative use are Branching varieties.
The stems are often too short to make a good cut flower (unless you “pinch” the plants very early in their growth… I’ll show you how to do it under the “Growing On” section)
Even though they produce multiple blooms, you will still need to plant new seeds about every 2-3 weeks May-August if you want blooms all summer.
Here are a few of my favorite Sunflowers to grow for cut flower use:
“ProCut Orange” (single stem)
“ProCut Plum” (single stem)
“ProCut Brilliance” (single stem)
“Vincent’s Choice” (single stem)
“Cherry Rose” (branching)
“Autumn Beauty” (branching)
“Soraya” (branching)
“Starburst Panache” (branching)
“Starburst Lemon Aura” (branching)
“Strawberry Blonde” (branching)

“Ruby Eclipse” Sunflower
HOW TO SOW
Sunflowers are heat-loving, summer-blooming flowers.
Here in Michigan, our last spring frost is about May 15, so we wait until that date to sow our first round of seeds. Depending on the variety and the soil temperature, we can expect to see blooms in 50-90 days - from late June to mid-July.
Transplants or Direct Sow?
Sunflowers are very forgiving and can be transplanted or direct sown.
If you have problems with birds, squirrels or chipmunks, you may want to start the seeds indoors as transplants to prevent the seeds from being gobbled up! Don’t worry - the seeds grow FAST and will be ready to transplant out in less than 2 weeks. Do not leave them in the seed trays for much longer than that.
You can also direct sow the seeds. It really couldn’t be easier. Poke a hole with your finger, drop in 2 seeds (in case one doesn’t germinate), cover the hole and you’re done. Thin to one plant per hole if they both germinate.
PLANT SPACING
For Single Stem Sunflowers: Plants should be spaced 4-9” apart. I usually do 6” spacing. The closer the plants are spaced, the smaller the blooms will be, which is more desirable for bouquets. Plants spaced farther apart will produce larger blooms.
For Branching Sunflowers: Plants should be placed 12”-24” apart. I usually do 18” spacing.
GROWING ON
Sunflowers are quite tolerant of most soil types and will thrive without much fuss.
For Branching Sunflowers ONLY: Branching sunflowers are capable of producing multiple long-stemmed blooms per plant IF THEY ARE PINCHED.
Plants that are not pinched usually produce many blooms, but the stems are so short and thick, it renders them unusable for cut flower use.
In contrast, pinched plants can produce 6-10 long-stemmed blooms that are perfect for cut flower use. 10 blooms from 1 seed! That is an incredible ROI (Return on Investment)!

Pinching MUST take place early in their growth, when the plants are about 8”-12” tall (less than knee high). Pinching alters the growth habit of the plant, causing all the stems to originate from one point on the plant.
To pinch, simply locate the central bud on the plant (it will be tiny, less than the size of a pea) and dig it out with your thumbnail. That’s it!
DO NOT PINCH SINGLE STEM SUNFLOWERS.

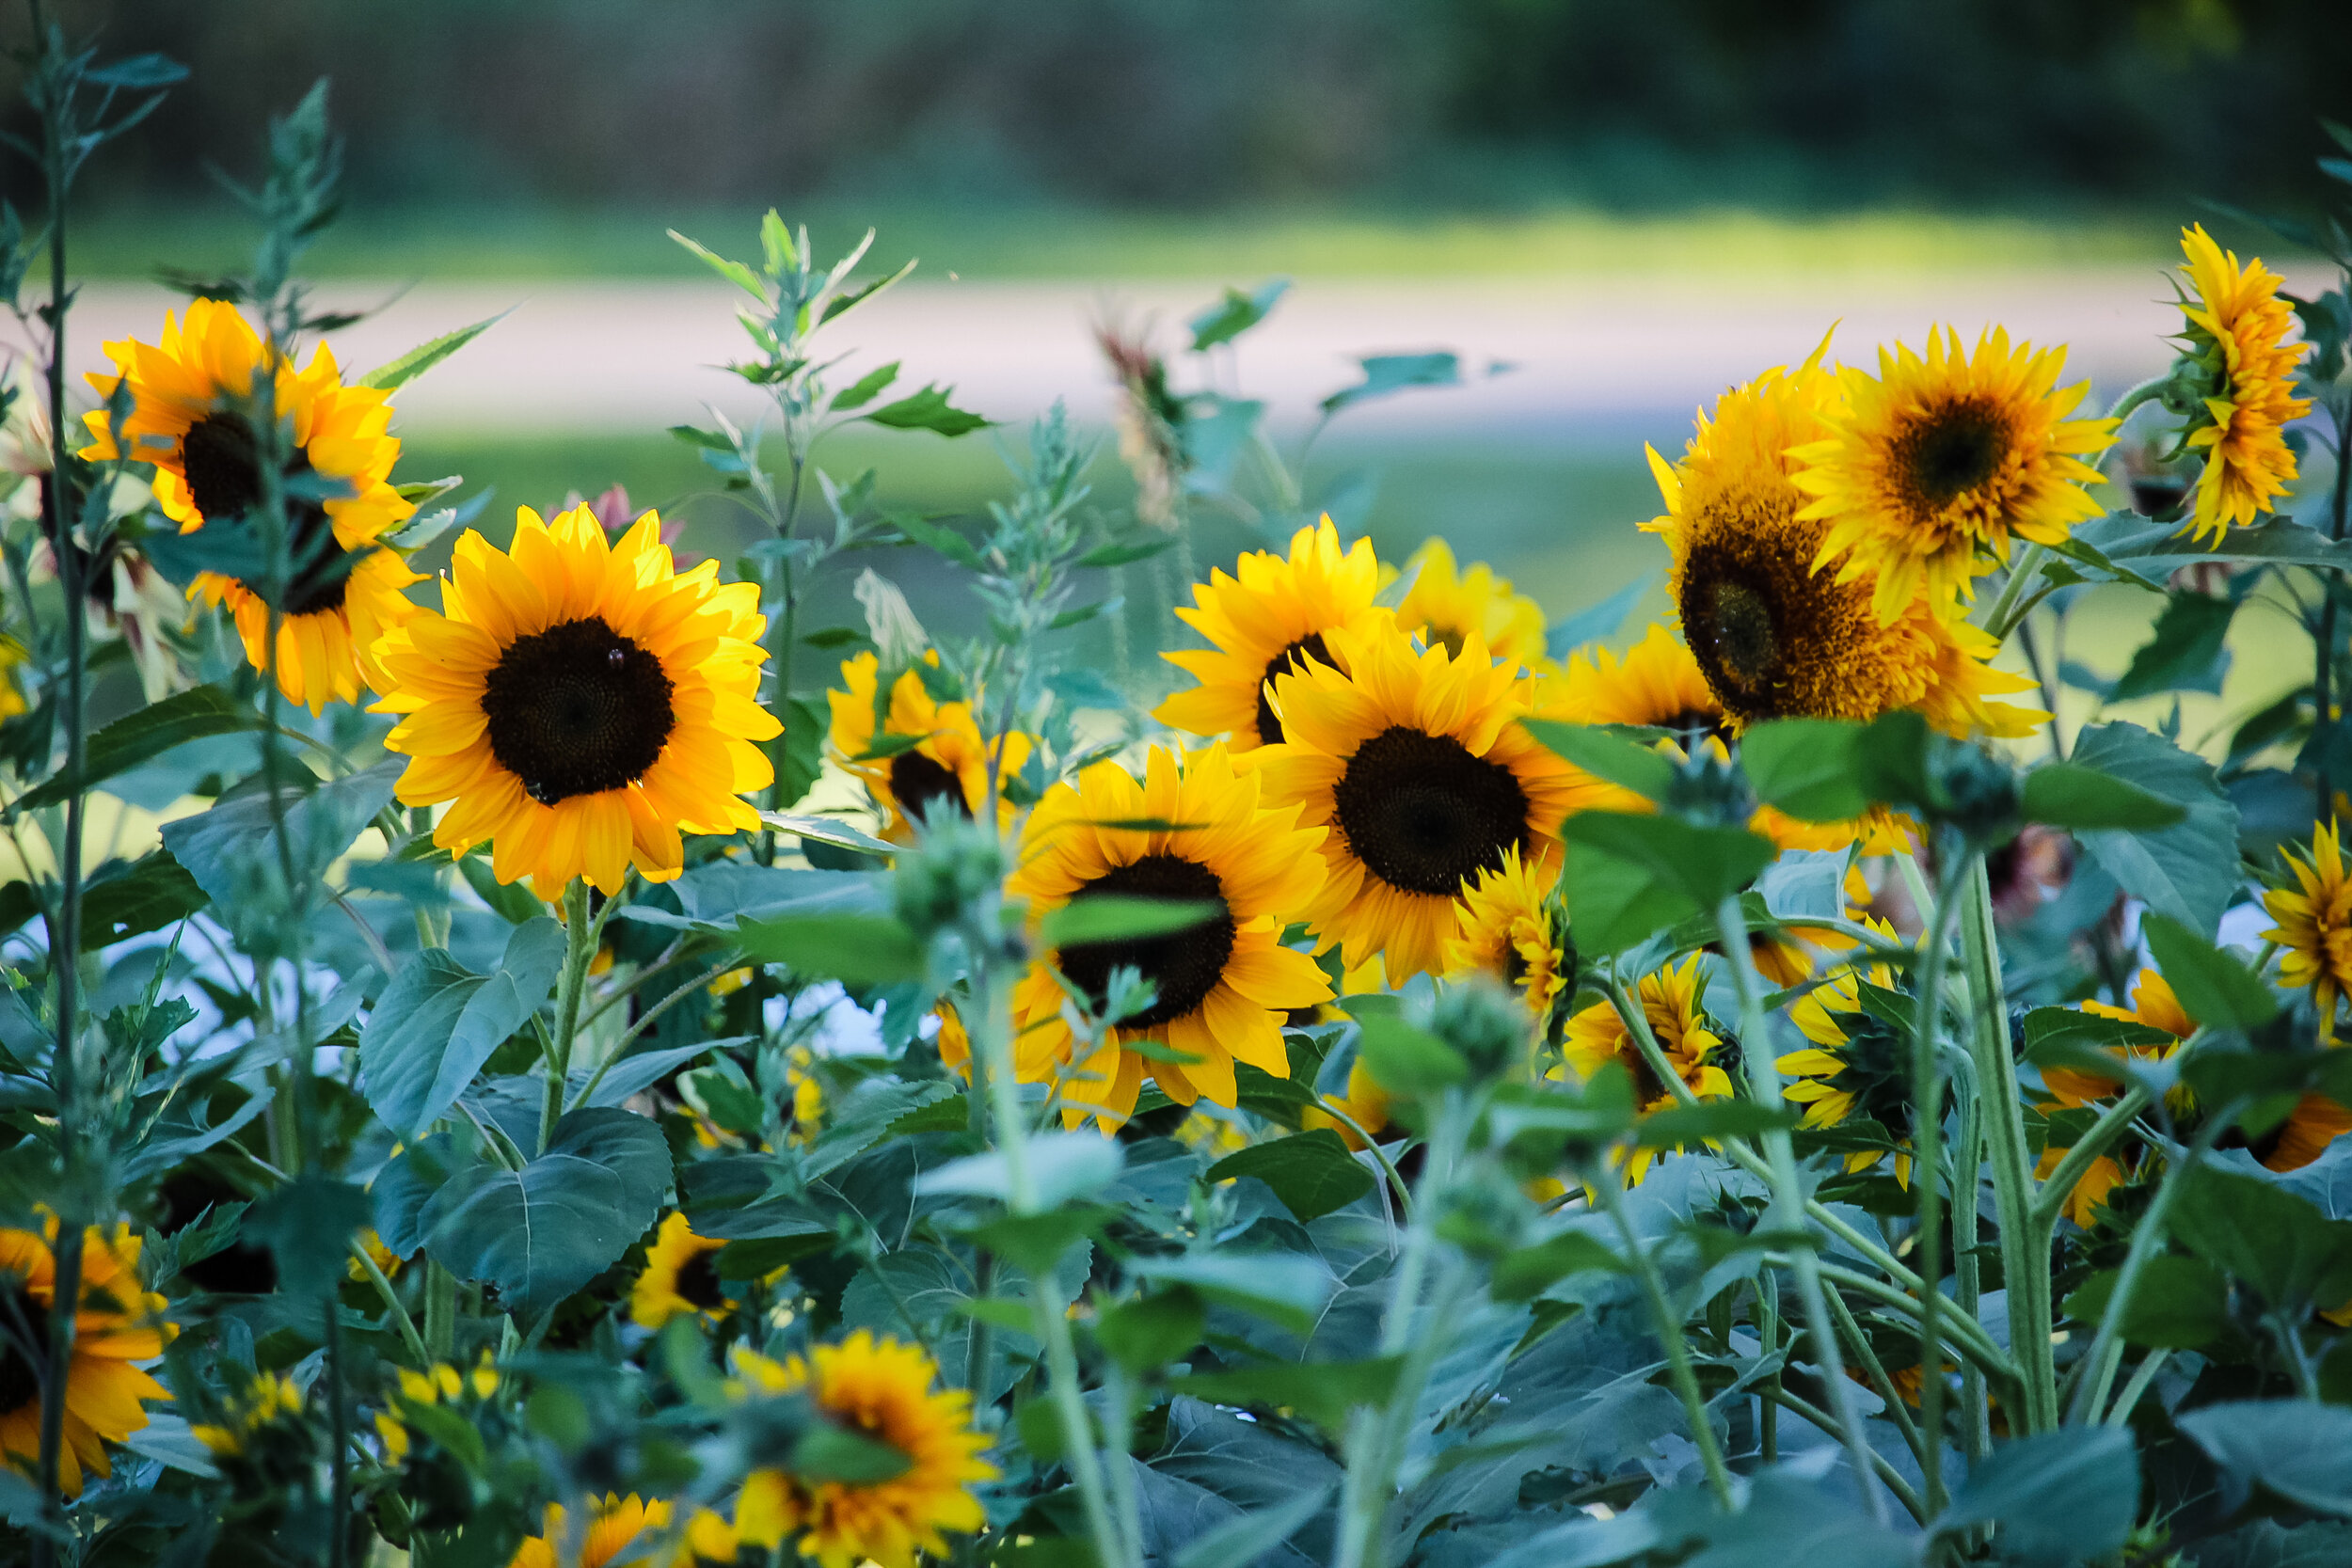
STAGE OF HARVEST
We’ve all oooh and aaahed over those gorgeous photos of sunflower fields…. But did you know sunflowers grown for cut flower use actually need to be harvested BEFORE they open?
Yup. That’s right. BEFORE they open up, BEFORE you can see their pretty faces.
If you miss harvesting them at the ideal stage, you can still harvest as long as the petals are pointing forward, not back (knowing they won’t last as long in the vase as blooms cut at the ideal stage). Once they are pointing back, you might as well leave them for the bees and the birds.
As you can see in the photo below, these Sunflower blooms all blew open faster than we could harvest! We got a day of rain… and then they all opened up in the span of a few hours. While some were too far gone to harvest (and now worthless to me), they sure looked nice in the field!

Pictured below is a bloom that I would consider too far gone to harvest (especially because it has insect damage). I left this one for the birds!

The one pictured below is at the ideal stage of harvest. For the longest vase life, you want to harvest the stem when you notice a few petals starting to lift off the face.

Cut the stems about 24” deep and strip off nearly all the foliage (you can allow a few leaves to remain at the top, if desired).
When Sunflowers are cut at this stage, you will get a much longer vase life. The flower will open fully over the next day or 2.
POST HARVEST CARE
If you are displaying the Sunflowers immediately, no special treatment is needed, besides allowing them to rest in a cool, dark area for a few hours.
However, if you want to store them for later (because they all tend to be ready at once!), you can place them in a cooler or refrigerator for about a week. This will delay opening. Once removed from cold storage, the blooms will open up naturally.

Sunflower are a somewhat “dirty flower”. They tend to make the water get gross. Dirty water breeds bacteria, the enemy of cut flowers. Bacteria significantly reduces vase life.
To combat this, it’s important to change the water at least once a day or use commercial flower food (easily found on Amazon - I like “Floralife”).
QUESTIONS?
Questions or comments? Leave them below and I’ll get back to you!
Ready for more?
If you’re serious about growing the garden of your dreams this year, register for my online course, “Backyard Cutting Garden 101”. You’ll find everything you need to plan, grow, harvest and arrange your stunning blooms. I can’t WAIT to help you grow! Click on the button below for all the details.

How to Grow: Sweet Peas
They are “sweet”, indeed!
How to Grow: Sweet Peas
Of all the flowers I grow on the farm, Sweet Peas are the most deliciously fragrant.
I love to fill my house with bunches and bunches of them. After a long winter, it’s so refreshing to open the windows, bring the Sweet Peas inside and allow their intoxicating fragrance wash away all the staleness of winter.
Sweet Peas were always on my list of flowers to grow in my vegetable garden, but after 3 years of failed attempts, I decided it was finally time to get serious about learning how to grow them.
It turns out I was planting them MUCH too late in the season and they would just shrivel up and die on a hot day. When I finally learned the secret (plant them a LOT earlier than you’d expect!), I had my first Sweet Pea success.
They can be a bit fussy (and demanding) and sometimes I wonder why I even bother to grow them… but there is nothing else like them!

Let’s look at the Pros and Cons of growing Sweet Peas for cut flower use.
PROS
They come in a multitude of colors.
They are one of the most fragrant flowers you can grow.
They are elegant and romantic.
CONS
They can be tricky to start from seed.
They do not handle root disturbance well (more about this later…).
They do not like hot weather. They prefer moist, cool climates.
They do not last long in the vase (3-5 days).
They are extremely ethylene gas sensitive and expire quickly if exposed to it (this is the gas produced by ripening fruit, like apples and bananas).
They can be difficult to harvest, as the vines tangle into each other.
They need to be supported on a trellis or netting.
They are toxic and should not be ingested. Use caution around pets and small children.
CHOOSING SEEDS
Sweet Peas have become increasingly popular in the last few years and there are many choices out there when it comes to seeds.
Honestly, I get overwhelmed by all the choices and tend to stick to the same types each year… but feel free to experiment!
Here are a few of my favorite Sweet Peas to grow for cut flower use:
“High Scent” (the most fragrant flower I grow on the farm!)
“Spencer Series” (I usually buy a mix of all the colors)
“Mammoth Choice Mix”
HOW TO SOW
Sweet Peas thrive in cool, moist environments and generally do best in the spring and early summer. When the heat of summer comes on, they tend to go to seed and die off.
If you live in a warmer climate, you may plant them in the fall or late winter. Colder climate folks can start them in early spring.
Here in Michigan, our last spring frost is about May 15. I try to get my Sweet Peas in the ground about 4-6 weeks before that.
Sweet Peas can go in the garden around the same time you would plant edible garden peas. I always plant my garden peas on Good Friday, which is usually in early April.
They require rich, well drained soil. If you struggle with wet soil in the spring, try growing them in raised beds. They are “heavy feeders”, meaning they are hungry for nutrients.
I dig a trench and fill the trench with well composted manure, then cover it back up with the soil and plant into that “compost filled” trench.
(*NOTE: Sweet Peas are NOT edible and in fact are considered a toxic plant, so use caution around small children and pets).
TRANSPLANTS OR DIRECT SOW?
Sweet Peas can be transplanted or direct sown.
For either method, soaking the seeds for up to 24 hours before sowing may help increase germination success.
Transplants can be started indoors about 4-5 weeks before planting them out. They are quite frost hardy and can be planted out when there is still a risk of frost (mine often get snowed on… and they are fine!).
Transplants will help you get a jump on the season, but be aware that Sweet Peas are fussy about being transplanted. Their root systems really, really, REALLY do not like to be disturbed.
Place 2 seeds per pot or container. Sweet Peas need a lot of room for their roots to develop, so plant them in the deepest containers you can find. 4” pots, like ones tomato plants often come in, will work. Or you can use peat pots that will naturally disintegrate in the garden.
The seeds can take up to 3 or 4 weeks (!!!) to germinate, so be VERY patient. Once they have sprouted up, then can be gradually hardened off and moved out to the garden.
Once in the garden, it’s not uncommon for them to “pout” for about 3-4 weeks after being transplanted (no matter how gentle you are with their roots!). They sit there, looking exactly the same way they did when you put them in… until one day they get over themselves and start growing like crazy. Be patient!
If you are direct sowing, sow them about 6 weeks before your last spring frost. Sow 2 seeds per hole. Make sure that the soil stays evenly moist the entire time you are waiting for the seeds to germinate.
I’ve had great success with direct sowing by watering thoroughly after sowing the seeds and covering the area with a thick layer of straw (about 6-9” deep). The straw keeps the soil evenly moist and deters birds and other pesky critters that want to eat the seeds. Pull back the mulch occasionally to check for germination.
Once the seeds have germinated, the straw makes a great mulch to help keep the soil moist and cool.
PLANT SPACING
Sweet Peas should be spaced about 6” apart. They are a climbing vine that can reach up to 10’ tall and need to have some kind of support to grow on.

GROWING ON
Sweet Peas are thirsty plants and need lots of water.
When plants are about 8” tall, pinch out the central stem. This will cause the plant to branch and produce more stems.
Sweet Peas enjoy a weekly fertilizer regimen in addition to the compost trench (demanding little buggers, aren’t they?!?). Fish emulsion fertilizer works great. Once they start growing vigorously, you can stop waiting on them hand and foot. ;)
STAGE OF HARVEST
Harvest stems when 1-3 blooms on the cluster are open. The remaining blooms will open up in the vase.
There are 2 ways you can harvest and it comes down to personal preference:
1. Harvest the bloom on the single stem. This is the “cleanest” method, but sometimes you’ll end up with short stems.
2. Harvest the bloom, stem and part of the vine with the leaves (like the photo below). This method looks more “wild” and allows you to choose the stem length of your choice.

POST HARVEST CARE
For longest vase life, keep them away from any ripening fruit. We always have bananas, apples, avocados, etc. ripening in our kitchen, so I cannot display Sweet Peas in the kitchen or they expire in about 24 hours. Instead, I place jars of blooms in our bedrooms and living room, where the sweet fragrance is especially welcoming.
QUESTIONS?
Ask them here and I’ll get back to you!
READY FOR MORE?
If you’re serious about growing the garden of your dreams this year, register for my online course, “Backyard Cutting Garden 101”. You’ll find everything you need to plan, grow, harvest and arrange your stunning blooms. I can’t WAIT to help you grow! Click on the button below for all the details.

No-Knead Artisan Bread
A simple, yet mouthwatering, recipe that will delight your taste buds… and your friends and family!
No-Knead Artisan Bread
You, yes you, can make this bread. I promise.
Doesn't it look just like something you would pay $8 for from an upscale artisan bakery? I don't know about you, but I would be willing to pay $8 for this bread.
What if I told you that you could make this bread, all by yourself, for less than $1? You will totally impress your friends and family with this beautiful bread and they will refuse to believe how easy it is!

It's true, my friends. It can be done. And guess what? You don't even have to good at baking. And you don't have to know how to knead bread. And you don't need fancy mixers.
The recipe simply calls for 4 ingredients and a secret weapon - the humble Dutch Oven.
Dutch Oven
What is a Dutch Oven? Well, it's basically a big oven-proof dish with a lid. Most are made from cast iron, but some are ceramic.
When I'm making this bread, I use my enameled cast iron Dutch Oven, but I've also used the Pyrex casserole dishes with lids. If using the small Pyrex dishes, I divide the dough in half to make two loaves, instead of the one large loaf I make in the cast iron Dutch Oven.
Whatever you choose to use, make sure it can handle high heat (450 degrees) and that the lid fits well.

Now, let me be perfectly honest here. I hate it when I see recipes that say "So easy! So fast!" and then I read the instructions only to realize it's NOT easy or fast.
This recipe only requires about 5 minutes of hands-on time and is VERY easy, but there is a lot of planning ahead, waiting and setting timers. This is a bread to bake while you are home for a good chunk of the day, at least 3 hours. Also, the dough needs to be mixed/prepared at least 12 hours ahead of the baking time (24 hours is even better), so you'll have to do some planning ahead... which is not my strong suit.
Ingredients
4 cups of flour (I suggest you start with unbleached white flour. Once you have made the loaf a few times, you can start replacing some white flour with whole wheat flour, if desired)
2 cups of cold water
2 tsp of Kosher salt
1/2 tsp of yeast (not instant yeast)

1. Mix all the ingredients together with a wooden spoon in a large bowl or container. A big glass bowl with a plate as a lid works great too. The lid does not have to be air tight (in fact, it should not be - the gases need to escape during fermentation).
Dough will be wet.
Leave the loosely covered container/bowl of dough on the counter (not the fridge!) for 12-24 hours. Go on with your business of living while the dough works it's magic.


2. After 12-24 hours, pick a time when you'll be around the house for about 3 hours. Got it? Ok, now sprinkle some flour on a work surface. I just use my counter as my work surface.

3. Dump the dough out of the bowl onto the floured surface. It will be a wet, sticky mess. Sprinkle the dough with a little more flour and attempt to fold the dough in half a couple times, working the dough no more than about 10 seconds. I like to use this plastic scraper I got at the dollar store to help me turn it over and get the sticky bits off the counter.
After folding it, cover the dough with a tea towel or flour sack towel and let it rest for 15 minutes. Go putter around for a while.

4. When the 15 minutes is up, take off the towel and lay it on the counter.
Coat the same tea towel with flour or cornmeal (my preferred choice) to keep the dough from sticking. Use more than you think you should.
Now gently gather up the dough in your hands and try to shape it into a ball. Sprinkle with more flour if needed. This should take no more than 10 seconds or so. Don't overwork the dough. You'll end up with a ball with a smooth top, but wrinkly seam on the bottom. Perfect.
5. Now place the ball seam side down on the cornmeal coated towel. Sprinkle more cornmeal or flour on top of the dough.

6. Gently cover the dough with the flaps of the tea towel and let it take a nap for 2 hours. Maybe you could take a nap too...
7. About 30 minutes before the 2 hour "nap" is over, you'll need to start preheating your oven to 450 degrees with the Dutch Oven inside it! It is very important that both the oven and the Dutch Oven are hot.
When the 2 hour rest time is over, put on your oven mitts and pull out the extremely hot Dutch Oven and remove the lid.
Now comes the hardest part. You will need to open the towel, carefully pick up the dough, still in the towel and flip it into the steaming hot Dutch Oven so the seam side is now facing up.
Do it quickly and confidently (even if you don't feel confident). Even if it looks like a mess when you dump it it, it will still turn out delicious.
8. Place the lid back on (with your oven mitts on!!!) and slide the Dutch Oven back into the oven. Bake for 30 minutes. After the 30 minutes is up, remove the lid and continue baking for 15 minutes.

9. Ta-da! Your bread is done. Pull the Dutch Oven out and remove the loaf. Allow the loaf to cool on a wire rack before slicing (yeah right... I can never resist cutting off a little piece and slathering it with butter while it's still piping hot).

10. Admire your lovely loaf of bread and be amazed that you, yes YOU!, baked such a wonder. Now go share it with your friends and teach THEM how to bake this bread! Spread the love.

BUT WAIT! There’s more!
I discovered that this recipe actually makes INCREDIBLE pizza dough. Over the years, I’ve come up with this pizza recipe and our family LOVES it.
In fact, my son is very reluctant for me to share our “secret recipe” because he thinks it’s the best pizza in the world and we should sell it. Ha!
I don’t plan on opening a pizza shop anytime soon, so here you go ;)

Cast Iron Deep Dish Pizza
2 cast iron pans
1 batch of No-Knead Artisan Bread Dough
16 oz bag of shredded Mozzarella cheese/Pizza cheese. Feel free to use less cheese if desired.
Pizza Sauce, about 3-4 oz. I often divide a 14oz jar into 4ths and freeze the remaining sauce in small jam jars.
Desired toppings: Pepperoni, cooked sausage, ham, black olive, onion, peppers… the sky is the limit!
Olive oil
Salt
Pizza Seasoning
Garlic Powder
Method
Preheat oven to 450 degrees F.
Follow the directions for making the bread, but STOP before you get to Step 7 (when you transfer the dough to the Dutch Oven).
Grease 2 cast iron pans liberally, using about 1-2 tbsp of olive oil. Divide the dough in half and press it into greased cast iron pans.
Pour a bit more olive oil on top of the dough in the pan and keep pressing the dough gently to the sides of the pan. It make take a little time for the dough to “release” and stay put. By this time, the dough will be liberally greased on the top and bottom.
Sprinkle the crust with a bit of salt, garlic powder and pizza seasoning.
Spread out the sauce, then top with cheese and desired pizza toppings.
Sprinkle with more salt, garlic powder and pizza seasoning, if desired.
Bake the pizzas in the cast iron pans at 450 degrees for about 12-18 minutes… or until they are golden and bubbly.
Remove pizzas from the oven and allow them to cool for about 10 minutes before serving.
Let me know if you try the recipe! It’s a real crowd pleaser and if you’re new at making bread, I think you’ll love how easy and simple this recipe is.
Enjoy!

Chocolate Crinkles Recipe: Our Favorite Christmas Cookie!
Our favorite Christmas cookie recipe. I think you’ll love them as much as we do!
Chocolate Crinkle Cookie Recipe
These cookies.
They fly off the plate so fast I’ve never had a chance to photograph them until now. And you better believe I had to beat off a lot of snitching hands trying to sneak a few, just to get these shots. Ha!
I found this recipe in a magazine over a decade ago and they quickly became my “go-to” Christmas cookie. They look beautiful and taste even better than they look.
It’s like a combination of a cookie, brownie and donut. Be still my heart.

BEFORE YOU BEGIN: Please note that the dough needs to rest in the fridge for 2+ hours before baking. Make sure you take this into account! Sometimes, I make the dough a day ahead of time and let it sit in the fridge overnight.
INGREDIENTS
3/4 cup butter, melted
1/2 cup unsweetened cocoa powder
1 cup sugar
2 eggs
2 tsp vanilla extract
2 cups flour
1 tsp baking powder
1 tsp baking soda
1/2 tsp salt
6 ounces of semisweet chocolate chips (about 3/4 cup)
3/4 cup confectioner’s sugar
METHOD
In large bowl, combine the melted butter, cocoa powder and sugar.
Whisk in the eggs and vanilla.
In medium sized bowl, combine the flour, baking powder, baking soda and salt.
Use a spoon or rubber spatula to add the dry ingredients to the wet ingredients.
Stir in chocolate chips.
Refrigerate dough for at least 2 hours (or overnight).
When ready to bake, heat oven to 350 F.
Pour confectioner’s sugar into a small bowl.
Roll the dough into balls about the size of a ping pong ball. Place dough balls in the bowl of confectioner’s sugar, and roll them around until evenly coated.
Place dough balls on a cookie sheet (I always use parchment paper) and bake for 10-11 minutes. Cookies will be very soft and gooey.
Allow cookies to cool on a wire rack for about 5 minutes (I simply slide the parchment paper with cookies off the baking sheet onto the wire rack).
Dust cookies with remaining confectioner’s sugar. I put a few tablespoons of confectioner’s sugar in a small sieve and lightly tap the sieve over the cookies.
Allow cookies to cool completely before handling.

Step 9: Roll dough into balls and coat with confectioner’s sugar.

Step 10: Place dough on cookie sheet.

Finished!
I hope you enjoy these cookies as much as we do!
Do you have a favorite Christmas cookie? Please share in the comments below!
-Lori

Grandma Hamm's Peanut Butter Cookies
A very special recipe to honor the woman who loved and lived in this home before me.
Grandma Hamm’s Peanut Butter Cookies
We bought this farmhouse in 2010 from a family who lived here since the 1945.
They raised 4 kids here. They raised countless farm animals. They grew a huge garden. They canned and preserved. They baked and baked and baked some more.
When we moved here, our neighbors would share stories about “Grandma Hamm” and all the delicious baked goods she would make for them.
One of the daughters who grew up here stopped by our farm to introduce herself. I begged her to share some of the family recipes.
She sent me this recipe in the mail: “Grandma Hamm's Peanut Butter Cookies”. I made them... and I swear the house sighed in contentment. "Oh yes, I remember this smell! It's been a while!"
Isn't it funny how certain smells can take us back in time and bring back memories?
I cannot tell you how delighted I am to fill this house with the scents of Grandma Hamm's legacy of love.
Now you can try them yourself. I think you’ll enjoy them as much as we do!
-Lori
