

How to Grow Tulips as a Cut Flower
Learn the difference between growing Tulips for landscape vs cut flowers.
How to Grow Tulips as a Cut Flower
While many people are used to growing Tulips in their landscaping and flower beds, growing Tulips specifically as a cut flower to be displayed in a vase requires a completely different method and mindset!
What is the difference between growing Tulips for landscaping vs Tulips for cut flowers?
Great question! Let’s compare/contrast the two methods:
Landscape Use
Function = to look beautiful outdoors in the garden or landscape
Treated as a short lived Perennial
Bulbs are spaced 4-6 inches apart, usually using a bulb planter
Bulbs are replaced or refreshed every 2-3 years as they decline in quality and vigor
Plants are allowed to grow, bloom and fade away, with hopes they will rebloom the following year (but with awareness that most bulbs need to be replaced every 2-3 years).

Cut Flower Use
Function = to look beautiful in a vase or arrangement
Treated as an Annual
Bulbs are spaced tightly, like eggs in a carton
Bulbs are replaced every year
Entire plant is harvested before it blooms. Stem/bloom is removed from the bulb and placed in a vase. The bulb is discarded.

2. Why can’t I just cut the Tulips in my landscaping and use those in a vase?
You can… however, to get a long enough stem, you’ll likely need to cut the stem at ground level.
As you can see in the photo below, some Tulip types are naturally shorter and you’d have to cut them off at the bulb in order to get a usable stem.

When you cut the bloom and stem away from the bulb, the bulb has no way to photosynthesize and re-energize itself. While the bulb may produce leaves/foliage the following spring, it’s unlikely it will ever bloom again.
Trust me on this. I didn’t believe this was true and was determined to prove it wrong. After cutting 400 Tulip blooms off at the soil level, I left the bulbs in the ground to see if they would eventually rebloom. And they did… I finally got 2 tiny, pathetic blooms… 3 years later. 3 years!!!!
It’s usually a waste of time to try to replant bulbs that have been separated from the stem. It’s best to compost them.

3. WAIT! I thought Tulips were Perennials and came back every year?
Well, some do (sort of) and some don’t…
There are many different varieties of Tulips and some are better than others at naturalizing/perennializing.
Tulips are native to Central Asia (Turkey, Iraq, Russia) and thrive in climates that are similar - hot, dry summers and cold, wet winters. There are very few climates in North America that can mimic these conditions required for naturalization.
These 3 varieties are most likely (but not guaranteed) to naturalize if the climate is right:
Darwin Hybrid Tulips
Emperor Tulips
Triumph Tulips
It’s helpful to know that the Tulips grown for cut flower use are specifically bred to perform as an Annual - they bloom once, then the bulbs are discarded/composted.
Most botanical gardens replant their Tulips bulbs each year to achieve a stunning display each spring. Many parks/public spaces choose Darwin Hybrid, Emperor and Triumph Tulips, but replace the bulbs every 2-3 seasons as they decline in quality.
4. Can I grow Tulips in pots?
I find conflicting information about this. Many bulb suppliers strongly discourage growing them in pots, while others say it’s ok. However, most sources agree that bulbs grown in pots are subject to much more stress than bulbs planted in the ground (since they have less protection from the elements) and should be discarded after they bloom.
5. Are there any Tulips that will give me the best of both worlds? A landscape flower AND a cut flower?
Yes. Darwin Hybrid Tulips (like “Apricot Impression”, “Mystic Van Ejke”) and some Single Tulips often have very tall, long stems reaching over 24”. It’s possible to harvest a 10-12” stem for the vase while still leaving nearly all the foliage/leaves on the stem (which is required if you want the bulbs to rebloom the following year).

Most other Tulip varieties are too short to harvest a usable stem while also leaving enough foliage behind. Also remember, cut flower Tulip varieties are bred as Annuals, not Perennials, and will not reliably rebloom even if they are not harvested.
The photo below shows where the bloom would need to be cut in order to leave enough foliage on the stem for the bulb to generate. This short stem length is unacceptable for most growers.

6. How do I plant Tulip bulbs that I intend to harvest for cut flowers?
Let me show you! When you’re growing for cut flower use, you can plant Tulip bulbs MUCH closer together. We nestle them together closely, like eggs in a carton. This allows you to grow a lot of Tulips in a small space and the close spacing encourages the Tulips to grow long, straight stems.
The photo below is about 100 Tulips bulbs. You can see for yourself how many bulbs you can easily fit into a small space!

Most people use the “Trench Method” when growing Tulips as cut flowers, instead of digging a separate hole for each bulb.
Here’s how it works:
Dig a trench about 6 inches deep
Place the bulbs in the trench, spacing them like eggs in a carton
Cover the bulbs with the soil. Water in well.
If your climate receives sufficient rain and snow over the winter, no extra watering is necessary. If not, a few deep waterings over the winter/early spring will be required.
On our farm, we use the “Temporary Raised Bed Method”:
Rake the soil surface smooth
Build a temporary raised bed on top of the soil. Sides should be 6-12” high.
Place the Tulip bulbs in the raised bed, like eggs in a carton
Fill the raised bed with compost or compost/soil mix. Water in well.
If your climate receives sufficient rain and snow over the winter, no extra watering is necessary. If not, a few deep waterings over the winter/early spring will be required.
When Tulip harvest is over, disassemble the bed and spread out the compost/soil where needed.

Because of the extremely high vole pressure on our farm, we take extra steps to ensure that our bulbs are completely enclosed and protected from marauding rodents. You can read all about it HERE: How to Protect Your Tulips from Voles.
7. How do I harvest Tulips for cut flowers?
Ok, here is the strangest part about growing Tulips for cut flowers…
You don’t EVER want to see a single Tulip in bloom in the field! Yes, that’s right, your #1 goal is to harvest every bloom BEFORE they open.
Why?
Tulips that are already open will have a shorter vase life (3-5 days) Instead, you want to Tulip to open up AFTER it’s in the vase, not before. Tulips that open in the vase will have a 7+ day vase life.
Tulips that are harvested before they are open can be stored in a cooler or refrigerator for 1-2 weeks before being used. This is especially helpful when there is a heat wave and all the Tulips ripen in 1-2 days, instead of gradually ripening over 7-14 days. It happens. ;)

When the blooms are just starting to color up, but not open yet, it’s time to harvest. Pull the entire plant, bulb and all, out of the ground. With the food source still attached (the bulb), the blooms can be stored dry for about 2 weeks.
To store the blooms in your fridge or cooler, bundle the blooms in newspaper. Place them upright in a bucket (no water) or lay them flat (bundling helps keep the stems straight). Keep them in the dark to prevent bending toward light (“phototrophic”)!

When you’re ready to use the Tulips, snip off the bulb, strip off the lower leaves and wash the stem clean. Place the stem in clean water and it will gradually begin to open up.
If the stem feels floppy or limp, do not panic! Follow the instructions above, but also wrap the stems tightly in newspaper to keep them upright. Within a few hours, the stems will be straight and the paper can be removed.

Floppy Tulips that have been dry stored in the cooler for 2 weeks. The stems are limp as noodles!

Wrap the stems tightly in paper, recut the stem ends and place in cool water for at least 1 hour (or overnight).

Unwrap the paper. The stems are now fully hydrated and firm!
Fun fact! Tulip stems keep growing after they have been cut. If you notice your Tulips look taller in the vase than they did yesterday, you’re not crazy! They actually did grow. Simply give them a trim every few days.

TULIP PLANTING SUMMARY
WHEN TO PLANT: Plant Tulip bulbs in the fall when temperatures begin to drop (soil temperatures below 60 degrees F), usually late September to November.
PLANTING SITE: Tulips do best with full sun, but can tolerate partial shade. Tulips require well-draining soil. They may rot in wet, heavy soils.
WHEN TO WATER: Water deeply once after planting the bulbs. Water moderately in the spring if the soil is dry. During the blooming season, water every 3-5 days if there is no rainfall.
PLANTING WIDTH & DEPTH: Decide if you are going to plant the Tulips for landscape display OR cut flower use.
Landscape Display: If growing for landscape display, plant the bulbs 4-5” apart and about 5-7” deep. The rule of thumb is to plant the bulbs 3x as deep as the bulb is high. Plant the bulbs pointy side up.
Cut Flower Use: If growing for cut flower use (harvesting the blooms to display in a vase), plant the bulbs closely nestled together (but not touching) and about 5-7” deep. The rule of thumb is to plant the bulbs 3x as deep as the bulb is high. Plant the bulbs pointy side up.
AFTER BLOOMING (Landscape display Tulips only): After the Tulips have finished blooming, it’s important to allow the plants to die back naturally. This is how they gather energy to bloom again the following year. Allow the leaves/stems to completely die back and turn yellow before clearing away debris.
To summarize…
If you want to enjoy Tulips in your landscaping AND you want them to rebloom the next season, I don’t recommend harvesting them for cut flowers (unless you are growing Darwin hybrids and you want to sneak a few blooms for bouquets).
Instead, plant your cut flower Tulips in a dedicated area, treat them as an Annual flower and enjoy them in the vase!

How to Grow Foxglove
How to Grow: Foxglove (Digitalis purpurea)
INTRODUCTION
Whimsical, magical and enchanting. Foxglove is all that and more!
The mere sight of them evokes visions of mythical lands and I always expect to see fairies flitting about them (but it’s usually just bumblebees! Ha!).
Foxglove stems look incredible in arrangements.
When crafting bouquets, it’s helpful to incorporate “line” or “spike” shaped flowers, such as Snapdragon, Veronica, Larkspur, Delphinium or Foxglove, to add interest and height to the arrangement.
Foxglove is a fabulous addition to the cutting garden… or to simply grow for the pollinators (and fairies).

Camelot Mix
Let’s look at the Pros and Cons of growing Foxglove for cut flower use.
PROS
Their “spike” shape adds drama, movement and visual interest to bouquets. There’s nothing else quite like them!
They are long-lasting in the vase when harvested at the proper stage (more about that later!)
They are magical. I think that’s reason enough to grow them. ;)
They usually provide 2 flushes of blooms - one in late spring/early summer and another about a month or two later.
CONS
Warning: All parts of the plant are toxic if ingested. If you have curious children or pets that could eat the flowers or leaves, it’s best to skip growing Foxglove. Touching the plants/flowers is perfectly safe. While I don’t want to downplay their toxicity, I do want to point out that many common flowers (and houseplants, too!) are toxic if ingested, including Morning Glory, Delphinium, Larkspur, Tulips, Lilies, Hyacinths, Hydrangea, Lily of the Valley, Poinsettias, Clematis, Alstroemeria, Sweet Peas and more.
Most varieties are Biennial, which means they produce foliage their first year, overwinter in the garden, then bloom in their second year. That’s a long time to wait to see blooms! In order to have some plants in bloom each year, it’s important to start more plants from seed each year.

Camelot Mix
CHOOSING SEEDS
Depending on where you live (your climate) and what variety of Foxglove you grow, they may perform as:
an Annual (1 year life cycle),
a Biennial (2 year life cycle), or
a short-lived Perennial (2-3 years)
Some Foxglove varieties have been bred to be FYF (First Year Flowering). This means they will grow like an Annual flower and bloom in their first season. They may flower in their second year, but not reliably.
Most Foxglove varieties are Biennials (if the seed pack does not indicate they are FYF, you can assume they are Biennial).
It usually takes about 360 days from sowing the seeds until they bloom. If you sow the seeds in May, you can expect them to bloom the FOLLOWING year in May. In the first season, they will only grow foliage. Leave them in the garden over the winter (they are tough!) and they will bloom the following spring. After they bloom in their second season, they drop their seeds and the plant dies.
If you allow the plants to drop their seeds and grow in an undisturbed area, they may “self-sow” the following spring and create a “Perennial” patch of Foxglove, with some new plants establishing every year.
Note: If you buy a Foxglove plant at a Plant Nursery and it’s in full bloom, the plant is in its second season. It will die after its blooming is complete. Do not expect it to come back the next season (although it may! Foxglove can be unpredictable like that!).

Camelot Mix
The following Foxglove series are a great choice for cut flower use, since they are FYF:
“Camelot” series (FYF - first year flowering)
“Dalmation” series (FYF - first year flowering)
Here are a few of my favorite Foxglove varieties to grow for cut flower use:
“Camelot Rose” (FYF - first year flowering)
“Gloxiniaeflora Mix” (Biennial)

Camelot Mix
HOW TO SOW
Foxglove is quite easy to grow from seed, although it can take up to 3 weeks for seeds to germinate… so be patient! Foxglove prefers cool weather, so keep the seedlings on the cooler side (unlike Agertum, Celosia, and Zinnias, which like it HOT!).
Transplants or Direct Sow?
It’s best to start Foxglove from seed indoors or in Winter Sowing containers to be transplanted into the garden.
They can be Direct Sown, but this can be difficult since the seeds are tiny.
Start seeds in trays about 6-8 weeks before your Average Last Spring Frost Date. Transplant the seedlings after your Average Last Spring Frost Date.
If you want to speed up the process of growing Biennial Foxglove (and not have the plants taking up valuable space in your garden all summer long), you can try this “Fall Planting” trick.
Start the Foxglove seeds in trays in mid-summer.
When the seedlings are 6-8 weeks old, transplant them into your garden beds. By this time, it’s early fall and you likely have some Annual flowers that are spent anyway. Remove them and put the Foxglove seedling in that space instead.
Allow the young plants to establish and grow a strong root system before the ground freezes.
The following spring, they will bloom!
PLANT SPACING
9-12 inch spacing is appropriate for cut flower use.

Dalmatian Peach
GROWING ON
Like most cut flowers, Foxglove appreciates consistent feeding and watering. They perform best in fertile soil.
Plants can be netted or supported to prevent them from falling over. They can grow quite tall! I usually don’t net them, but other people choose to.
Pinching is not required. Most plants that have a “rosette” type growth habit (low-growing leaves radiating from the center of the plant, like Foxglove and Statice) do not require pinching.
Foxglove does not have many issues with pests or diseases.

Dalmatian Peach
STAGE OF HARVEST
Remember when I mentioned bumblebees earlier?
I have a bit of a complicated relationship with bumblebees.
On one hand, I love to watch them bumble around in the flowers. It’s so fun and relaxing to be around those adorable “Flying Pandas” (that’s what I call them).
On the other hand, I know that as soon as they pollinate a floret on the Foxglove, that floret will turn brown and ugly and fall off the stem.
This is true for nearly all cut flowers - once the flower has been pollinated, it has fulfilled its mission in life and it immediately moves onto the next phase - dying and going to seed.
If you harvest a stem of florets that have been pollinated, they will all look brown and ugly within a day or two.
The solution? Harvest BEFORE they are pollinated. Check the bottom florets on each stem. When 1 or 2 florets are open, it’s time to harvest before the bumblebees get to them! I like to harvest early in the morning before the bumblebees are awake.
The remaining florets on the stem will gradually open up in the vase over the next week.
P.S. It’s completely acceptable to leave a few stems for the bumblebees. That’s what I do ;)

Dalmatian Peach
POST-HARVEST CARE
Like most cut flowers, always harvest in the cool of the day and allow the flowers to rehydrate in water in a cool location overnight before arranging.
Foxglove is ethylene gas sensitive (gas released from ripening fruit which causes flowers to ripen and expire very quickly), so be sure to display them away from fruit.
QUESTIONS?
Ask them here and I’ll get back to you!
Ready for more?
If you’re serious about growing the garden of your dreams this year, register for my online course, “Backyard Cutting Garden 101”. You’ll find everything you need to plan, grow, harvest and arrange your stunning blooms. I can’t WAIT to help you grow! Click on the button below for all the details.

How to Grow Frosted Explosion Grass
How to Grow Frosted Explosion Grass
INTRODUCTION
If you’re going to plant a cutting garden, then Frosted Explosion Grass is a “must-grow” plant!
The gorgeous seed heads add irresistible sparkle, texture and elegance to bouquets and arrangements. It can be harvested and utilized at various stages, which makes it extremely versatile.
When the stems are young, the decorative seeds are a mix of lime green and red-brown. As the stems age, the seeds turn rich red-brown, and when the stems dry on the plant, they turn a dusky wheat color.
Frosted Explosion Grass is easy to grow, incredibly prolific, long-lasting in the vase AND it’s a great dried flower option.

What’s not to love?!?
Anytime you make a bouquet and think “Hmmm… it’s missing something…”, just grab a few stems of Frosted Explosion Grass and you’ll be shocked to see what a difference it makes!

Frosted Explosion Grass in bouquets
Let’s look at the Pros and Cons of growing Frosted Explosion Grass for cut flower use.
PROS
It’s easy to grow. It’s grass seed, after all!
It looks beautiful in nearly all bouquets and arrangements.
It’s an excellent “filler” that adds mass and volume to your bouquets with just a few stems (Translation: If you’re running short on flowers, the Frosted Explosion Grass will help make the bouquet look full and lush).
It’s long-lasting in the vase.
It looks beautiful when dried (either allow it to dry on the plant or hang fresh cut stems upside down to dry).
It’s “cut-and-come-again”. The more stems you harvest, the more stems it will grow.
CONS
It can be too productive! We can never keep up with harvesting all the stems! Do your best to harvest on a regular basis to keep the plants productive. If you stop harvesting, the plants will go completely to seed and stop growing new stems.
It can be a bit tricky to harvest as the plants can get unruly.

HOW TO SOW
Frosted Explosion Grass is easy to start from seed.
Transplants or Direct Sow?
I do not recommend direct sowing Frosted Explosion Grass, simply because it’s too easily mistaken as a weed when it's a small seedling.
Start the seeds indoors 4-6 weeks before planting out. Drop 2-3 seeds per cell, press down into the seed starting mix, then cover lightly with vermiculite or seed starting mix. Seeds germinate in 7-14 days.
Transplant the seedlings after the threat of frost.
For best results, I recommend planting 2-3 successions of Frosted Explosion Grass, about 2-3 weeks apart.
This will ensure you have a steady supply of stems for months.
PLANT SPACING
9-12 spacing works best for most growers.

Ethereal looking Frosted Explosion Grass in a centerpiece arrangement
GROWING ON
This grass is easygoing and undemanding. Once the seedlings are established, they need average amounts of water.
I do not recommend pinching or netting Frosted Explosion Grass.
About 6 weeks after the plants begin producing their beautiful seeded stems, they begin to fade and die back. This is why it’s useful to plant several successions, so you can abandon the old plants and harvest from the “fresher” ones.
This year, we experimented with “cutting back” the old plants with a weed whipper to see if they would re-bloom. We cut them back on August 14 and they DID rebloom about a month later, but the stems were much shorter… which makes sense because the plants need about 14 hours of light to produce long stems and we only have 13 hours of light in mid-September.
We may try it again, but cut back earlier in the season so the new stems can grow back when we have more daylight!

STAGE OF HARVEST
You can harvest Frosted Explosion Grass at any stage, from barely open to fully blown open. It all depends on personal preference.
Seeds emerge green, then fade to reddish brown.
Sometimes we want lime green seeds, sometimes we want reddish brown seeds and sometimes we want the ethereal faded wheat-colored stems. It just depends on what kind of bouquets and arrangements we are making!
Harvest regularly to encourage new growth.
However, if you plan on using them for dried flowers, allow stems to completely mature and dry on the plant before harvesting. This produces extra full and airy dried material.

Frosted Explosion Grass in bouquets

Frosted Explosion Grass in bouquets
POST-HARVEST CARE
Frosted Explosion Grass requires no special post-harvest care.
QUESTIONS?
Ask them here and I’ll get back to you!
Ready for more?
If you’re serious about growing the garden of your dreams this year, register for my online course, “Backyard Cutting Garden 101”. You’ll find everything you need to plan, grow, harvest and arrange your stunning blooms. I can’t WAIT to help you grow! Click on the button below for all the details.

Best Perennials for the Cut Flower Garden
Perennials are a great choice to fill the awkward space between Spring Blooming bulbs and Summer Blooming Annuals!
When we started our flower farm, we grew mostly Summer Blooming Annual flowers like Cosmos, Sunflowers and Zinnias. The seed is inexpensive and they grow quickly when planted from seed after the Average Last Spring Frost Date.
However, we soon noticed that we struggled with what I call “Awkward Gap Season”, which is the 6-8 weeks between when the Spring blooming bulbs die off (Daffodils, Tulips, etc) in mid May and the Summer Blooming Annuals begin in mid July.
What could we use to fill that “dead” space between mid-May to mid-July?
Perennials to the rescue!
Many types of Perennials bloom during the dreaded “Awkward Gap Season”.
I can’t tell you how much I’ve learned to love and appreciate our Perennials. Even though many Perennials are only in flower for about 2-6 weeks out of the year, many of them bloom right when I need them, when nothing else on the farm is in bloom!
Perennials do take a few years to establish before they are vigorous enough to harvest from, so I recommend planting as many as you can, as soon as you can.
While they may not bloom for a long length of time (many Perennials bloom for about 2-6 weeks out of the year), they are hardy, reliable and generally more drought tolerant than annual plants.
Some Perennials will give you a flush of blooms in early summer, then a second flush in late summer/early fall if cut back after the first blooming.
Fall is the BEST time to plant Perennials (about 4-6 weeks before your Average First Fall Frost), but they can also be planted in the spring.
Here is a list of a Few of my favorite Perennials on our farm
Not all of these Perennials bloom in the spring/early summer… but many do!
* Please note that some crops we grow may be considered “invasive” in your area. Be sure to do your own research before planting!
Achillea millefolium - Yarrow “Colorado Mix”
Allium - Ornamental Onion “Millenium”, “Purple Sensation”, “Drumstick”, “Garlic Chives”
Anemone x hybrida - Japanese Anemone “Honorine Jobert”
Aruncus dioicus - Goatsbeard
Astilbe -False Goatsbeard
Baptisia hybrid - False Indigo “Decadence® Deluxe Pink Truffles”
Echinops bannaticus - Globe Thistle “Blue Glow”
Eryngium planum - Sea Holly “Blue Glitter”
Geum - Avens “Totally Tangerine”, “Tempo Rose”, “Pretticoats Peach”
Gypsophila - Baby's Breath “Million Star II”
Hylotelephium telephium 'Herbstfreude' - Stonecrop/Sedum “Autumn Joy”
Lilium Lily (prefer the LxA hybrid types, as they are unscented)
Lupinus - Lupine
Lysimachia clethroides - Gooseneck Loosestrife
Melissa officinalis - Lemon Balm
Nepeta mussinii - Catmint
Origanum vulgare - Wild Marjoram
Paeonia lactiflora - Peony “Sarah Berhardt”, “Kansas”, “Dr. Alexander Fleming”, Duchess de Nemours”, “Festiva Maxima”, etc
Perovskia atriplicifolia - Russian Sage
Phlox paniculata - Garden Phlox “David”
Physostegia virginiana - Obedient Plant
Pycnanthemum pilosum - Mountain Mint
Rudbeckia hirta - Black-Eyed Susan “Irish Spring”, “Moroccan Sun”
Rudbeckia Triloba - Brown-Eyed Susan “Filou”
Scabiosa caucasia - Pincushion Flower “Fama Blue”, “Fama White”
Solidago - Goldenrod
Tanacetum parthenium - Feverfew/Matricaria “Magic Single”, “Magic Lime Green”, “Tetra White”
Veronica - Speedwell “Skyler Blue”, “Skyler Pink”, “Skyler White”
Feverfew “Magic Single”

Sedum “Autumn Joy”

Peony “Dr. Alexander Fleming” (pink), “Kansas” (magenta), “Duchess de Nemours” (white)

Rudbeckia triloba

Yarrow

Japanese Anemone “Honorine Jobert”

Lupine

Goatsbeard

Globe Thistle “Blue Glow”

Veronica “Skyler Blue”, “Skyler Pink”, “Skyler White”
Gypsophila

Rudbeckia hirta “Moroccan Sun”

Baptisa hybrid “Decadence® Deluxe Pink Truffles”

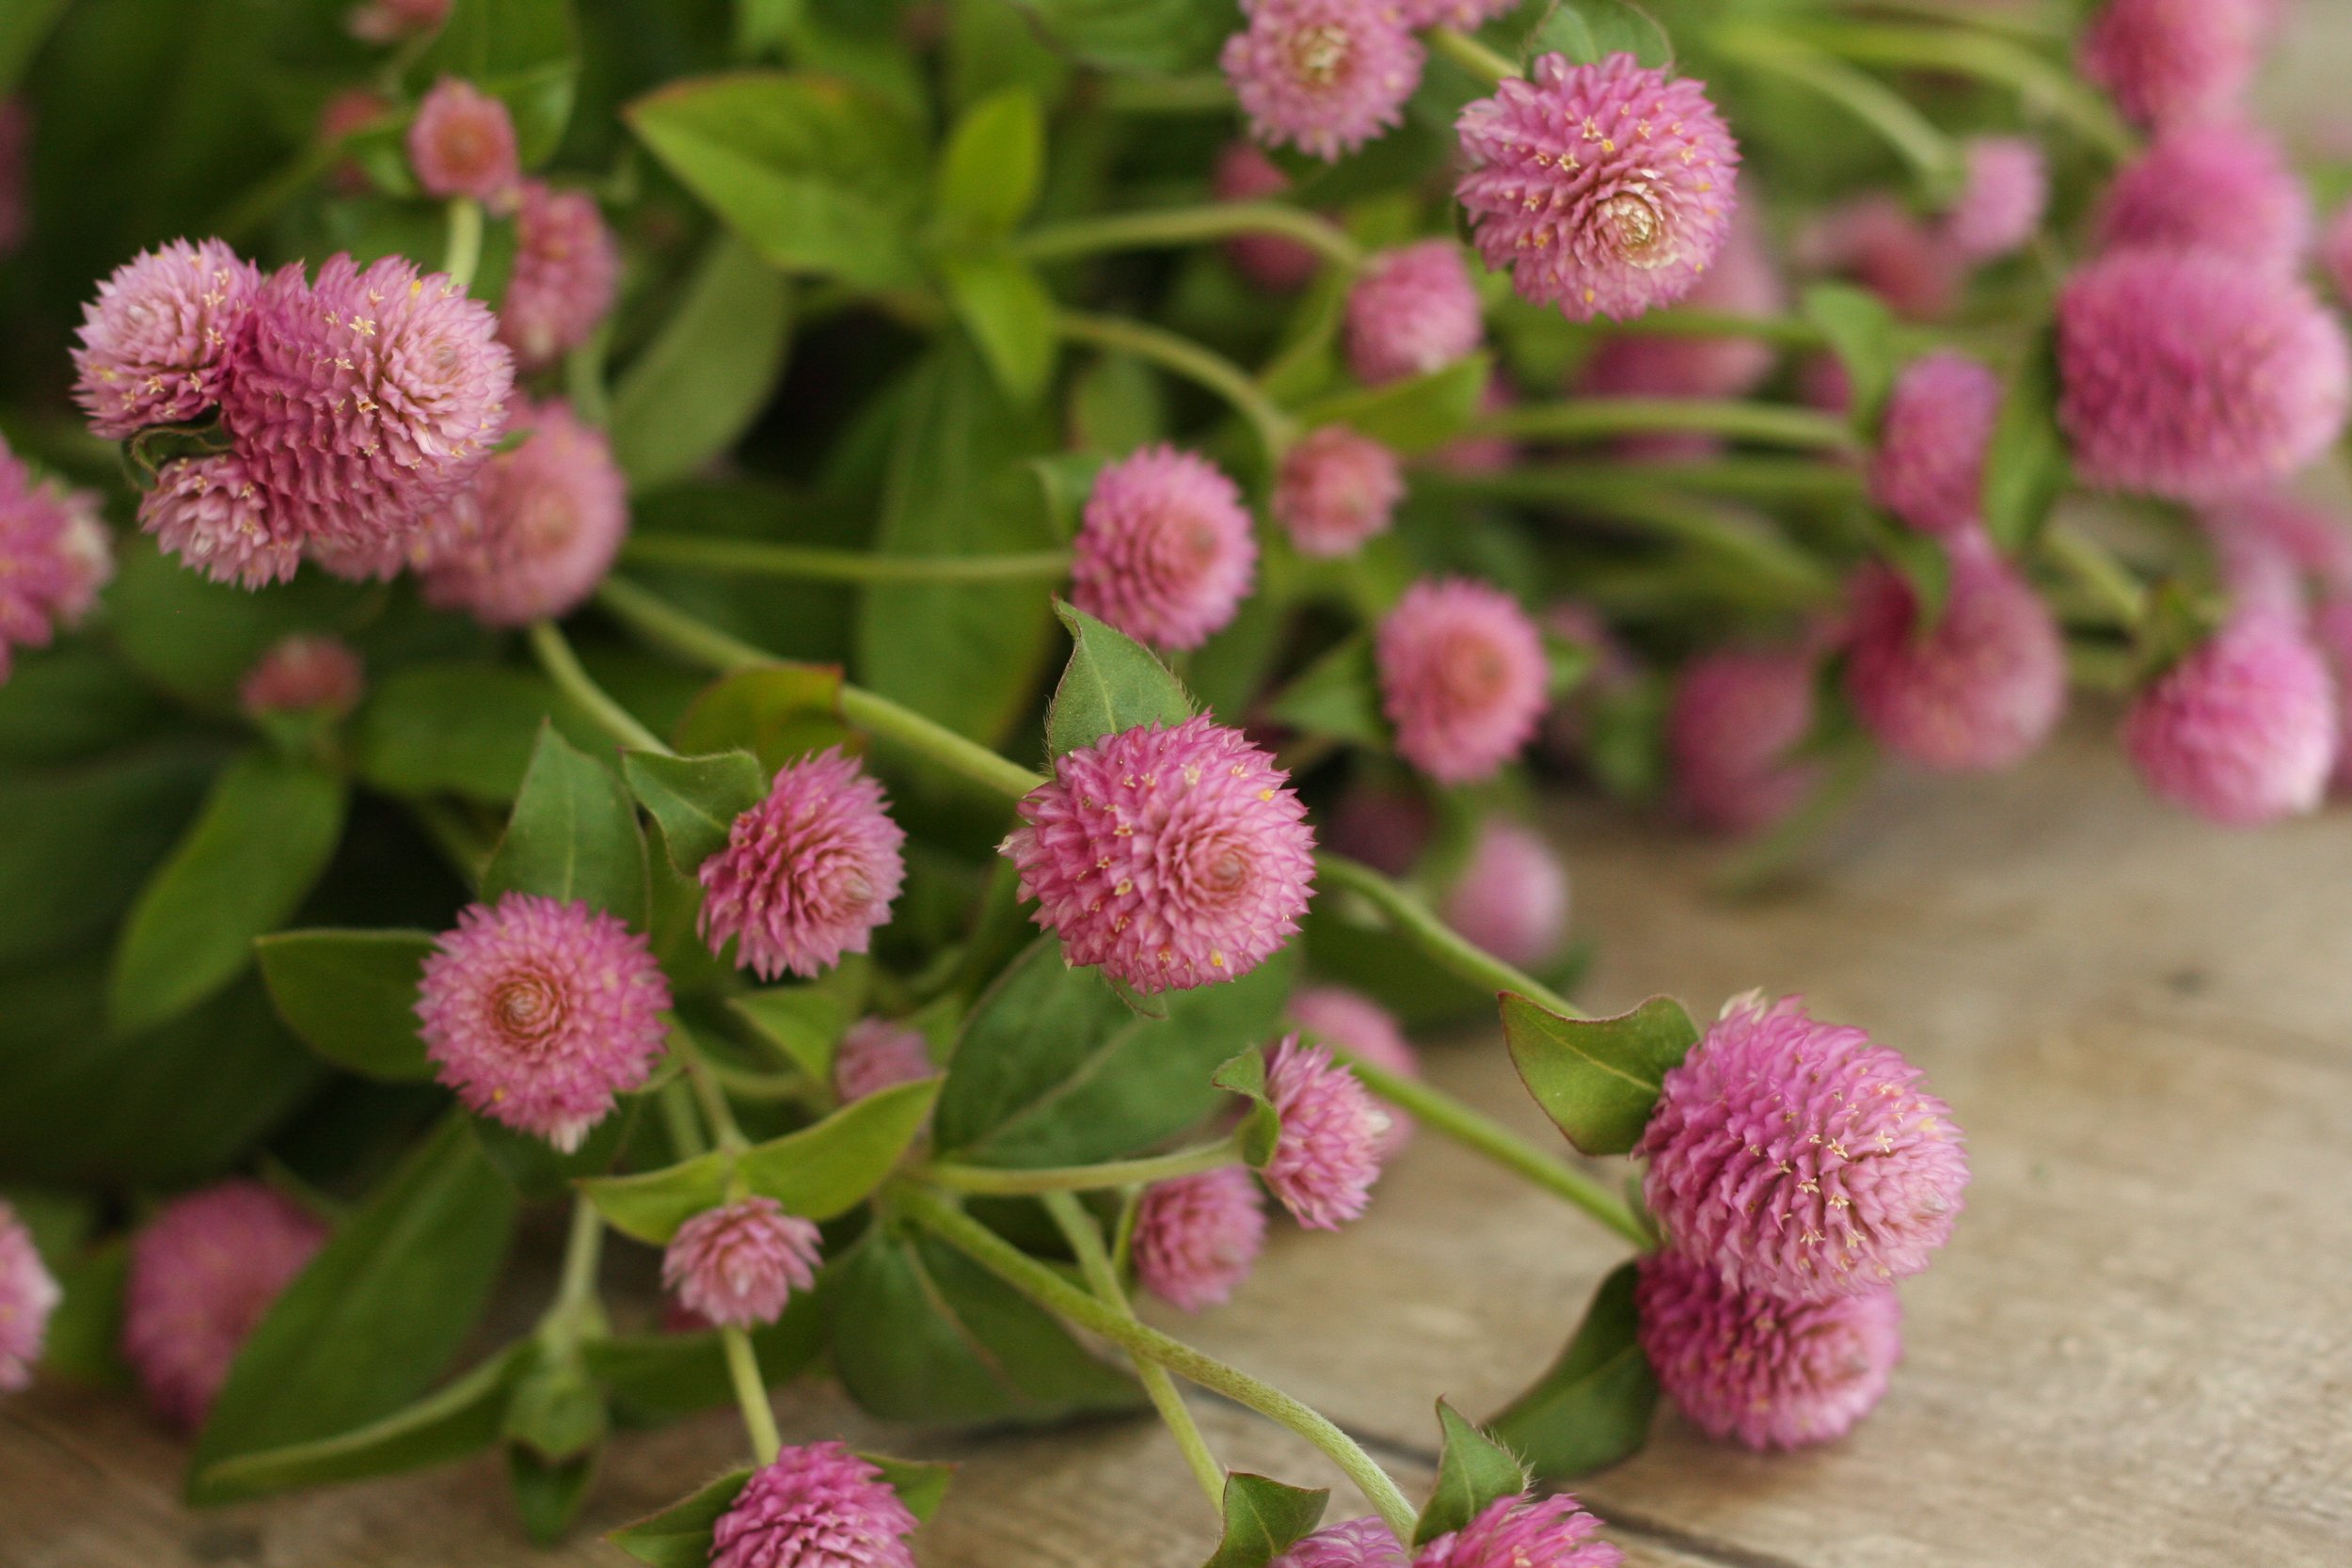
How to Grow: Globe Amaranth
How to Grow: Globe Amaranth (Gomphrena)
Pronunciation: glowb am-ah-ranth or gaam-free-nuh
INTRODUCTION
Cute. Adorable. Sweet.
Gomphrena (or Globe Amaranth - I use the two names interchangeably) is not the flashiest flower in the cutting garden, but they are useful, versatile and playful. Every garden should have some!
They can be tucked into bouquets or even better, displayed on their own in bunches.
But here’s the best part - Gomphrena is a wonderful “Everlasting” (dried) flower that retains its color and form for years. During the long winter months, I have dried Gomphrena bunches scattered around, bringing brightness and beauty to our home.
Gomphrena is a heat-loving flower and thrives in hot climates.

Brilliant Mix
Let’s look at the Pros and Cons of growing Globe Amaranth for cut flower use.
PROS
They come in a variety of colors (mostly pinks, reds, violets and white)
They are a playful addition to bouquets.
They are very heat tolerant.
They have a good vase life of about 7 days.
They are an excellent “Everlasting” flower.
They are great for floral “wearables”, such as flower crowns, corsages, boutonnieres, etc.

Audray Pastel Mix
CONS
They can be somewhat tricky to harvest.
They need heat to thrive.

Audray White
CHOOSING SEEDS
There are 2 main types of Gomphrena, so pay attention while choosing seed.
Gomphrena globosa has a more branching type of growth habit. I find the stems a bit knobby and cumbersome to harvest at times, although they DO fill out a bouquet quickly. It comes in a variety of beautiful violets, pinks, and whites. The plants have broad, thick leaves. Harvestable stems have multiple blooms per stem.
Gomphrena haageana has more upright stems and harvesting is a breeze. The plants have narrow leaves that are easy to strip off. It comes in shades of red and orange, much bolder than the Gomphrena globosa colors. Harvestable stems have only one bloom per stem, so while they are easier to harvest, they are time-consuming.
Oh, how I wish these came in pastel shades too! I would probably grow only the Gomphrena haageana type if they came in more colors!
Here are a few of my favorite Gomphrena to grow for cut flower use:
“Bicolor Rose“ (globosa type)
“QIS Orange” (haageana type)
“Strawberry Fields” (haageana type)
Salmon Pastel
HOW TO SOW
Gomphrena is a late summer blooming flower and loves heat. They should be planted after the last spring frost (for us, it’s about May 15).
Transplants or Direct Sow?
Transplants are recommended, as germination can be erratic (and seedlings look like weeds!).
Transplants should be started indoors 6-8 weeks before the last spring frost. They like heat, so place the trays on a heat mat to germinate. After germination, keep the seedlings growing in a warm place.

QIS Carmine
PLANT SPACING
Spacing varies depending on what type you’re growing.
Globosa types are best at 9-12 inch spacing.
Haageana types can grow at 6-9 inch spacing.

Salmon Pastel

Audray White
By the time the plants are large enough to bloom, they are quite self-reliant. Deep watering once a week should be sufficient (water until soil is saturated as far down as you can stick your finger in the soil).
If flowers are harvested and spent blooms are “deadheaded” (removed), the plants will continue to send up blooms until frost or cold weather arrives.
We do not use netting or support with Gomphrena, since it would make harvesting difficult. If the plants are planted close enough together, they will support each other.

Audray White
STAGE OF HARVEST
Harvest when the blooms are in full color, but not “tired” and faded. Gomphrena has a long “harvest window”, which means you will have a couple of weeks where they are at the ideal stage before they start to fade (unlike some flowers that have a harvest window of just mere hours!).
Harvest deep into the plant, down to 1-2 sets of leaves from the bottom, to stimulate more growth. If you’re growing lots of them or it’s the end of your growing season, it might be easier to harvest the entire plant at once, as harvesting individual stems can be time-consuming.
We have started using this “whole plant harvest” method on our farm, instead of treating the plants as “cut-and-come again”. We succession plant Gomphrena 3-4 times over the season about 2-3 weeks apart, so we always have some plants ready to be harvested.
Salmon Pastel
POST-HARVEST CARE
As always, harvest flowers in the cool of the day (morning or evening).
Gomphrena requires no special care if being used fresh.
For dried flowers, hang small bunches upside down in a warm, dry, well-ventilated location out of the direct sun (a garage, closet or even kitchen pantry could work). Once dry, flowers hold indefinitely.

Dried Gomphrena - QIS Carmine, QIS Orange
QUESTIONS?
Ask them here and I’ll get back to you!
Ready for more?
If you’re serious about growing the garden of your dreams this year, register for my online course, “Backyard Cutting Garden 101”. You’ll find everything you need to plan, grow, harvest, and arrange your stunning blooms. I can’t WAIT to help you grow! Click on the button below for all the details.